如何解除google ads和google账户的绑定关系
如果你恰好在研究admob,当你开通admob时,提示你有ads绑定无法开通。
那么如何将ads从google账号下解除呢:
- 登录ads
- 依次点击顶部的“工具与设置”-“帐号访问权限和安全”,在这里可以看到有权访问该Google Ads帐号的用户,其中就有“您本人”。
- 点击“您本人”后面的“移除访问权限”,即可彻底删除Google Ads帐号
如果你恰好在研究admob,当你开通admob时,提示你有ads绑定无法开通。
那么如何将ads从google账号下解除呢:
httpd_txrx: httpd_resp_send_err: 431 Request Header Fields Too Large - Header fields are too long for server to interpret在menuconfig中,调整HTTPD_MAX_REQ_HDR_LEN 的值:
menuconfig=>component config=>HTTP server=>max http request header leagth
官方其实已经对此问题做了说明,\examples\protocols\http_server\simple\README.md
If the server log shows "httpd_parse: parse_block: request URI/header too long", especially when handling POST requests, then you probably need to increase HTTPD_MAX_REQ_HDR_LEN, which you can find in the project configuration menu (`idf.py menuconfig`): Component config -> HTTP Server -> Max HTTP Request Header Length相关源码路径: \examples\system\console\components\cmd_system
这个框架实际就是一个现成构架好的命令字,参数以及回调函数的框架,只要我们按照规范填写对应的参数,就能实现一个完整的console命令。
    // 第1步:
    /*参数段设置*/
    // 第2步:
    /*命令结构体配置*/
    // 第3步:将命令结构体插入命令序列
ESP_ERROR_CHECK(esp_console_cmd_register(&cmd));我们找一个例子说明,其他的都是类似的步骤。
    int num_args                = 1;
    deep_sleep_args.wakeup_time = arg_int0("t", "time", "<t>", "Wake up time, ms");
#if SOC_PM_SUPPORT_EXT_WAKEUP
    deep_sleep_args.wakeup_gpio_num = arg_int0(NULL, "io", "<n>", "If specified, wakeup using GPIO with given number");
    deep_sleep_args.wakeup_gpio_level = arg_int0(NULL, "io_level", "<0|1>", "GPIO level to trigger wakeup");
    num_args += 2;
#endif
deep_sleep_args.end = arg_end(num_args);deep_sleep_args 是用户创建的结构体,这个根据实际需要创建,例子中用的是int做参数,所以结构体主要是 arg_int, 以此类推,你可以选择arg_rem、arg_lit、arg_db1、arg_str等等。
这个结构体定义的最后一个成员是固定的 end,用来限制参数的个数。
arg_int0:表示当前字段最多一个参数,可以为空,类型为int。
arg_int1:标识当前为一个必填字段,类型为int。
arg_intn:以此类推。
如果是其他类型,就有其他类似arg_xxx的参数构造函数。
我们具体以上面的内容为例子
arg_int0("t", "time", "<t>", "Wake up time, ms");其中有4个成员,分别是:
源码例子:
 const esp_console_cmd_t cmd = {
        .command = "deep_sleep",
        .help =
            "Enter deep sleep mode. "
#if SOC_PM_SUPPORT_EXT_WAKEUP
            "Two wakeup modes are supported: timer and GPIO. "
#else
            "Timer wakeup mode is supported. "
#endif
            "If no wakeup option is specified, will sleep indefinitely.",
        .hint     = NULL,
        .func     = &deep_sleep,
        .argtable = &deep_sleep_args
    };
其中 command、help、hint、func、argtable 是系统的固定定义,分别表示:
从上面的内容可以知道,我们要设计自己的命令行需要做一下工作:
到这里,我们就实现了自己的命令行,是不是很简单,主要的工作量都在准确实现参数列表和回调上。
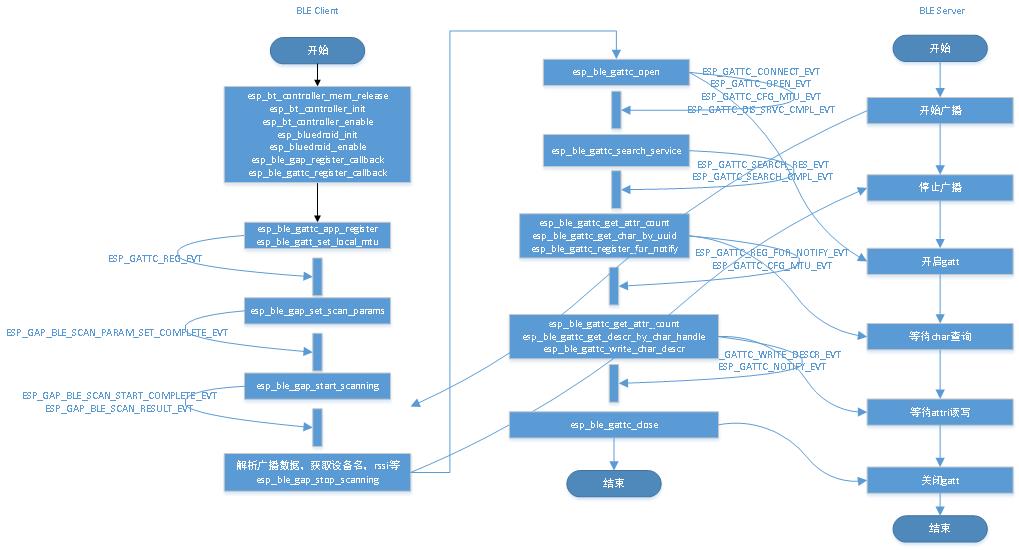
最近完成了esp32 自动扫描nordic设备的广播名称,并跟nordic uart server通讯的功能。
esp32 :ble uart client, gatt_client
nordic:ble uart server (NUS), gatt_server
说明:因为通讯的交互过程跟char的数量以及属性有关系的,有几个char,是只读还是读写等,这些都对应不同的交互流程。 所以以下的内容过程就是针对nordic NUS的特征的而撰写的,如果你自己的设备有所不同,要灵活调整,不可生搬硬套,重要的是理解gatt本质。
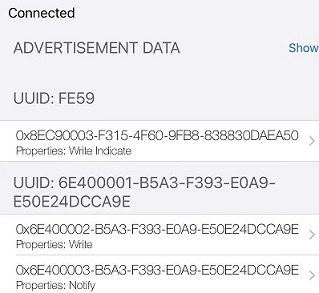
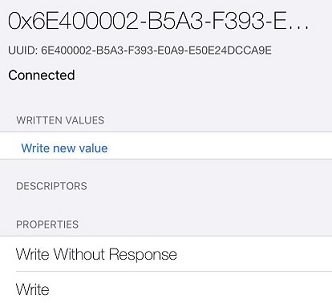
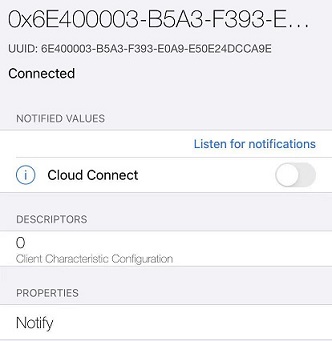
说明:ca9e 是nordic的蓝牙串口服务 NUS,下面有两个 char。 RX uuid 是0002,属性是write 和write without response, TX uuid 是0003,属性是notify。
In the era of Internet of Things(IoT), wireless communication is getting increasingly popular in everyday life. In the world of IoT devices, ESP32 is a popular low-cost System on Chip (SoC) microcontroller with built-in hybrid WiFi and Bluetooth chips by Espressif Systems. Because of its robust design and ultra-low power consumption, it has become so popular in IoT applications. But when we talk about IoT applications, security in IoT will come to our mind for data safety and secure connection. ESP32 supports X.509 certificate-based mutual authentication for HTTPs, IoT cloud (AWS-IoT, Azure, Google Firebase, etc.) authentication, and data communications. Over the Internet, ESP32 also gives us the data security for stored data into FLASH memory and Boot Sectors to prevent the data from being stolen. Today we talk about the ESP32 security features, mainly related to of Boot sectors. The two main security features on ESP32 are called Secure-Boot and flash security, also known as Flash-Encryption.
The ESP32 has a 1024-bits One-Time-Programmable (OTP) memory block. This OTP memory block is divided into 4-block of 256-bits each.
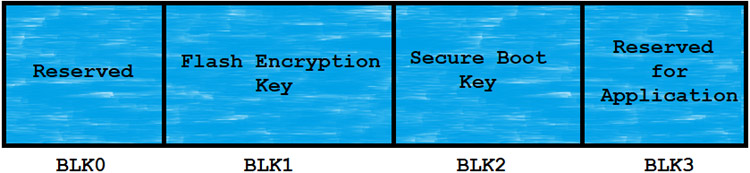
These blocks of memory store the keys of the Flash encryption and Secure Boot. Because of the OTP memory block, there is no software present to read out those memory blocks. One and only ESP32 hardware can read and validate the Security features.
ESP32 Flash Encryption is a security feature for the ESP32 provided by the ESP-IDF by Espressif System to protect the flash memory. Flash encryption is encrypting the contents of ESP32’s SPI flash memory and when this feature is enabled, the following types of data are encrypted by default:
idf.py menuconfigAfter open the ESP32 project config menu, now navigate to
“Security Features” -->
“Enable flash encryption on boot” -->
“Enable usage mode (Development(NOT SECURE))” / “Enable usage mode (Release)”
In flash encryption there are two modes:
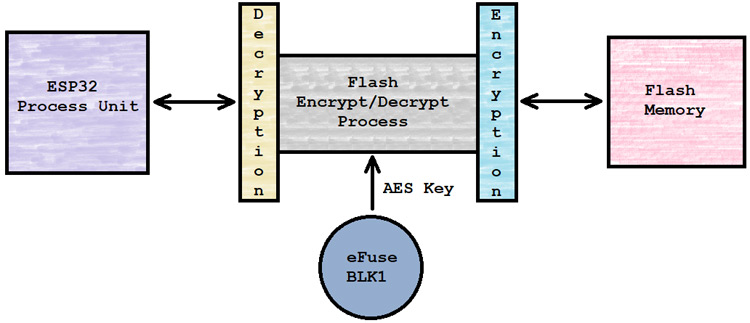
When the flash encryption is enabled, the binaries of the current code flash into the ESP32’s memory as a plain text file. But after completion of the flash process, on the first boot of the ESP32, the device itself encrypted each and every upper mention partition, one by one by using the AES flash encryption key which is stored into the eFUSE-BLK1 at the time of flash. After encrypting the partition the ESP32 device restarted itself and processed with the programmed logic.
The ESP32’s flash execution process decrypts the flash memory data when the ESP32’s execution unit tries to read and for the writing process, the flash execution process encrypts the data before writing into the flash memory.
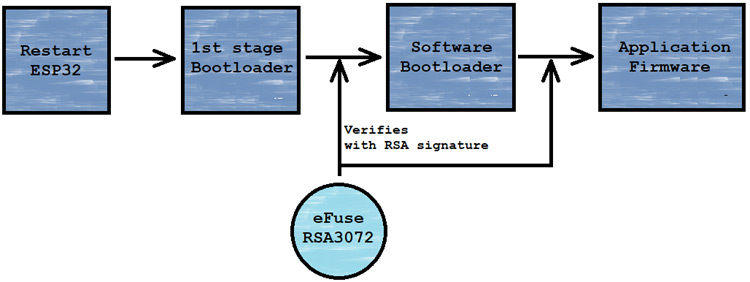
The ESP32 Secure-boot is a security feature, which provides security to run correct applications on ESP32 hardware. When secure boot is enabled, each and every flash memory’s binaries [Software bootloader & Application firmware] are verified before loading with the RSA-3072 based Secure-boot’s signature keys. We can call the Secure-boot a “Guardian of The ESP32”.
For enabling the Flash Encryption, in the same steps we can enable the Secure-boot from the project menuconfig.
“Security Features” -->
“Enable hardware Secure Boot in bootloader”When the ESP32 device is booted up, then ESP32 hardware’s trusted rom or we said the 1st stage bootloader runs verification with RSA-3072 based secure-boot key on the software bootloader and then the software bootloader verifies the application firmware with the same signature key and start the application.
The ESP32 comes with a secure environment [Secure-boot & Flash-Encryption], which we need to enable while flashing the code. For more security, we need to enable both of them.
copy /usr/share/zoneinfo/xxx/xxx to /etc/localtime
原因:
为什么设置了时区以后,已经运行的程序在使用localtime函数调用时没有使用新时区呢?这个可以通过glibc的源码来回 答。localtime等涉及到本地所在时区的函数在调用的时候会先调用tzset这个函数,这一点可以通过tzset函数的manpage看出来。 tzset完成的工作是把当前时区信息(通过TZ环境变量或者/etc/localtime)读入并缓冲。事实上tzset在实现的时候是通过内部的 tzset_internal函数来完成的,显式的调用tzset会以显式的方式告知tzset_internal,而单独调用localtime的时候 是以隐式的方式告知tzset_internal,前者将强制tzset不管何种情况一律重新加载TZ信息或者/etc/localtime,而后者则是 只有在TZ发生变化,或者加载文件名发生变化的时候才会再次加载时区信息。因此,如果只是/etc/localtime的内容发生了变化,而文件名" /etc/localtime"没有变化,则不会再次加载时区信息,导致localtime函数调用仍然以老时区转换UTC时间到本地时间。

解决方法:在调用localtime之前调用tzset,则可强制刷新时区信息执行
ALTER TABLE tbl_name IMPORT TABLESPACE;
提示
Table 'xxx.xxx' doesn't exist in engine
先检查是不是真的不存在,其实是刚手动创建的,所以不是这个问题。
再排查,发现其中的一种错误:
覆盖或者导入的ibd文件,没有给予正确的用户归属权限,用chown设置下,就正常了
system:mac air 11.4beta
xcode:12.4 12D4e
iphone:XR 14.6
在xcode,手机出现“Unsupported OS version”,导致无法下载调试。
原因是当前系统和硬件下,xcode就本限制在了当前版本,无法升级到最新的,导致无法支持最新的手机版本。
参考:
因为原贴已经说的很清楚了,建议直接看原贴,如果想偷懒可以直接看以下总结步骤:
官方参考: https://docs.espressif.com/projects/esp-idf/zh_CN/latest/esp32/api-guides/partition-tables.html
如下是Factory app, two OTA definitions 的内容
# ESP-IDF Partition Table
# Name,   Type, SubType, Offset,  Size, Flags
nvs,      data, nvs,     0x9000,  0x4000,
otadata,  data, ota,     0xd000,  0x2000,
phy_init, data, phy,     0xf000,  0x1000,
factory,  app,  factory, 0x10000,  1M,
ota_0,    app,  ota_0,   0x110000, 1M,
ota_1, app, ota_1, 0x210000, 1M,分区表的长度是0xc00,后面还md5校验,签名等,所以整个内容在 0x1000以内。
0x9000=0x8000+0x1000
0xd000=0x9000+0x4000
0xf000=0xd000+0x2000
0x10000=0xf000+0x1000
0x110000=0x10000+0x100000(1M)
0x210000=0x110000+0x100000(1M)
从上面的计算中,我们就可以看到,偏移地址和容量都是连续的,这也就是为什么实际的分区表,只天容量,不填其实偏移地址,因为地址可以根据容量进行计算得出。
# Name,   Type, SubType, Offset,   Size, Flags
# Note: if you change the phy_init or app partition offset, make sure to change the offset in Kconfig.projbuild
nvs,      data, nvs,     ,        0x4000,
otadata,  data, ota,     ,        0x2000,
phy_init, data, phy,     ,        0x1000,
ota_0,    app,  ota_0,   ,        0x180000,
ota_1,    app,  ota_1,   ,        0x180000,
fctry, data, nvs, , 0x4000I (58) boot: ## Label Usage Type ST Offset Length
I (65) boot: 0 nvs WiFi data 01 02 00009000 00004000
I (72) boot: 1 otadata OTA data 01 00 0000d000 00002000
I (80) boot: 2 phy_init RF data 01 01 0000f000 00001000
I (87) boot: 3 ota_0 OTA app 00 10 00010000 00180000
I (95) boot: 4 ota_1 OTA app 00 11 00190000 00180000
I (102) boot: 5 fctry WiFi data 01 02 00310000 00004000从运行日志看,跟我们上面介绍的计算结果一致。
烧录时的地址配置如下:
从这个例子看,为了节省空间,factory分区被省掉了,直接是ota_0分区。
系统:CentOS Linux release 7.8.2003 (Core)
chip:esp32c3
重点:之前是在windows下工作的,因为编译烧录都比较方便。最近因为各种git的不稳定原因,导致无法正确编译和运行,所以才打算在海外搞个linux环境,这样就可以解决git相关的困扰。
官方指导参考:https://docs.espressif.com/projects/esp-idf/zh_CN/latest/esp32c3/get-started/index.html#id4
进入目标目录, 下载工具:
git clone --recursive https://github.com/espressif/esp-idf.git设置工具
./install.sh遇到的问题:
1)python版本问题
ESP-IDF supports Python 3.6 or newer but you are using Python 2.7.5. Please upgrade your installation as described in the documentation.需要升级python,请参考网上文章,通过最新源码更新python。
2)ModuleNotFoundError: No module named '_ctypes'
解决:
yum install libffi-devel -y然后需要重新安装python3
make clean
./configure
make&&make install./export.sh
遇到的问题:
Traceback (most recent call last):
  File "<string>", line 1, in <module>
ModuleNotFoundError: No module named 'click'
env: idf.py: No such file or directory
解决:
python -m pip install click由于是vps,所以 export.sh 实际上不会成功,一直卡死在 libusb-1.0 的错误中。所以只能手动设置环境变量,需要设置IDF_PYTHON_ENV_PATH 和PATH:
export PATH=/data/develop/esp/esp-idf/tools:$PATH
export PATH=/root/.espressif/python_env/idf4.4_py3.9_env/bin:$PATH
export IDF_PYTHON_ENV_PATH=/root/.espressif/python_env/idf4.4_py3.9_env
注意IDF_PYTHON_ENV_PATH一定要设置成 espressif的python路径,否则会一直提醒你执行 install.sh
验证idf.py环境ok:
idf.py --version
Setting IDF_PATH environment variable: /data/develop/esp/esp-idf
ESP-IDF v4.4-dev-1849-g8e3e65a-dirty找一个例子测试下
idf.py set-target esp32c3
idf.py build
出现错误:
升级cmake:
wget https://github.com/Kitware/CMake/releases/download/v3.21.0-rc2/cmake-3.21.0-rc2.tar.gz
tar zxvf cmake-3.21.0-rc2.tar.gz
make&&make install
添加cmake的环境变量
/usr/local/share/cmake-3.21
cmake --version
cmake version 3.21.0-rc2

CMake suite maintained and supported by Kitware (kitware.com/cmake).
riscv32-esp-elf-gccis not a full path and was not found in the PATH.
解决:把
> /root/.espressif/tools/riscv32-esp-elf/esp-2021r1-8.4.0/riscv32-esp-elf/bin

添加到PATH环境变量里

排除完问题后,以前在windows下无法正常编译的demo,编译通过,