openwrt设置bridge模式
设置 /etc/config/network:
config interface 'lan'
        option ifname 'eth0.1 ra0'
        option type 'bridge'
        option proto 'dhcp'
        option macaddr '00:0C:43:00:00:40'
设置 /etc/config/network:
config interface 'lan'
option ifname 'eth0.1 ra0'
option type 'bridge'
option proto 'dhcp'
option macaddr '00:0C:43:00:00:40'
按照模块的使用手册,我们知道设备的usb会虚拟出5个串口设备。
在openwrt中默认是支持usb转uart的驱动的,默认是可以支持此设备的,我们只要在menuconfig中选择相应的开关就可以完成支持
Kernel Modules → USB Support
<*> kmod-usb2
<*> kmod-usb-ohci
<*> kmod-usb-serial
                <*> kmod-usb-serial-option
                -*- kmod-usb-serial-wwan
<*> kmod-usb-core
在网路上有大量的扫描程序和爬虫在扫描肉鸡,其中一个最常用的方式就是扫描ssh权限。这种肉鸡主要用来【翻腔】或者DDOS或者挖矿等,总之是可以牟利的。
新注册的vps,还没多久就发现:
There were 2816 failed login attempts since the last successful login.
而避免被暴力的一种简单的方法就是强制密钥登陆。
然后私钥就可以用来在客户端登录时使用,如果密钥没密码,就可以实现无密码登录了
作为一个ios开发者,在你调试APNs时,正常的情况下你需要弄好证书给到后台的同事上线到测试环境,然后才能开始测试调试推送的相关功能。
如果这个过程遇到证书错误,后台代码错误,苹果变更接口等,等到能调试ios的功能,需要等到好久的时间。
那么ios可以独立调试APNs的相关功能吗?当然可以,Knuff就是一款简洁简单的推送调试工具。下面的以MAC的为介绍对象,其他平台的请自行理解。
软件界面如下:

Custom:自定义模式,可以自行选择证书,我们测试自己的应用,就用这个模式
Knuff iOS: Knuff iOS表示使用Knuff的证书,直接推送给Knuff配套的ios应用。
Choose:选择推送的push证书,我们需要选择我们证书,关于如何生成正确的证书,请自行google。
Production:选择证书后,就会出现这个选择,production表示appstore证书,推送给appstore版本的APP。
Sandbox:表示开发调试的非AppStore版本。
Priority:测试时可随意选择。
Payload:表示要推送的报文,具体字段含义这里就不展开了,请自行了解。
Token:device token,在注册苹果 APNs服务时获取的。参考代码如下:
注册服务
[[UIApplication sharedApplication] registerUserNotificationSettings:[UIUserNotificationSettings
                                                                             settingsForTypes:(UIUserNotificationTypeSound | UIUserNotificationTypeAlert | UIUserNotificationTypeBadge)
                                                                             categories:nil]];

[[UIApplication sharedApplication] registerForRemoteNotifications];
回调事件
调用didRegisterForRemoteNotificationsWithDeviceToken
至此我们就可以开始测试了,通过这个工具我们就能轻易的测试我们的device token是否正确,测试我们生成的证书是否正确。给自己发送任意想测试的payload。
have fun!
关于APNs的工作原理,网上有大量的文章,建议学习apple的官方文档。通过APNs我们就可以通过服务器想APP推送想要的内容和事件。从而实现通知或者激活应用的目的。本文我们讲介绍如何搭建php的APNs推送以及如何实现静默推送。
经过多方的验证,目前推荐这个:
https://github.com/immobiliare/ApnsPHP
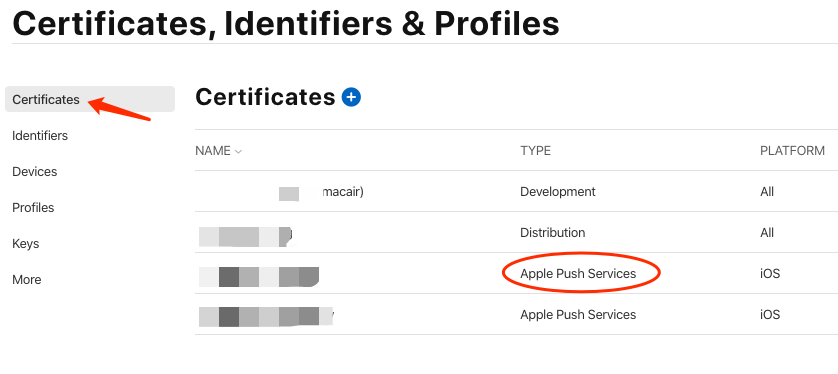
想要通过苹果服务器推送信息,必须要有合法的证书。很多人在推送这部分花了很多时间,很多情况是没搞清楚失败到底是代码的问题还是证书的问题。所以,我们需要先验证证书的合法和正确性。
推送时,我们要制作推送证书,我们要选择正确的类型,具体的制作过程可自行搜索,最终的证书类型如下:
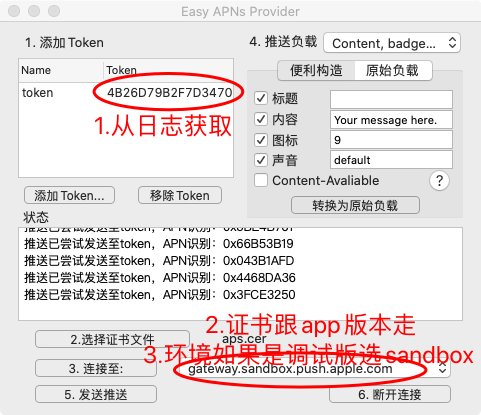
先前我的文章推荐过Knuff,经过深入的实践,这里我推荐Easy APNS Provider,可以从MAC store下载。相比较Knuff,EAP更加的稳定强大。通过工具我们就可以先行验证证书的正确性,避免后面定位问题浪费更多的时间。
[2020.03.31更新]:另一款值得推荐的是: https://github.com/noodlewerk/NWPusher
在MAC上用客户端向苹果发送推送服务器请求时,我们选择上面安装的证书就可以了。
上面我们讲了怎么选择正确的客户端证书,当我们使用php 服务器推送时,我们还要做些额外的工作:
#生成cert.pem
openssl pkcs12 -clcerts -nokeys -out cert.pem -in cert.p12
#生成key.pem(先输出导出key.p12时设置的密码P*d, 然后设置一个新的密码,如pushpwd,这个密码后面php推送时要设置)
openssl pkcs12 -nocerts -out key.pem -in key.p12
#合并成ck.pem
cat cert.pem key.pem > ck.pem这个软件包的最新版本支持HTTP2,如果你的PHP的版本支持HTTP2,建议优先使用。开发包里面自带了几个sample,简单配置后基本就可以使用。这里我们以sample_push.php为测试对象。
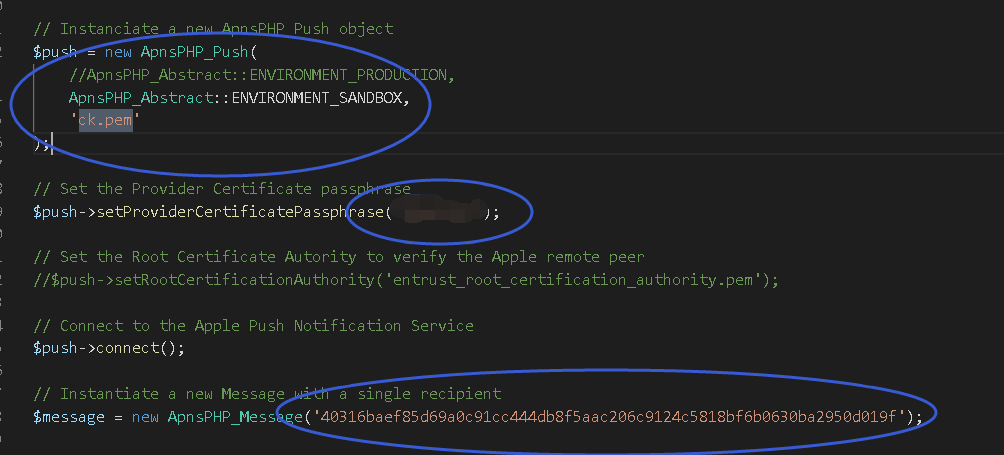
如图所示,配置要点如下:
测试通过的返回如下:
Fri, 13 Jan 2017 13:31:35 +0100 ApnsPHP[15355]: INFO: Trying tls://gateway.sandbox.push.apple.com:2195... Fri, 13 Jan 2017 13:31:35 +0100 ApnsPHP[15355]: INFO: Connected to tls://gateway.sandbox.push.apple.com:2195. Fri, 13 Jan 2017 13:31:35 +0100 ApnsPHP[15355]: INFO: Sending messages queue, run #1: 1 message(s) left in queue. Fri, 13 Jan 2017 13:31:35 +0100 ApnsPHP[15355]: STATUS: Sending message ID 1 [custom identifier: Message-Badge-3] (1/3): 167 bytes. Fri, 13 Jan 2017 13:31:36 +0100 ApnsPHP[15355]: INFO: Disconnected.在上面我们提到了设备的device token,那么调试阶段如何获取这个token呢?在我们发起了注册请求后,系统会触发相应的消息回调。相关的参考代码如下:
-(void)application:(UIApplication *)application didRegisterForRemoteNotificationsWithDeviceToken:(NSData *)deviceToken
{
    //读取APNS token
    NSString* _deviceToken = [[[[deviceToken description]
        stringByReplacingOccurrencesOfString: @"<" withString: @""]
        stringByReplacingOccurrencesOfString: @">" withString: @""]
        stringByReplacingOccurrencesOfString: @" " withString: @""];
    QMLogDebug(@"apns token:%@",_deviceToken);
    NSUserDefaults * userDefault = [NSUserDefaults standardUserDefaults];
    [userDefault setObject:_deviceToken forKey:APNSTOKEN];
    [userDefault synchronize];
}
上面的deviceToken就获取了我们需要的token。这里的deviceToken是NSData对象,可以手动导出二进制,然后这个导出文件就可以在测试客户端中使用。
除了ck.pem证书,我们的项目还需要 entrust_root_certification_authority.pem 这个证书,一共两个证书。
ios最新的版本中已经支持了静默推送,静默推送时,客户端会收到消息,执行相应的动作,但不会做任何给用户的提示。在普通的推送中我们可以通过如下的代码实现静默推送的效果:
{
  "aps" : {
    "badge" : 0
  }
}
但是苹果还是专门定义了一个开关来表示静默推送 "content-available" : 1,由于此开关优先级较低,在静默推送的报文中不能出现alert,sound 等,否则就会变成普通推送。
静默推送的payload如下:
{
  "aps" : {
    "content-available" : 1
  }
}
静默推送的前提:
参考:
How to generate a Push Notification certificate and download the Entrust Root Authority certificate
首选当时letsencrypt了,官方网站是:https://letsencrypt.org. 网上大把文章,但按照本人一贯的习惯还是去官网,避免被过时的信息误导,反而浪费更多的时间。
官方推荐的是cetrbot:https://certbot.eff.org/
根据本人的系统,实际的文档路径:https://certbot.eff.org/#centosrhel7-nginx
首先需要安装certbot:
默认centos7是不支持certot,你需要先安装EPEL:https://fedoraproject.org/wiki/EPEL#How_can_I_use_these_extra_packages.3F
实际的安装包为:https://dl.fedoraproject.org/pub/epel/epel-release-latest-7.noarch.rpm
下载后安装rpm。然后执行:
sudo yum install certbot
一路‘y’,安装完成:
Installed:
  certbot.noarch 0:0.9.3-1.el7

Dependency Installed:
  dialog.x86_64 0:1.2-4.20130523.el7                 pyOpenSSL.x86_64 0:0.13.1-3.el7                     python-cffi.x86_64 0:1.6.0-5.el7
  python-chardet.noarch 0:2.2.1-1.el7_1              python-enum34.noarch 0:1.0.4-1.el7                  python-idna.noarch 0:2.0-1.el7
  python-ipaddress.noarch 0:1.0.16-2.el7             python-ndg_httpsclient.noarch 0:0.3.2-1.el7         python-parsedatetime.noarch 0:1.5-3.el7
  python-ply.noarch 0:3.4-10.el7                     python-psutil.x86_64 0:2.2.1-1.el7                  python-pycparser.noarch 0:2.14-1.el7
  python-requests.noarch 0:2.6.0-1.el7_1             python-six.noarch 0:1.9.0-2.el7                     python-urllib3.noarch 0:1.10.2-2.el7_1
  python-zope-component.noarch 1:4.1.0-1.el7         python-zope-event.noarch 0:4.0.3-2.el7              python-zope-interface.x86_64 0:4.0.5-4.el7
  python2-acme.noarch 0:0.9.3-1.el7                  python2-certbot.noarch 0:0.9.3-1.el7                python2-configargparse.noarch 0:0.11.0-1.el7
  python2-cryptography.x86_64 0:1.3.1-3.el7          python2-dialog.noarch 0:3.3.0-6.el7                 python2-mock.noarch 0:1.0.1-9.el7
  python2-pyasn1.noarch 0:0.1.9-7.el7                python2-pyrfc3339.noarch 0:1.0-2.el7                pytz.noarch 0:2012d-5.el7

Complete!
在已经有webserver运行的情况下,certbot推荐我们使用“webroot”插件。可以实现在不暂停web服务的情况下更新证书。
webroot:不需要停机你的web服务
certbot certonly --webroot -w AAA -d BBB
BBB是你要支持的域名,AAA是BBB当前已经可以访问的目录。
standalone:需要停机你当前服务器的80端口的服务
certbot certonly --standalone -d xxx.com
以上每一条命令生成一个对立的目录,如果是多个域名就是合在一起的一个文件。如果要每个域名都生成独立的目录和文件,就要执行多次。
成功后:
IMPORTANT NOTES:
 - Congratulations! Your certificate and chain have been saved at
   /etc/letsencrypt/live/xxx/fullchain.pem. Your cert
   will expire on 2017-03-18. To obtain a new or tweaked version of
   this certificate in the future, simply run certbot again. To
   non-interactively renew *all* of your certificates, run "certbot
   renew"
 - If you like Certbot, please consider supporting our work by:

   Donating to ISRG / Let's Encrypt:   https://letsencrypt.org/donate
   Donating to EFF:                    https://eff.org/donate-le
手动在nginx的conf中配置相关的路径就可以了:
ssl_certificate /etc/letsencrypt/live/xxx/fullchain.pem;
ssl_certificate_key /etc/letsencrypt/live/xxx/privkey.pem;
certbot renew
证书没有过期的话,我们可以撤销:
[root@rxblog certbot-0.22.2]# ./certbot revoke --cert-path /etc/letsencrypt/archive/xxx.com/cert1.pem
Saving debug log to /var/log/letsencrypt/letsencrypt.log

-------------------------------------------------------------------------------
Would you like to delete the cert(s) you just revoked?
-------------------------------------------------------------------------------
(Y)es (recommended)/(N)o: Y

-------------------------------------------------------------------------------
Deleted all files relating to certificate iwwenbo.com.
-------------------------------------------------------------------------------

-------------------------------------------------------------------------------
Congratulations! You have successfully revoked the certificate that was located
at /etc/letsencrypt/archive/iwwenbo.com/cert1.pem

-------------------------------------------------------------------------------
如果证书已经过期了,我们只能删除了
certbot delete --cert-name example.com
OK,暂时告一段落。
其实主要就是要理解这两个函数的功能和适用场景:
startUpdatingLocation
startMonitoringSignificantLocationChanges
可以参看苹果的这个demo:https://developer.apple.com/library/content/samplecode/Regions/Introduction/Intro.html
理解了,自己改动下,就能实现强大的后台定位
2016.12.25:
了解更多的细节,可以参看这里,全部确认到了,基本就搞定了:
https://developer.apple.com/library/content/documentation/UserExperience/Conceptual/LocationAwarenessPG/CoreLocation/CoreLocation.html
最近在重构之前的代码,所以在本地游多个分支,经常出现如下的问题:
linker command failed with exit code 1 (use -v to see invocation)
之前也是基本重新update下pod基本就ok,今天发现之前ok的提交到git的代码,拉到本地又出现这个问题了,所有有必要弄清楚根源,避免每次都各种莫名尝试浪费时间。
从其中的一条错误提示入手:
ld: warning: directory not found for option '-L/Users/xxx/Library/Developer/Xcode/DerivedData/xxx-gttrbsolrpknxhbtjxulraplunas/Build/Products/Debug-iphonesimulator/AFNetworking'
在这个路径下确实发现缺少东西,对于目前成功编译的项目,我们手动删除目标后,再此编译,发现也提示这个错误这个很奇怪,按理应该成功才对。所以初步的原因是这个目标对象对应的pod库没有。那么是什么时候生成的呢,我们进一步分析。
在尝试了pod install和update后,目标并没有生成,所以pod阶段只是创建关联project。应该还是在编译阶段生成的。
按照正常的流程,应该是build时生成相应的target的库,现在却没有生成,进一步在网上搜索,看到“Build Active Architecture Only”
这个选项,当为 YES时,表示只编译当前的architecture版本。所以改为yes后,便可以生成当前 architecture的库了。
所以失败的原因是,这个选项为NO时默认生成所有的target的库,但是是按默认顺序的,还并没有来的及生成当前的目标库,所以link时就失败了。改为YES,相当于当前平台更改为了最高优先级,所以就直接生成了。
最近把ios的代码升级到了ios10和xcode8 ,出现了大量:
NSManageObjectContext - Class is not key value coding-compliant for the key @count
解决:
参考:http://stackoverflow.com/questions/39511997/nsmanageobjectcontext-class-is-not-key-value-coding-compliant-for-the-key-cou
更新RestKit:
pod 'RestKit', :git => 'https://github.com/RestKit/RestKit.git', :commit => '9cbba9eb1b490c3c5e2873c8fba8e9c0fec1bf07'
更新后会有新的错误,依照提示修复就可以了。
安装 cocoapods:
sudo gem install cocoapods

ERROR:  While executing gem ... (Errno::EPERM)
    Operation not permitted - /usr/bin/xcodeproj
解决:手动指定路径:
sudo gem install -n /usr/local/bin cocoapods