esp32分区表分析总结
esp32分区表分析总结
要点
- 分区表的首地址是0x8000。
- 分区若偏移地址为空,则会紧跟着前一个分区之后开始;若为首个分区,则将紧跟着分区表开始。目前根据实际的代码和信息分析,第一个分区默认是从0x9000开始。
- factory (0x00) 是默认的 app 分区。启动加载器将默认加载该应用程序。但如果存在类型为 data/ota 分区,则启动加载器将加载 data/ota 分区中的数据,进而判断启动哪个 OTA 镜像文件。
- OTA 升级永远都不会更新 factory 分区中的内容。
- 如果您希望在 OTA 项目中预留更多 flash,可以删除 factory 分区,转而使用 ota_0 分区
- app 分区始终会被加密,不管 Flags 字段是否设置。
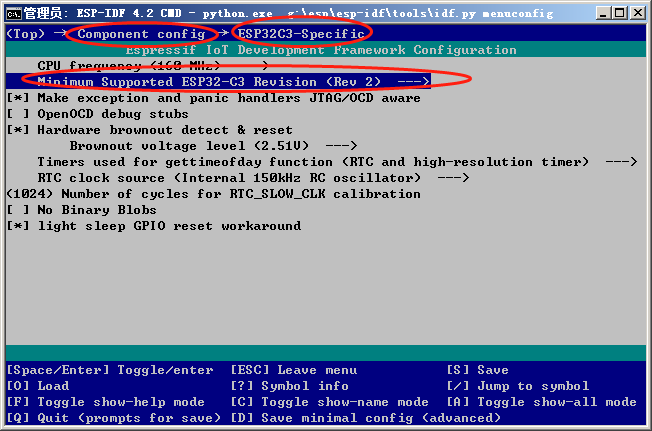
- 如果您在项目配置菜单(idf.py menuconfig)中设置了分区表 CSV 文件的名称,然后构建项目或执行 idf.py partition_table。这时,转换将在编译过程中自动完成。
- idf.py partition_table-flash :使用 esptool.py 工具烧写分区表。
- idf.py flash :会烧写所有内容,包括分区表。
官方参考: https://docs.espressif.com/projects/esp-idf/zh_CN/latest/esp32/api-guides/partition-tables.html
分区表
如下是Factory app, two OTA definitions 的内容
# ESP-IDF Partition Table
# Name,   Type, SubType, Offset,  Size, Flags
nvs,      data, nvs,     0x9000,  0x4000,
otadata,  data, ota,     0xd000,  0x2000,
phy_init, data, phy,     0xf000,  0x1000,
factory,  app,  factory, 0x10000,  1M,
ota_0,    app,  ota_0,   0x110000, 1M,
ota_1, app, ota_1, 0x210000, 1M,- nvs:系统的非易失区,wifi配置,校准数据,以及其他通过api写入的非易失数据在这里。
- otadata:这个用户存储ota的过程数据,比如当前区标识,完整性,校验等等。
- phy_init:针对不同PHY的初始配置信息
- factory:出厂分区,内容是我们的用户代码,我们的程序主体。当ota区有效时,此区会被跳过,默认没有ota时,运行的就是此区,一旦有ota版本,系统会尝试去启动ota的内容。
- ota_0:第1个ota分区。
- ota_1:第2个ota分区,无论如何总有一个是当期使用的激活区,另一个作为ota缓存空间用。
- nvs_key:nvs区的秘钥分区。
解释
分区表的长度是0xc00,后面还md5校验,签名等,所以整个内容在 0x1000以内。
0x9000=0x8000+0x1000
0xd000=0x9000+0x4000
0xf000=0xd000+0x2000
0x10000=0xf000+0x1000
0x110000=0x10000+0x100000(1M)
0x210000=0x110000+0x100000(1M)
从上面的计算中,我们就可以看到,偏移地址和容量都是连续的,这也就是为什么实际的分区表,只天容量,不填其实偏移地址,因为地址可以根据容量进行计算得出。
实际例子分析
分区表
# Name,   Type, SubType, Offset,   Size, Flags
# Note: if you change the phy_init or app partition offset, make sure to change the offset in Kconfig.projbuild
nvs,      data, nvs,     ,        0x4000,
otadata,  data, ota,     ,        0x2000,
phy_init, data, phy,     ,        0x1000,
ota_0,    app,  ota_0,   ,        0x180000,
ota_1,    app,  ota_1,   ,        0x180000,
fctry,    data, nvs,     ,        0x4000
系统运行日志
I (58) boot: ## Label            Usage          Type ST Offset   Length
I (65) boot:  0 nvs              WiFi data        01 02 00009000 00004000
I (72) boot:  1 otadata          OTA data         01 00 0000d000 00002000
I (80) boot:  2 phy_init         RF data          01 01 0000f000 00001000
I (87) boot:  3 ota_0            OTA app          00 10 00010000 00180000
I (95) boot:  4 ota_1            OTA app          00 11 00190000 00180000
I (102) boot:  5 fctry            WiFi data        01 02 00310000 00004000
从运行日志看,跟我们上面介绍的计算结果一致。
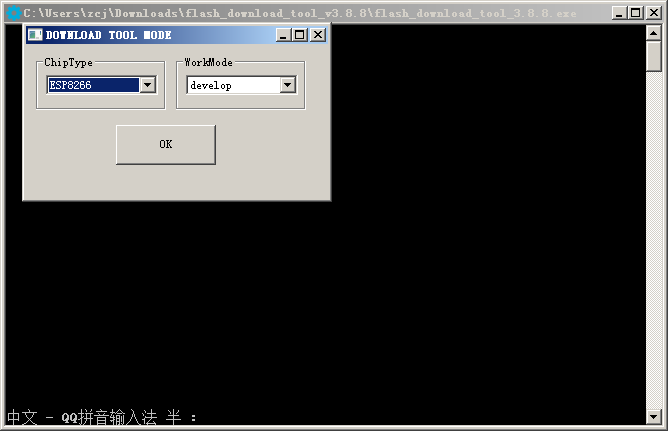
flash工具配置
烧录时的地址配置如下:
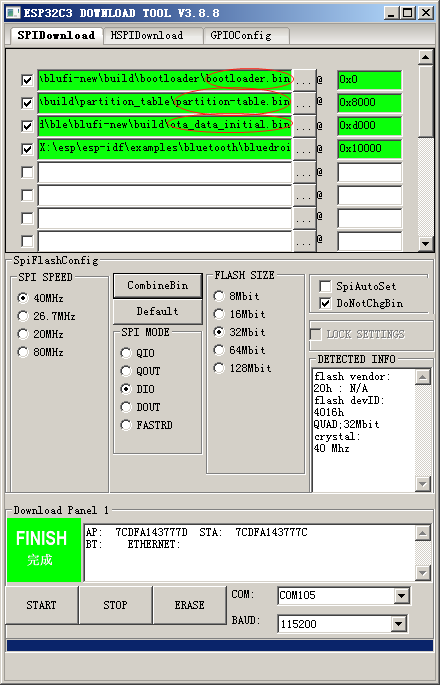
- bootloader.bin: 默认从0地址开始。
- partition-table.bin: 默认起始地址0x8000
- ota_data_initial.bin: 对应的otadata和phy_init两个分区内容
- app.bin:对应的是ota_0
从这个例子看,为了节省空间,factory分区被省掉了,直接是ota_0分区。