esp32分区表分析总结

esp32分区表分析总结

要点

  • 分区表的首地址是0x8000。
  • 分区若偏移地址为空,则会紧跟着前一个分区之后开始;若为首个分区,则将紧跟着分区表开始。目前根据实际的代码和信息分析,第一个分区默认是从0x9000开始。
  • factory (0x00) 是默认的 app 分区。启动加载器将默认加载该应用程序。但如果存在类型为 data/ota 分区,则启动加载器将加载 data/ota 分区中的数据,进而判断启动哪个 OTA 镜像文件。
  • OTA 升级永远都不会更新 factory 分区中的内容。
  • 如果您希望在 OTA 项目中预留更多 flash,可以删除 factory 分区,转而使用 ota_0 分区
  • app 分区始终会被加密,不管 Flags 字段是否设置。
  • 如果您在项目配置菜单(idf.py menuconfig)中设置了分区表 CSV 文件的名称,然后构建项目或执行 idf.py partition_table。这时,转换将在编译过程中自动完成。
  • idf.py partition_table-flash :使用 esptool.py 工具烧写分区表。
  • idf.py flash :会烧写所有内容,包括分区表。

官方参考: https://docs.espressif.com/projects/esp-idf/zh_CN/latest/esp32/api-guides/partition-tables.html

分区表

如下是Factory app, two OTA definitions 的内容

# ESP-IDF Partition Table
# Name,   Type, SubType, Offset,  Size, Flags
nvs,      data, nvs,     0x9000,  0x4000,
otadata,  data, ota,     0xd000,  0x2000,
phy_init, data, phy,     0xf000,  0x1000,
factory,  app,  factory, 0x10000,  1M,
ota_0,    app,  ota_0,   0x110000, 1M,
ota_1,    app,  ota_1,   0x210000, 1M,
  • nvs:系统的非易失区,wifi配置,校准数据,以及其他通过api写入的非易失数据在这里。
  • otadata:这个用户存储ota的过程数据,比如当前区标识,完整性,校验等等。
  • phy_init:针对不同PHY的初始配置信息
  • factory:出厂分区,内容是我们的用户代码,我们的程序主体。当ota区有效时,此区会被跳过,默认没有ota时,运行的就是此区,一旦有ota版本,系统会尝试去启动ota的内容。
  • ota_0:第1个ota分区。
  • ota_1:第2个ota分区,无论如何总有一个是当期使用的激活区,另一个作为ota缓存空间用。
  • nvs_key:nvs区的秘钥分区。

    解释

    分区表的长度是0xc00,后面还md5校验,签名等,所以整个内容在 0x1000以内。
    0x9000=0x8000+0x1000
    0xd000=0x9000+0x4000
    0xf000=0xd000+0x2000
    0x10000=0xf000+0x1000
    0x110000=0x10000+0x100000(1M)
    0x210000=0x110000+0x100000(1M)

从上面的计算中,我们就可以看到,偏移地址和容量都是连续的,这也就是为什么实际的分区表,只天容量,不填其实偏移地址,因为地址可以根据容量进行计算得出。

实际例子分析

分区表

# Name,   Type, SubType, Offset,   Size, Flags
# Note: if you change the phy_init or app partition offset, make sure to change the offset in Kconfig.projbuild
nvs,      data, nvs,     ,        0x4000,
otadata,  data, ota,     ,        0x2000,
phy_init, data, phy,     ,        0x1000,
ota_0,    app,  ota_0,   ,        0x180000,
ota_1,    app,  ota_1,   ,        0x180000,
fctry,    data, nvs,     ,        0x4000

系统运行日志

I (58) boot: ## Label            Usage          Type ST Offset   Length
I (65) boot:  0 nvs              WiFi data        01 02 00009000 00004000
I (72) boot:  1 otadata          OTA data         01 00 0000d000 00002000
I (80) boot:  2 phy_init         RF data          01 01 0000f000 00001000
I (87) boot:  3 ota_0            OTA app          00 10 00010000 00180000
I (95) boot:  4 ota_1            OTA app          00 11 00190000 00180000
I (102) boot:  5 fctry            WiFi data        01 02 00310000 00004000

从运行日志看,跟我们上面介绍的计算结果一致。

flash工具配置

烧录时的地址配置如下:
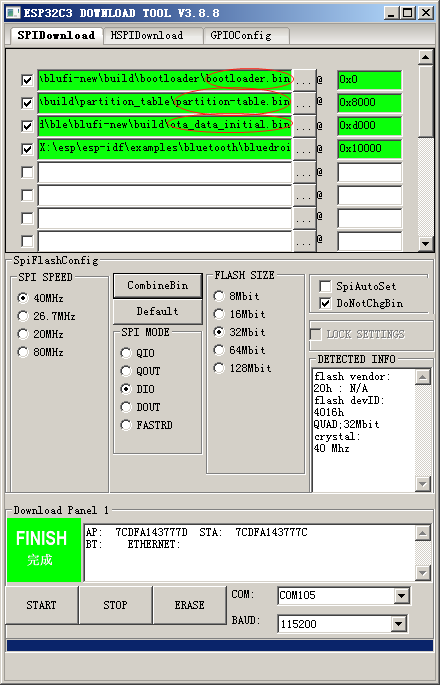
file

  • bootloader.bin: 默认从0地址开始。
  • partition-table.bin: 默认起始地址0x8000
  • ota_data_initial.bin: 对应的otadata和phy_init两个分区内容
  • app.bin:对应的是ota_0

从这个例子看,为了节省空间,factory分区被省掉了,直接是ota_0分区。
how to build an esp32 centos environment

esp32 centos开发环境搭建

系统:CentOS Linux release 7.8.2003 (Core)

chip:esp32c3

前言

重点:之前是在windows下工作的,因为编译烧录都比较方便。最近因为各种git的不稳定原因,导致无法正确编译和运行,所以才打算在海外搞个linux环境,这样就可以解决git相关的困扰。

环境安装

官方指导参考:https://docs.espressif.com/projects/esp-idf/zh_CN/latest/esp32c3/get-started/index.html#id4

  1. 进入目标目录, 下载工具:

    git clone --recursive https://github.com/espressif/esp-idf.git
  2. 设置工具

    ./install.sh

    遇到的问题:

1)python版本问题

ESP-IDF supports Python 3.6 or newer but you are using Python 2.7.5. Please upgrade your installation as described in the documentation.

需要升级python,请参考网上文章,通过最新源码更新python。

2)ModuleNotFoundError: No module named '_ctypes' 问题

解决:

yum install libffi-devel -y

然后需要重新安装python3

make clean 
./configure
make&&make install
  1. 设置环境变量

    ./export.sh

遇到的问题:

Traceback (most recent call last):
  File "<string>", line 1, in <module>
ModuleNotFoundError: No module named 'click'
env: idf.py: No such file or directory

解决:

python -m pip install click

由于是vps,所以 export.sh 实际上不会成功,一直卡死在 libusb-1.0 的错误中。所以只能手动设置环境变量,需要设置IDF_PYTHON_ENV_PATH 和PATH:

export PATH=/data/develop/esp/esp-idf/tools:$PATH
export PATH=/root/.espressif/python_env/idf4.4_py3.9_env/bin:$PATH
export IDF_PYTHON_ENV_PATH=/root/.espressif/python_env/idf4.4_py3.9_env

注意IDF_PYTHON_ENV_PATH一定要设置成 espressif的python路径,否则会一直提醒你执行 install.sh

验证idf.py环境ok:

idf.py --version
Setting IDF_PATH environment variable: /data/develop/esp/esp-idf
ESP-IDF v4.4-dev-1849-g8e3e65a-dirty

编译

找一个例子测试下

idf.py set-target esp32c3
idf.py build

出现错误:

  1. CMake 3.5 or higher is required. You are running version 2.8.12.2

升级cmake:

wget https://github.com/Kitware/CMake/releases/download/v3.21.0-rc2/cmake-3.21.0-rc2.tar.gz
tar zxvf cmake-3.21.0-rc2.tar.gz
make&&make install

添加cmake的环境变量
/usr/local/share/cmake-3.21

cmake --version
cmake version 3.21.0-rc2

CMake suite maintained and supported by Kitware (kitware.com/cmake).
  1. 工具链错误 :
    
    riscv32-esp-elf-gcc

is not a full path and was not found in the PATH.


解决:把
> /root/.espressif/tools/riscv32-esp-elf/esp-2021r1-8.4.0/riscv32-esp-elf/bin 

添加到PATH环境变量里

排除完问题后,以前在windows下无法正常编译的demo,编译通过,

centos python2.7 升级 python3

安装一个软件要求python3.6 以上版本,当前的版本是2.7.5

系统配置

CentOS Linux release 7.8.2003 (Core)

python源码下载

https://www.python.org/downloads/source/
我们下载最新的版本。

wget https://www.python.org/ftp/python/3.9.6/Python-3.9.6.tgz
tar zxvf Python-3.9.6.tgz

编译

./configure
make
make install

设置系统默认的python版本

检查版本

python -V
Python 2.7.5
python3 -V
Python 3.9.6

我们需要设置环境变量,默认使用python3

cd /usr/bin
ls -al /usr/bin | grep python
lrwxrwxrwx    1 root root          7 Jul 10  2020 python -> python2
lrwxrwxrwx    1 root root          9 Jul 10  2020 python2 -> python2.7
-rwxr-xr-x    1 root root       7144 Apr  2  2020 python2.7
-rwxr-xr-x    1 root root       1835 Apr  2  2020 python2.7-config
lrwxrwxrwx    1 root root         16 Jul 10  2020 python2-config -> python2.7-config
lrwxrwxrwx    1 root root         14 Jul 10  2020 python-config -> python2-config

照猫画虎,将建立python3的软连接

ln -s /usr/local/bin/python3 /usr/bin/python
python -V
Python 3.9.6
[root@li1974-11

可见python3已生效。

还原yum

因为yum是用的默认版本,python3会导致yum失效。需要对yum的python做指定。修改以下2个文件:

vi /usr/bin/yum
vi /usr/libexec/urlgrabber-ext-down

修改首行的 #!/usr/bin/python 为 #!/usr/bin/python2.7

验证yum修改后的效果:

yum --version
3.4.3
  Installed: rpm-4.11.3-43.el7.x86_64 at 2020-07-10 12:34
  Built    : CentOS BuildSystem <http://bugs.centos.org> at 2020-04-01 04:21
  Committed: Panu Matilainen <pmatilai@redhat.com> at 2019-10-04

  Installed: subscription-manager-1.24.45-1.el7.centos.x86_64 at 2021-04-29 18:18
  Built    : CentOS BuildSystem <http://bugs.centos.org> at 2020-12-15 16:38
  Committed: William Poteat <wpoteat@redhat.com> at 2020-11-24

  Installed: yum-3.4.3-167.el7.centos.noarch at 2020-07-10 12:36
  Built    : CentOS BuildSystem <http://bugs.centos.org> at 2020-04-02 15:56
  Committed: CentOS Sources <bugs@centos.org> at 2020-03-31

  Installed: yum-plugin-fastestmirror-1.1.31-54.el7_8.noarch at 2020-07-10 12:36
  Built    : CentOS BuildSystem <http://bugs.centos.org> at 2020-05-12 16:27
  Committed: Michal Domonkos <mdomonko@redhat.com> at 2020-03-12

yum 正常。

ESP32 下载工具说明

ESP32系列 flash下载

环境

硬件: esp32c3

环境: windows7

目前最新的IDF环境编译和下载都是python脚本完成的,但是对于非开发人员,测试或者工厂等下载最简单的方式还是通过下载工具,而不是配置负载的开发环境。

工具获取

去乐鑫官网下载最新的下载工具,工具页面:
https://www.espressif.com/zh-hans/support/download/other-tools

V3.8.8下载链接:
https://www.espressif.com/sites/default/files/tools/flash_download_tool_v3.8.8.zip

下载

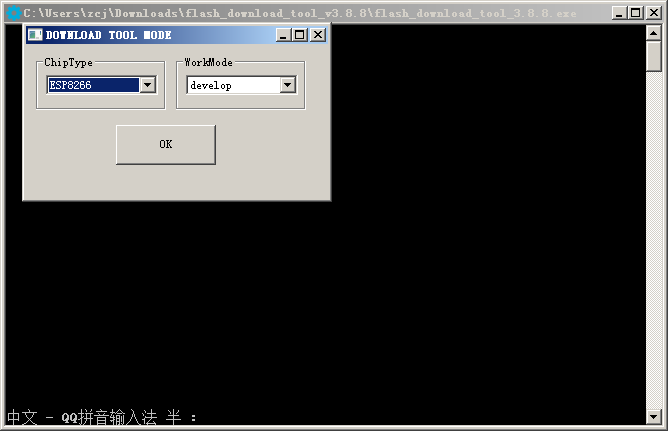
解压后,运行工具,chip选择esp32c3,workmode选择develop

确定后,进入主页面,需要选择3个对应的bin档,他们分别是:

build\bootloader\bootloader.bin
build\partition_table\partition_table.bin
build\xxx.bin

其中xxx.bin是你的工程名称,也就是你的用户代码bin。
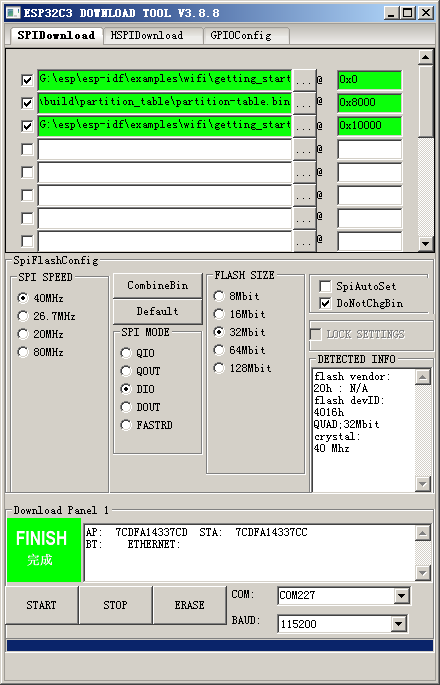
3个bin对应的地址分别是 0x0,0x8000,0x1000。以上bin的名称和地址都是根据命令行模式下载的日志中找到的,根据对应的size和地址,基本就能找到以上的信息。具体如图所示:

注意设置正确的串口,点击开始后,工具会自动读取正确的spiflash信息。

完成

完成后,绿色的按钮会显示完成字样,中间不要断电或者中断。
工具下载完成后不像命令行,不会自动重启,需要手动重启。

esp apsta lwip config

when you are developing an apsta app of esp, you should config int the menuconfig procedure, such as below:

  • Component config -> LWIP > [x] Enable copy between Layer2 and Layer3 packets.
  • Component config -> LWIP > [x] Enable IP forwarding.
  • Component config -> LWIP > [x] Enable NAT (new/experimental).

esp8266-window7-environment-installation

esp8266 window7开发环境搭建

最新代码

https://github.com/espressif/ESP8266_RTOS_SDK

安装toolchain

下载msys32

在windows环境下我们需要msys32,在linux不需要

https://dl.espressif.com/dl/esp32_win32_msys2_environment_and_toolchain-20181001.zip

下载8266对应的toolchain

在默认的msys下是没有8266的toolchain的,我们需要下载:

https://dl.espressif.com/dl/xtensa-lx106-elf-gcc8_4_0-esp-2020r3-win32.zip

将解压后的xtensa-lx106-elf放到/msys32/opt/下

安装python环境

# python -m pip install --user -r $IDF_PATH/requirements.txt
Requirement already satisfied: setuptools in g:/msys32/mingw32/lib/python2.7/site-packages (from -r requirements.txt (line 4)) (40.4.3)
Collecting click>=5.0 (from -r requirements.txt (line 8))
  Downloading https://files.pythonhosted.org/packages/d2/3d/fa76db83bf75c4f8d338c2fd15c8d33fdd7ad23a9b5e57eb6c5de26b430e/click-7.1.2-py2.py3-none-any.whl (82kB)
    49% |▒▒▒▒▒▒▒▒▒▒▒▒▒▒▒▒▒▒▒▒▒▒▒▒▒▒▒▒▒▒▒▒                | 40kB 450kB/s eta 0:00    61% |▒▒▒▒▒▒▒▒▒▒▒▒▒▒▒▒▒▒▒▒▒▒▒▒▒▒▒▒▒▒▒▒▒▒▒▒▒▒▒▒            | 51kB 248kB/s eta     74% |▒▒▒▒▒▒▒▒▒▒▒▒▒▒▒▒▒▒▒▒▒▒▒▒▒▒▒▒▒▒▒▒▒▒▒▒▒▒▒▒▒▒▒▒▒▒▒▒        | 61kB 296kB/s     86% |▒▒▒▒▒▒▒▒▒▒▒▒▒▒▒▒▒▒▒▒▒▒▒▒▒▒▒▒▒▒▒▒▒▒▒▒▒▒▒▒▒▒▒▒▒▒▒▒▒▒▒▒▒▒▒▒    | 71kB 344k    98% |▒▒▒▒▒▒▒▒▒▒▒▒▒▒▒▒▒▒▒▒▒▒▒▒▒▒▒▒▒▒▒▒▒▒▒▒▒▒▒▒▒▒▒▒▒▒▒▒▒▒▒▒▒▒▒▒▒▒▒▒▒▒▒▒| 81kB     100% |▒▒▒▒▒▒▒▒▒▒▒▒▒▒▒▒▒▒▒▒▒▒▒▒▒▒▒▒▒▒▒▒▒▒▒▒▒▒▒▒▒▒▒▒▒▒▒▒▒▒▒▒▒▒▒▒▒▒▒▒▒▒▒▒| 92kB 385kB/s
Requirement already satisfied: pyserial>=3.0 in g:/msys32/mingw32/lib/python2.7/site-packages (from -r requirements.txt (line 9)) (3.4)
Requirement already satisfied: future>=0.15.2 in g:/msys32/mingw32/lib/python2.7/site-packages (from -r requirements.txt (line 10)) (0.16.0)
Requirement already satisfied: cryptography>=2.1.4 in g:/msys32/mingw32/lib/python2.7/site-packages (from -r requirements.txt (line 11)) (2.3.1)
Requirement already satisfied: pyparsing<2.4.0,>=2.0.3 in g:/msys32/mingw32/lib/python2.7/site-packages (from -r requirements.txt (line 12)) (2.2.0)
Collecting pyelftools>=0.22 (from -r requirements.txt (line 13))
  Using cached https://files.pythonhosted.org/packages/6f/50/3d7729d64bb23393aa4c166af250a6e6f9def40c90bf0e9af3c5ad25b6f7/pyelftools-0.27-py2.py3-none-any.whl
Requirement already satisfied: idna>=2.1 in g:/msys32/mingw32/lib/python2.7/site-packages (from cryptography>=2.1.4->-r requirements.txt (line 11)) (2.7)
Requirement already satisfied: asn1crypto>=0.21.0 in g:/msys32/mingw32/lib/python2.7/site-packages (from cryptography>=2.1.4->-r requirements.txt (line 11)) (0.24.0)
Requirement already satisfied: six>=1.4.1 in g:/msys32/mingw32/lib/python2.7/site-packages (from cryptography>=2.1.4->-r requirements.txt (line 11)) (1.11.0)
Requirement already satisfied: cffi!=1.11.3,>=1.7 in g:/msys32/mingw32/lib/python2.7/site-packages (from cryptography>=2.1.4->-r requirements.txt (line 11)) (1.10.0)
Requirement already satisfied: enum34 in g:/msys32/mingw32/lib/python2.7/site-packages (from cryptography>=2.1.4->-r requirements.txt (line 11)) (1.1.6)
Requirement already satisfied: ipaddress in g:/msys32/mingw32/lib/python2.7/site-packages (from cryptography>=2.1.4->-r requirements.txt (line 11)) (1.0.22)
Requirement already satisfied: pycparser in g:/msys32/mingw32/lib/python2.7/site-packages (from cffi!=1.11.3,>=1.7->cryptography>=2.1.4->-r requirements.txt (line 11)) (2.19)
Installing collected packages: click, pyelftools
Successfully installed click-7.1.2 pyelftools-0.27

编译工程

设置环境变量

因为我们使用的是msys32的虚拟环境,所以我们只要设置msys32的虚拟环境变量即可,不需要设置windows的环境变量。这样正好可以让我们在window系统下同时兼容esp32和esp8266的开发环境。
修改/home/xxx[用户]/.bashrc

新增:

export IDF_PATH=~/esp/ESP8266_RTOS_SDK
export PATH=/opt/xtensa-lx106-elf/bin:$PATH

检验环境变量:
重新打开mingw32.exe,执行

xtensa-lx106-elf-gcc -v
# xtensa-lx106-elf-gcc -v
Using built-in specs.
COLLECT_GCC=G:\msys32\opt\xtensa-lx106-elf\bin\xtensa-lx106-elf-gcc.exe
COLLECT_LTO_WRAPPER=g:/msys32/opt/xtensa-lx106-elf/bin/../libexec/gcc/xtensa-lx106-elf/8.4.0/lto-wrapper.exe
Target: xtensa-lx106-elf
Configured with: /builds/idf/crosstool-NG/.build/HOST-i686-w64-mingw32/xtensa-lx106-elf/src/gcc/configure --build=x86_64-build_pc-linux-gnu --host=i686-host_w64-mingw32 --target=xtensa-lx106-elf --prefix=/builds/idf/crosstool-NG/builds/xtensa-lx106-elf --with-local-prefix=/builds/idf/crosstool-NG/builds/xtensa-lx106-elf/xtensa-lx106-elf --with-headers=/builds/idf/crosstool-NG/builds/xtensa-lx106-elf/xtensa-lx106-elf/include --with-newlib --enable-threads=no --disable-shared --with-pkgversion='crosstool-NG esp-2020r3-49-gd5524c1' --disable-__cxa_atexit --enable-cxx-flags=-ffunction-sections --disable-libgomp --disable-libmudflap --disable-libmpx --disable-libssp --disable-libquadmath --disable-libquadmath-support --with-gmp=/builds/idf/crosstool-NG/.build/HOST-i686-w64-mingw32/xtensa-lx106-elf/buildtools/complibs-host --with-mpfr=/builds/idf/crosstool-NG/.build/HOST-i686-w64-mingw32/xtensa-lx106-elf/buildtools/complibs-host --with-mpc=/builds/idf/crosstool-NG/.build/HOST-i686-w64-mingw32/xtensa-lx106-elf/buildtools/complibs-host --with-isl=/builds/idf/crosstool-NG/.build/HOST-i686-w64-mingw32/xtensa-lx106-elf/buildtools/complibs-host --enable-lto --enable-target-optspace --without-long-double-128 --disable-nls --enable-multiarch --enable-languages=c,c++ --disable-libstdcxx-verbose --enable-threads=posix --enable-libstdcxx-time=yes
Thread model: posix
gcc version 8.4.0 (crosstool-NG esp-2020r3-49-gd5524c1)

下载最新代码

务必git pull,不要zip解压,windows下很多隐藏文件容易出问题

git pull https://github.com/espressif/ESP8266_RTOS_SDK.git

menuconfig

进入需要编译的工程例子目录

make menuconfig

进行必要的配置。为了接下来的下载,我们需要配置串口:Serial flasher config > Default serial port,根据实际的串口来配置。

On Windows, serial ports have names like COM1. On MacOS, they start with /dev/cu.. On Linux, they start with /dev/tty

编译

make

# make
Toolchain path: /opt/xtensa-lx106-elf/bin/xtensa-lx106-elf-gcc
Toolchain version: esp-2020r3-49-gd5524c1
Compiler version: 8.4.0
Python requirements from G:/msys32/home/zcj/esp/ESP8266_RTOS_SDK/requirements.txt are satisfied.
App "wifi_softAP" version: v3.4-28-g08e225dd
To flash all build output, run 'make flash' or:
python /home/zcj/esp/ESP8266_RTOS_SDK/components/esptool_py/esptool/esptool.py --chip esp8266 --port /dev/ttyUSB0 --baud 115200 --before default_reset --after hard_reset write_flash -z --flash_mode dio --flash_freq 40m --flash_size 2MB 0x0 /home/zcj/esp/ESP8266_RTOS_SDK/examples/wifi/getting_started/softAP/build/bootloader/bootloader.bin 0x10000 /home/zcj/esp/ESP8266_RTOS_SDK/examples/wifi/getting_started/softAP/build/wifi_softAP.bin 0x8000 /home/zcj/esp/ESP8266_RTOS_SDK/examples/wifi/getting_started/softAP/build/partitions_singleapp.bin

编译 & 下载

make flash

esp32 menuconfig 中Example Configuration及sdkconfig.h中宏的生成

在esp32的框架中,我们发现例子引用的sdkconfig.h在 build\config\ 目录下,因为build目录是生成的,所以我们很容易判断这个头文件也是动态生成的。

那么这个头文件的内容我们怎么控制呢?
经过验证,文件中大概分两类宏,用户自定义宏和硬件默认规格宏。用户自定义宏都是CONFIG_ESP_ 开头,其他的都是默认规格宏。

那么这些用户自定义宏又是在什么地方定义的呢,答案是 \main\Kconfig.projbuild 文件,这个文件是类似yaml的脚本,当你执行 idf.py menuconfig 时,会加载这个文件,进行对应的修改。

esp32 win7开发环境搭建

环境

系统:win7
hw target:esp32c3

注意:很多问题都跟git的网络有关,要仔细看错误提示。很多错误需要尝试多遍,才有可能成功。

安装包

离线包安装 https://dl.espressif.com/dl/esp-idf/?idf=4.4

更新最新代码

将安装的IDF_PATH更新成最新的git版本 https://github.com/espressif/esp-idf

更新submodule

git submodule update --init --recursive

安装python virtual environment

install.bat

设置环境变量

export.bat

编译工程

设置hw 平台类型

idf.py set-target esp32c3

错误1:

Unable to checkout '4f5e89fa84ce1d178a6765b8b46f2b6f91216677' in submodule path 'components/libsodium/libsodium'

解决1:
看日志是git无法成功,我们改为手动git pull,如果提示 openssl 10054错误。则

git config --global http.sslVerify "false"

其后还有很多的失败,基本需要逐个确认,多次执行

git submodule update --init --recursive

配置成功

-- Configuring done
-- Generating done
-- Build files have been written to: G:/esp/esp-idf/examples/wifi/getting_started/softAP/build

菜单配置

idf.py menuconfig

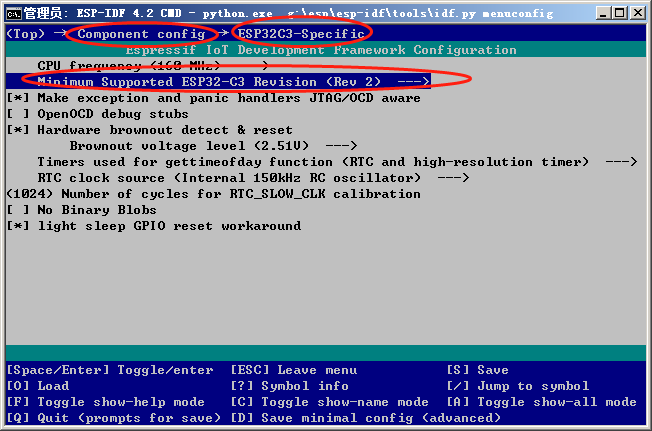
component config->esp32c3-specific,选择rev 2:
file

编译成功

idf.py build
[84/85] Generating binary image from built executable
esptool.py v3.1-dev
Merged 1 ELF section Generated G:/esp/espidf/examples/wifi/getting_started/softAP/build/bootloader/bootloader.bin
[85/85] cmd.exe /C "cd /D G:\esp\espidf\examples\wifi\getting_started\softAP\build\bootloader\esp-idf\esptool_py &&g:\esp\espressif\python_env\idf4.4_py3.8_env\Scripts\python.exe G:/esp/espidf/components/partition_table/check_sizes.py --
offset 0x8000 bootloader 0x0 G:/esp/espidf/examples/wifi/getting_started/softAP
/build/bootloader/bootloader.bin"
Bootloader binary size 0x48a0 bytes. 0x3760 bytes (76%) free.
[954/955] Generating binary image from built executable
esptool.py v3.1-dev
Merged 1 ELF section
Generated G:/esp/esp-idf/examples/wifi/getting_started/softAP/build/wifi_softAP.bin
[955/955] cmd.exe /C "cd /D G:\esp\esp..._started/softAP/build/wifi_softAP.bin"
wifi_softAP.bin binary size 0xa3490 bytes. Smallest app partition is 0x100000 by
tes. 0x5cb70 bytes (36%) free.

Project build complete. To flash, run this command:
g:\esp\espressif\python_env\idf4.4_py3.8_env\Scripts\python.exe ..\..\..\..\comp
onents\esptool_py\esptool\esptool.py -p (PORT) -b 460800 --before default_reset
--after hard_reset --chip esp32c3  write_flash --flash_mode dio --flash_size detect --flash_freq 80m 0x0 build\bootloader\bootloader.bin 0x8000 build\partition_
table\partition-table.bin 0x10000 build\wifi_softAP.bin
or run 'idf.py -p (PORT) flash'

烧录

idf.py -p COM105 flash
esptool.py v3.1-dev
Serial port COM105
Connecting....
Chip is ESP32-C3 (revision 2)
Features: Wi-Fi
Crystal is 40MHz
MAC: 7c:df:a1:86:4a:94
Uploading stub...
Running stub...
Stub running...
Changing baud rate to 460800
Changed.
Configuring flash size...
Flash will be erased from 0x00000000 to 0x00004fff...
Flash will be erased from 0x00010000 to 0x000b3fff...
Flash will be erased from 0x00008000 to 0x00008fff...
Compressed 18592 bytes to 11216...
Writing at 0x00000000... (100 %)
Wrote 18592 bytes (11216 compressed) at 0x00000000 in 0.6 seconds (effective 253
.8 kbit/s)...
Hash of data verified.
Compressed 668816 bytes to 372018...
Writing at 0x00010000... (4 %)
Writing at 0x0001bf69... (8 %)
Writing at 0x00025854... (13 %)
Writing at 0x0002c95b... (17 %)
Writing at 0x0003382e... (21 %)
Writing at 0x0003ae72... (26 %)
Writing at 0x00041d6a... (30 %)
Writing at 0x0004886c... (34 %)
Writing at 0x0004fb4e... (39 %)
Writing at 0x00056b56... (43 %)
Writing at 0x0005d1f1... (47 %)
Writing at 0x0006332e... (52 %)
Writing at 0x00068eeb... (56 %)
Writing at 0x0006f110... (60 %)
Writing at 0x0007537e... (65 %)
Writing at 0x0007b840... (69 %)
Writing at 0x00081ae0... (73 %)
Writing at 0x00087df9... (78 %)
Writing at 0x0008df30... (82 %)
Writing at 0x000945f7... (86 %)
Writing at 0x0009b5fe... (91 %)
Writing at 0x000a66e9... (95 %)
Writing at 0x000ae4bc... (100 %)
Wrote 668816 bytes (372018 compressed) at 0x00010000 in 11.2 seconds (effective
476.2 kbit/s)...
Hash of data verified.
Compressed 3072 bytes to 103...
Writing at 0x00008000... (100 %)
Wrote 3072 bytes (103 compressed) at 0x00008000 in 0.1 seconds (effective 258.7
kbit/s)...
Hash of data verified.

Leaving...
Hard resetting via RTS pin...
Done

擦除flash

idf.py erase_flash

查看日志

idf.py -p COMXXX monitor

esp32 windows environment issue of python requirements

pc系统:win7 x64

按照指导文档,无论是命令行安装还是msi安装,都一直卡在:

G:\esp\esp-idf-src\examples\wifi\getting_started\softAP>idf.py build
The following Python requirements are not satisfied:
pyserial>=3.0
future>=0.15.2
cryptography>=2.1.4
pyparsing>=2.0.3,<2.4.0
pyelftools>=0.22
gdbgui==0.13.2.0
pygdbmi<=0.9.0.2
reedsolo>=1.5.3,<=1.5.4
bitstring>=3.1.6
ecdsa>=0.16.0
esp-windows-curses; sys_platform == 'win32'
To install the missing packages, please run "G:\esp\esp-idf\install.bat"
Diagnostic information:
    IDF_PYTHON_ENV_PATH: D:\Programs\Python\Python38
    Python interpreter used: D:\Programs\Python\Python38\python.exe

ESP-IDF v4.2.1

解决:
python -m pip install --user -r \xxx\xxx\requirements.txt