orangepi 3B账号密码
orangepi
orangepi
orangepi
orangepi
ios 上架时,需要符合严格的尺寸要求,以下是简单的方案:
brew install imagemagick
# 批量处理(自动缩放+填充黑边)
mogrify -resize "1290x2796>" -background black -gravity center -extent 1290x2796 *.png
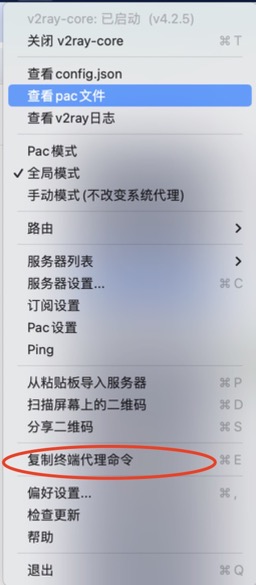
然后粘贴到 shell 中就可以了。
内容类似:
export http_proxy=http://127.0.0.1:1087;export https_proxy=http://127.0.0.1:1087;export ALL_PROXY=socks5://127.0.0.1:1080
如果想永久生效,可以直接配置到 shell 的配置文件中
https://github.com/nanomq/nanomq
sudo apt update
sudo apt install build-essential
gcc --version
# 安装依赖工具
sudo apt install ca-certificates curl gnupg
# 下载并添加 Kitware 的 GPG 密钥
curl -fsSL https://apt.kitware.com/keys/kitware-archive-latest.asc | sudo gpg --dearmor -o /usr/share/keyrings/kitware-archive-keyring.gpg
# 添加仓库到源列表
echo "deb [signed-by=/usr/share/keyrings/kitware-archive-keyring.gpg] https://apt.kitware.com/ubuntu/ $(lsb_release -cs) main" | sudo tee /etc/apt/sources.list.d/kitware.list
# 更新包列表
sudo apt update
sudo apt install cmake
cmake --version
git clone https://github.com/emqx/nanomq.git
cd nanomq
git submodule update --init --recursive
mkdir build && cd build
cmake -DNNG_ENABLE_QUIC=ON \
-DNANOMQ_TESTS=ON \
-DNNG_ENABLE_TLS=ON \
-DBUILD_ZMQ_GATEWAY=OFF \
-DBUILD_NFTP=OFF \
-DBUILD_DDS_PROXY=OFF \
-DENABLE_JWT=ON \
-DNNG_ENABLE_SQLITE=ON \
-DDEBUG=ON \
-DASAN=ON \
-DDEBUG_TRACE=ON \
..
编译
make
make install
sudo apt update
sudo apt install -y cmake gcc git make
git clone https://github.com/nanomsg/nng.git
cd nng
mkdir build && cd build
cmake ..
make -j$(nproc)
sudo make install
sudo ldconfig # 更新动态链接库缓存
vi /etc/systemd/system/nanomq.service
[Unit]
Description=NanoMQ MQTT Broker
After=network.target
[Service]
Type=simple
ExecStart=/data/nanomq/build/nanomq/nanomq start --conf /data/nanomq/etc/nanomq.conf
Restart=on-failure
User=root
Group=root
WorkingDirectory=/data/nanomq/build/nanomq
[Install]
WantedBy=multi-user.target
sudo systemctl daemon-reload
sudo systemctl enable nanomq
sudo systemctl start nanomq
sudo systemctl status nanomq
journalctl -u nanomq.service -b
mqtt的账号和主题设置
auth {
allow_anonymous = false
no_match = allow
deny_action = ignore
cache = {
max_size = 32
ttl = 1m
}
password = {include "/etc/nanomq_pwd.conf"}
acl = {include "/etc/nanomq_acl.conf"}
}
{"permit": "allow", "username": "#", "action": "pubsub", "topics": ["up"]}
{"permit": "allow", "username": "#", "action": "pubsub", "topics": ["down"]}
{"permit": "deny"}
]
BOOT1=x BOOT0=0 从用户闪存启动,这是正常的工作模式。
BOOT1=0 BOOT0=1 从系统存储器启动,这种模式启动的程序功能由厂家设置。
BOOT1=1 BOOT0=1 从内置SRAM启动,这种模式可以用于调试
schtasks.exe /create /tn "xxx" /ru SYSTEM /sc ONSTART /tr xxx
schtasks.exe |findstr "xxx"
schtasks.exe /delete /tn "xxx"
针对 docker cloudflare.docker.com 超时问题,目前测试中科大等都已经失效了。
下面的亲测可用:Daocloud 镜像加速器地址:https://docker.m.daocloud.io
编辑 /etc/docker/daemon.json, 增加如下:
"registry-mirrors": ["https://docker.m.daocloud.io"]
vi /etc/network/interfaces
iface vmbr0 inet6 dhcp
accept_ra 2
request_prefix 1
vi /etc/sysctl.conf
net.ipv6.conf.all.accept_ra=2
net.ipv6.conf.default.accept_ra=2
net.ipv6.conf.vmbr0.accept_ra=2
net.ipv6.conf.all.autoconf=1
net.ipv6.conf.default.autoconf=1
net.ipv6.conf.vmbr0.autoconf=1
apt-get update
apt-get install docker.io
systemctl enable docker
systemctl start docker
formating
mkfs -t ext4 /dev/sdx
mount
mkdir /mnt/dirx
mount -t ext4 /dev/sdx /mnt/dirx
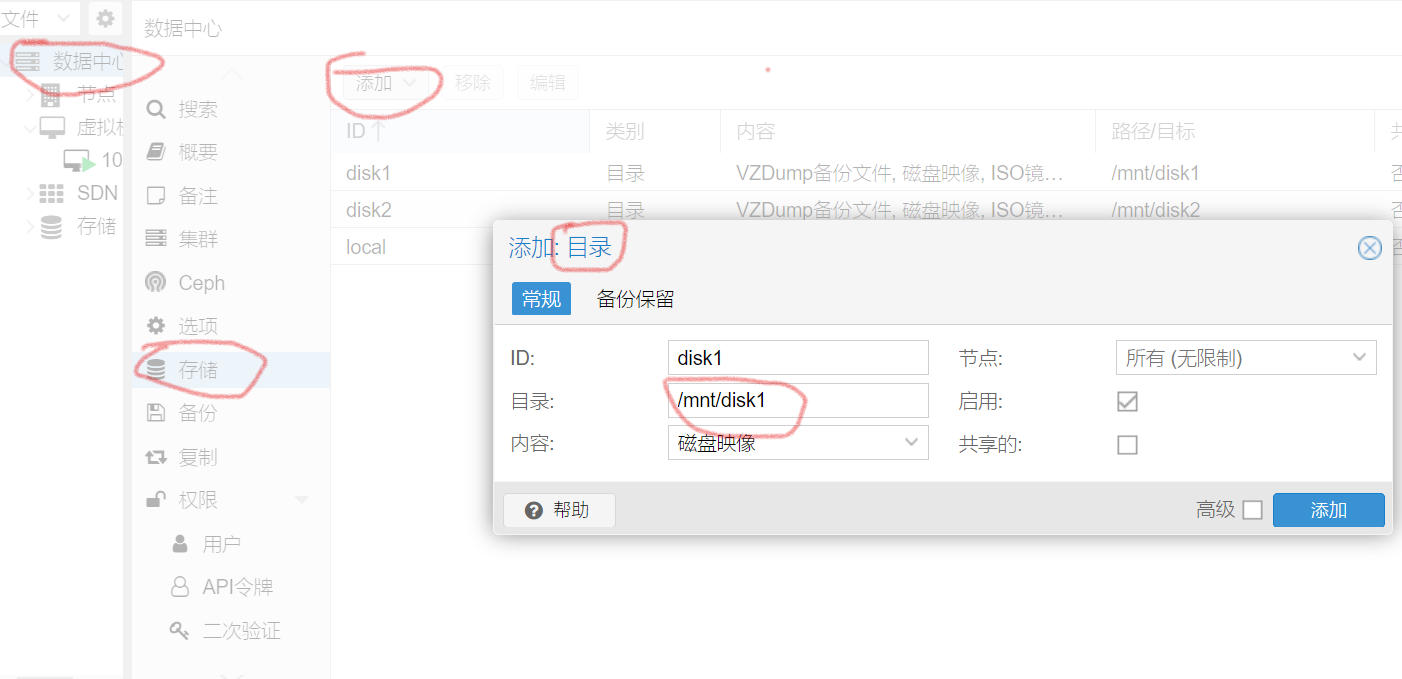
add the dir to pve:
add for auto mount,add to /etc/fstab's tail:
/dev/sdbx /mnt/dirx ext4 defaults 1 2
默认bios是有密码的,解除密码的方式就是通过主板跳线端子,把对应的端子拿下。
对应主板上的丝印是PSWD
t610是在开机按键后面的的大概位置,有个3排的跳线端子,中间那个是pswd。
如果你要开开机启动 :
advance-》after power loss-》on 就表示上电自动开机
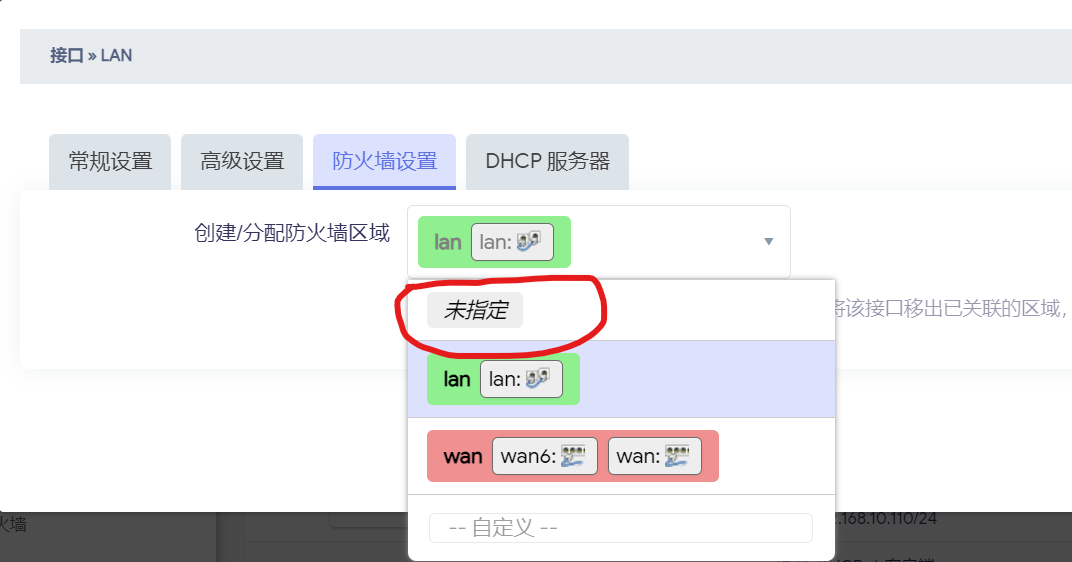
验证时,好奇,在ui上把wan lan防火墙去掉了,改成未指定,结果设备连不上了,ssh也无法链接:
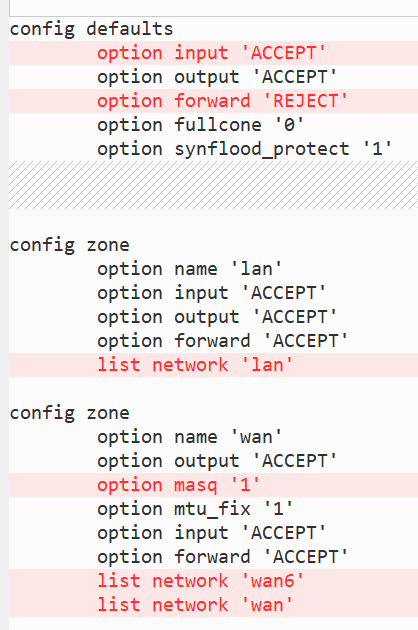
没办法,只能上串口,通过串口修改 /etc/config/firewall
红色部分时注意要恢复的内容
配置完成后,记得重启 /etc/init.d/network restart
ip a
enp开头的是有线网卡
wlpk开头的是无线网卡
将static更改为dhcp,并删除或注释掉address,netmask和gateway行
auto lo
iface lo inet loopback
iface enp1s0 inet manual
auto vmbr0
iface vmbr0 inet dhcp
#address 192.168.1.105
#netmask 255.255.255.0
#gateway 192.168.1.1
bridge-ports enp1s0
bridge-stp off
bridge-fd 0
iface wlp2s0 inet manual
source /etc/network/interfaces.d/*
反之就是动态改静态
先要安装网卡驱动,因为我们wlp2s0已经识别出来了,说明驱动已经ok了
先要安装 wpa工具apt install wpasupplicant
然后将 iface wlp2s0 inet manual
改为:
auto wlp2s0
iface wlp2s0 inet dhcp
wpa-ssid xxx
wpa-psk xxx
systemctl restart networking
screen -X -S sessionID quit
removed /var/log/my.ip.add.ress
此方法理论同样适用过滤别的关键词网站
因为搜索的内容严重被csdn污染,所以想研究下如何过滤。
目前对quic只是很浅很周边的了解,仅局限于材料和ppt,并未动手做过代码级别的实践。
最近想尝试下quic proxy的性能,是否能优于现有的技术方案,遂准备开始基本从零开始学习,记录下点滴,希望能帮到需要的人。
因为chrome quic 是一个已经可以体验实用的实现,打算先从chrome quic 学习。
https://github.com/quicwg/base-drafts/wiki/Implementations
https://blog.cloudflare.com/unlocking-quic-proxying-potential
https://blog.apnic.net/2023/03/23/hiding-behind-masques/
先做个简单记录,回头再慢慢细化 :https://www.cnblogs.com/rmb999/p/17774248.html
tcpip的很简单,disconnect就可以。
本地的比较麻烦。
查询pid
netstat -ano|findstr 5555
TCP 127.0.0.1:5555 0.0.0.0:0 LISTENING 3496
TCP 127.0.0.1:5555 127.0.0.1:58569 ESTABLISHED 3496
TCP 127.0.0.1:58569 127.0.0.1:5555 ESTABLISHED 2356
我们看到adb server的进程ID 3496
删除进程
taskkill /pid 3496 -f
成功: 已终止 PID 为 3496 的进程。
github: https://github.com/hiproz/aosp-server-toolkit
之前是用orange pi做家庭远程伺服跳板机的,平时开vnc或者ssh之类。发现老是死机,于是萌生了用二手手机做服务器的想法。
网上小黄鱼有很多二手手机,价格比开发板还便宜,而且配置更高,硬件的一致性也更好。
因为google的pixel手机对应的代码基线都是开源的,所以选择便宜的pixel手机。代码直接从aosp的官网获取。
目前pixel3的价格在100-200 比开发板是很高性价比了,所以我们选择pixel3手机作为入门。
aosp系统固件构建,一般主要是做跟服务器相关的特性修改,比如充电自动开机,集成各种工具,比如vnc,busybox等等。具体的编译和集成方法根据不同版本各有差异,需要自己从网上获取验证。
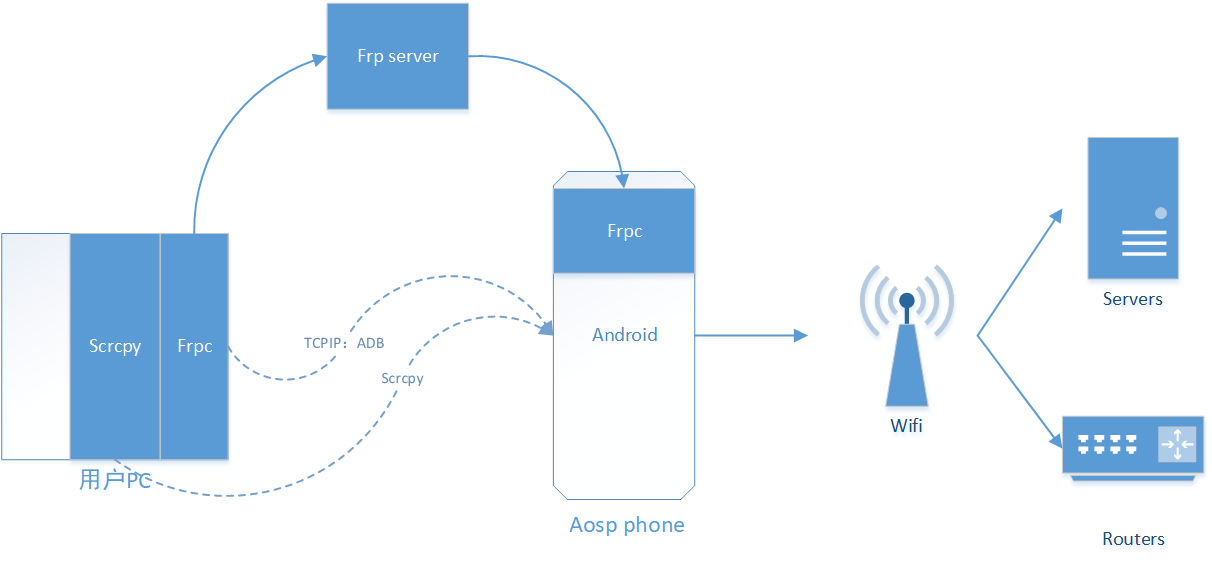
为了将pixel手机变成一台通用linux服务器,用来实现远程控制监控家庭和公司网络的目的。我们基于aosp源码,添加必要的工具集,并给出相关的软件配置操作流程等。
这里的固件和工具,当前通过pixel3验证,但理论上只要适合aosp对应版本的手机,就都能使用,只是我们不一定都一一验证,需要用户自行验证,有问题欢迎反馈。
我们方案的一些基本核心功能:
使用安卓adb,fastboot工具链来进行烧录。
adb version:Version 31.0.3-7562133
fastboot verison:fastboot version 31.0.3-7562133
【待补充】
和windows的基本一致,不一致的是设置环境变量的命令不同。
*不同之处待更新**【待补充】*
我们的系统是debug版本,所以支持root和remount。首次使用时,我们需要配置frpc相关的服务,保证我们以后可以远程操作手机。
为了对手机进行各种文件操作,我们建议默认remount。
adb root
adb remount
# 这里可能提示重启,请进行必要的重启
adb reboot
我们主要是通过frpc 来实现远程scrcpy和adb shell,所以你需要部署一台frp服务器。可以从网上买一个最小配置的vps。
你需要一台有公网ip的服务器,部署frp服务器,具体可以去frpc官网下载,因为我们手机端集成的是v0.58.0。所以我们建议服务器端和电脑客户端,也下载对应的版本。我们假设服务器开启token安全机制,参考配置如下:
bindPort = 7000
auth.method = "token"
auth.token = "123"
adb root
adb remount
adb shell
busybox vi /data/frpc.toml
frpc.toml 参考内容如下:
serverAddr = "1.1.1.1" # only support ip, do not use domain
serverPort = 7000
auth.method = "token"
auth.token = "000000"
[[proxies]]
name = "secret_proxy"
type = "stcp"
secretKey = "key"
localIP = "127.0.0.1"
localPort = 5555
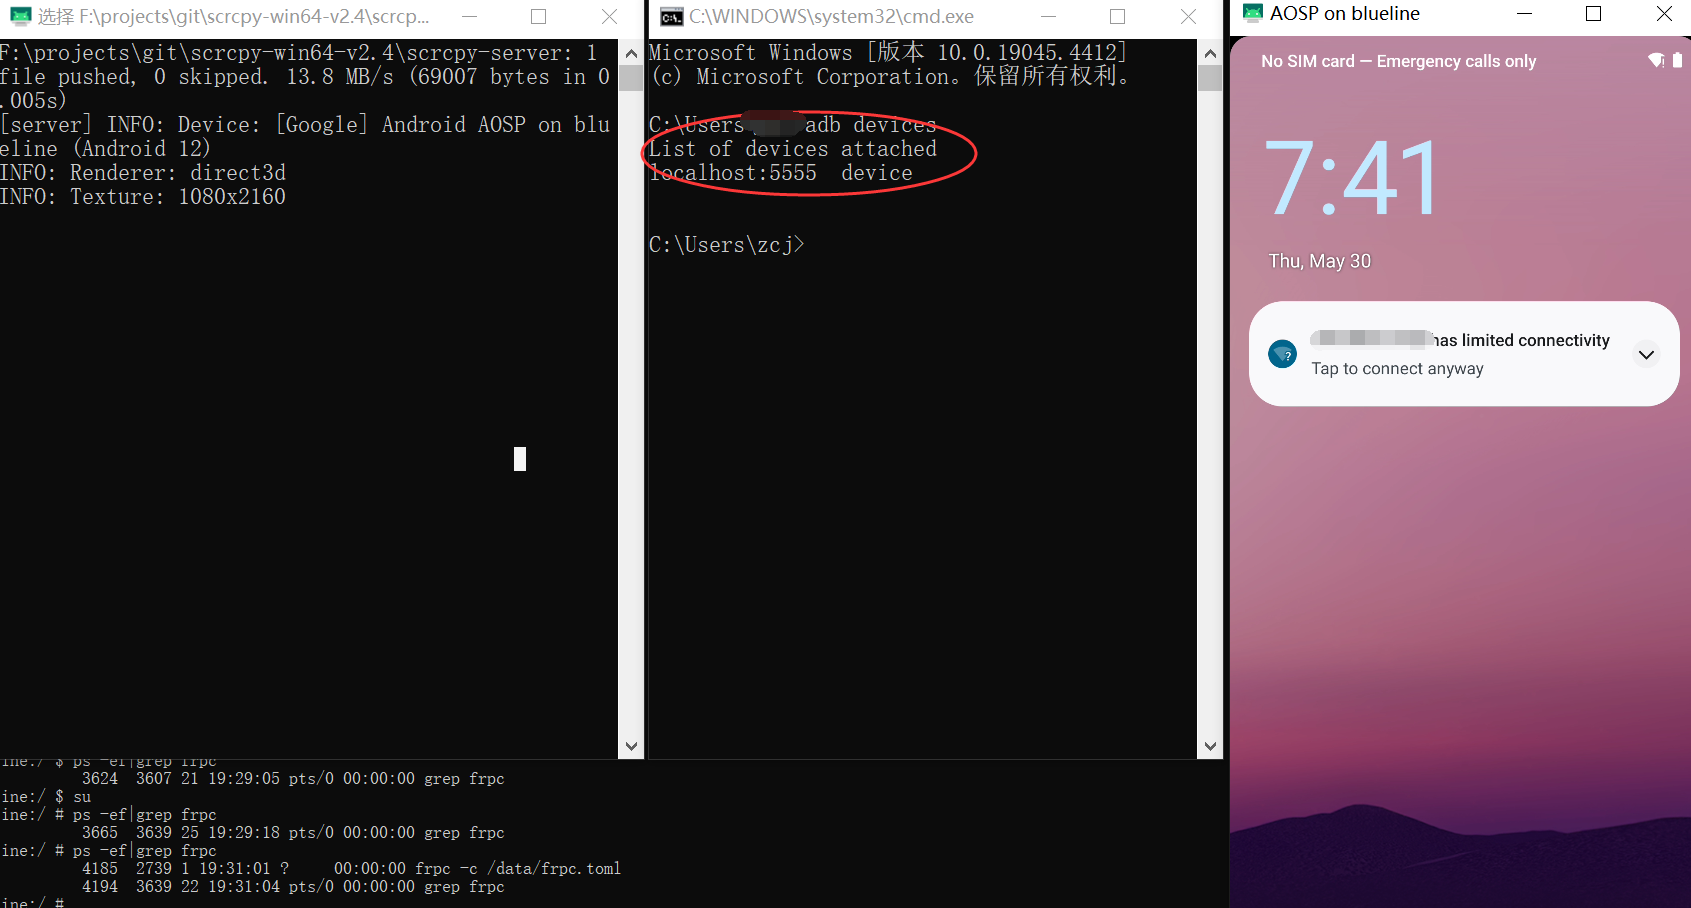
请根据你自己服务器的实际参数,修改以上参数,修改后adb reboot手机,重新进去adb shell 确认frpc是否正确取运行,如果能正确看到frpc进程信息,就初步确认frp运行起来了:
blueline:/ # ps -ef|grep frpc
root 4185 2739 1 19:31:01 ? 00:00:00 frpc -c /data/frpc.toml
root 4194 3639 22 19:31:04 pts/0 00:00:00 grep frpc
参看我们前面技术架构,在我们通过自己的电脑远程访问时,我们先要在本地把电脑上的frpc跑起来。
serverAddr = "1.1.1.1"
serverPort = 7000
auth.method = "token"
auth.token = "123"
[[visitors]]
name = "secret_visitor"
type = "stcp"
serverName = "secret_proxy"
secretKey = "key"
bindAddr = "127.0.0.1"
bindPort = 5555
在配置完frpc后,我们基本就可以拔掉usb,完全像远程服务器一样来访问手机了。这里我们假设你的frps 和frpc都配置正确。如果你有这方面的错误,请检查网络以及端口防火墙等基本网络参数。
adb connect localhost:5555
connected to localhost:5555
adb shell
我们的固件集成了ssh客户端,当我们需要将手机作为跳板服务器或者堡垒机服务器通过ssh访问别的ssh服务器器时,我们就可以使用手机中的ssh来完成
你可以使用 busybox vi
待补充
注意:这个只是代表了其中一种配置,仅供参考:
测试中发现的一个异常:
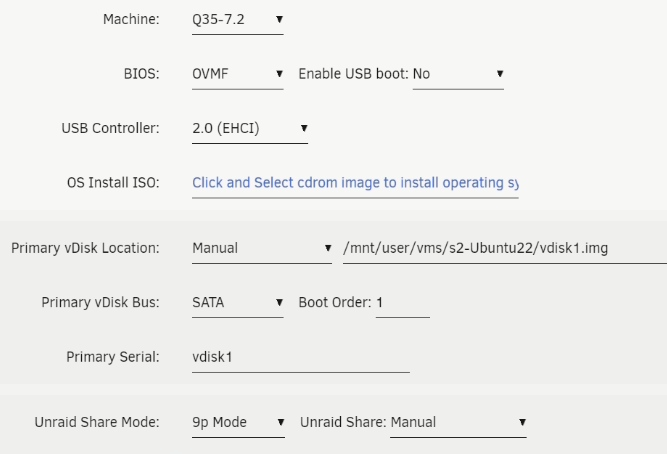
由于machine选择不同,导致系统起来后,ens3 网卡无法正常hdcp
如何只删除当前路径下的目录?
find . -maxdepth 1 -type d|sed -n '2,$p'|xargs rm -rf
以下内容主要参考网络内容,按照实际验证的顺序和细节补充而成,使流程更清晰,可以傻瓜式照抄。
根据自己手机刷机前的版本信息,在 https://source.android.com/docs/setup/about/build-numbers?hl=zh-cn#source-code-tags-and-builds 获取版本SP1A.210812.016.A1
后面repo init时,我们将要用这个版本号,获取准确的版本。
repo init -u https://android.googlesource.com/platform/manifest -b android-12.0.0_r3
获取vendor驱动,从 https://developers.google.com/android/drivers?hl=zh-cn 中找到对应版本 https://link.zhihu.com/?target=https%3A//developers.google.com/android/drivers/%23crosshatchsp1a.210812.016.a1, 这个待会编译时,要解压到vendor下
安装git, repo:https://mirrors.tuna.tsinghua.edu.cn/help/git-repo/
运行 repo init,这里考虑到网速的问题,我们使用清华的镜像地址。如果你没有网络困扰,也可以使用上面提到的google android官方地址:
mkdir ~/work/aosp/
cd ~/work/aosp/
repo init -u
https://mirrors.tuna.tsinghua.edu.cn/git/AOSP/platform/manifest -b android-12.0.0_r3
repo sync -jxx , xx为你的虚拟软核数
更新vendor和驱动:
cd ~/Downloads
tar xvf qcom-crosshatch-*.tgz
tar xvf google_devices-crosshatch-*.tgz
cd ~/work/aosp/
~/Downloads/extract-qcom-crosshatch.sh
~/Downloads/extract-google_devices-crosshatch.sh
编译
source build/envsetup.sh
lunch 4(aosp_blueline-userdebug)
m
m 是构建代码的简单命令
安装adb kit,安装adb 和fastboot工具集,作者用的是Version 31.0.3-7562133 版本。
烧录下载
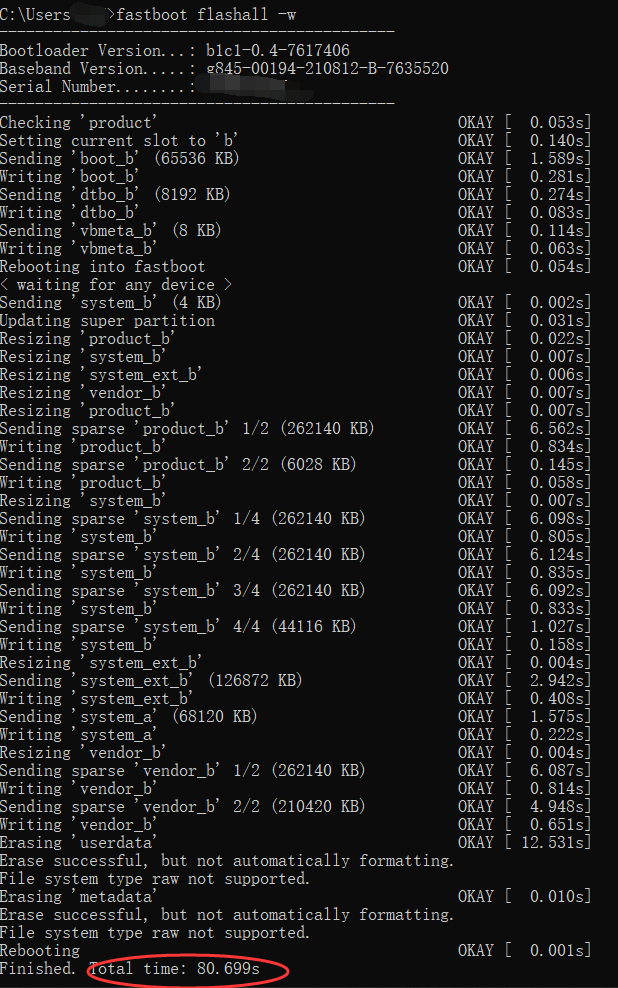
adb reboot bootloader
fastboot flashall -w
flashall 会提示设置ANDROID_PRODUCT_OUT环境变量,设置成实际的out编译目录就好(如果是在windows烧录,就把整个目录下载到windows,然后设置成windows实际的out路径)。
linux: export ANDROID_PRODUCT_OUT=/xxx/out/target/product/blueline
windows: set ANDROID_PRODUCT_OUT=/xxx/out/target/product/blueline
构建内核(可选),可以参考https://zhuanlan.zhihu.com/p/448289040 的后半部分内容。
最后,如果你不想麻烦,也可以取用我们编译好的原生版本:
https://cdn.itranscloud.com/aosp/aosp_blueline-userdebug_12_SP1A.210812.016.A1.7z
在某些重定向的配置场景中,所有请求都被proxy到了远端服务器,这时候certbot rewew的时候就因为无法远程操控well-known路径导致认证失败。
解决就是在proxy的本地创建认证目录:
# letsencrypt认证目录
location /.well-known/ {
root /data/wwwroot/xxx;
}
location /{
# 其他目录的操作在这里
}
主码流:
rtsp://admin:password@1.1.1.1/stream1
小分辨率子码流:
rtsp://admin:password@1.1.1.1/stream2
用户名默认admin ,密码password是手机app可以设置的:摄像机设置=》设置设备密码
TP支持rtsp的型号:TL-IPC43AW-COLOR
squashfs-factory.bin -- uboot 裸机第一次刷openwrt时用
squashfs-sysupgrade.bin -- 由openwrt升级到openwrt时用
官方固件的说明
xxx-preloader.bin -》 BL2
xxx-bl31-uboot.fip -》FIP
xxx-initramfs-recovery.itb -》包含rootfs image的运行在ram中的系统,用于flash还不完备时,加载在内存中做调试用,一般刷机不用
xxx-sysupgrade.bin -》 在系统升级页面中升级系统
如果您想要将最初在较旧的 QEMU 版本上启动的来宾迁移到较新版本的 QEMU,您需要确保两台机器实际上彼此兼容。一旦排除了根本无法迁移的设备之类的东西,并确保两个 QEMU 调用实际上创建了相同的虚拟硬件,这基本上可以归结为使用兼容的机器。
如果你只是想创建一台机器而不考虑迁移兼容性,你通常会这样做
qemu-system-ppc64 -machine pseries (...)
这将创建一个这种pseries
类型的机器。但在本例中,pseries
实际上是该机器类型的最新版本的别名;对于 6.2,这将是pseries-6.2
. 您可以通过以下方式找出哪些机器类型已版本化(以及给定二进制文件实际存在哪些机器类型)-machine ?
:
$ qemu-system-ppc64 -machine ?
Supported machines are:
40p IBM RS/6000 7020 (40p)
bamboo bamboo
g3beige Heathrow based PowerMAC
mac99 Mac99 based PowerMAC
mpc8544ds mpc8544ds
none empty machine
pegasos2 Genesi/bPlan Pegasos II
powernv10 IBM PowerNV (Non-Virtualized) POWER10
powernv8 IBM PowerNV (Non-Virtualized) POWER8
powernv IBM PowerNV (Non-Virtualized) POWER9 (alias of powernv9)
powernv9 IBM PowerNV (Non-Virtualized) POWER9
ppce500 generic paravirt e500 platform
pseries-2.1 pSeries Logical Partition (PAPR compliant)
pseries-2.10 pSeries Logical Partition (PAPR compliant)
pseries-2.11 pSeries Logical Partition (PAPR compliant)
pseries-2.12 pSeries Logical Partition (PAPR compliant)
pseries-2.12-sxxm pSeries Logical Partition (PAPR compliant)
pseries-2.2 pSeries Logical Partition (PAPR compliant)
pseries-2.3 pSeries Logical Partition (PAPR compliant)
pseries-2.4 pSeries Logical Partition (PAPR compliant)
pseries-2.5 pSeries Logical Partition (PAPR compliant)
pseries-2.6 pSeries Logical Partition (PAPR compliant)
pseries-2.7 pSeries Logical Partition (PAPR compliant)
pseries-2.8 pSeries Logical Partition (PAPR compliant)
pseries-2.9 pSeries Logical Partition (PAPR compliant)
pseries-3.0 pSeries Logical Partition (PAPR compliant)
pseries-3.1 pSeries Logical Partition (PAPR compliant)
pseries-4.0 pSeries Logical Partition (PAPR compliant)
pseries-4.1 pSeries Logical Partition (PAPR compliant)
pseries-4.2 pSeries Logical Partition (PAPR compliant)
pseries-5.0 pSeries Logical Partition (PAPR compliant)
pseries-5.1 pSeries Logical Partition (PAPR compliant)
pseries-5.2 pSeries Logical Partition (PAPR compliant)
pseries-6.0 pSeries Logical Partition (PAPR compliant)
pseries-6.1 pSeries Logical Partition (PAPR compliant)
pseries pSeries Logical Partition (PAPR compliant) (alias of pseries-6.2)
pseries-6.2 pSeries Logical Partition (PAPR compliant) (default)
ref405ep ref405ep
sam460ex aCube Sam460ex
taihu taihu
virtex-ml507 Xilinx Virtex ML507 reference design
pseries-x.y
如您所见,旧版本有多种机器类型;这些旨在提供与使用较旧的 QEMU 版本创建的默认机器兼容的配置。例如,如果您想要迁移在pseries
使用 QEMU 5.1 创建的计算机上运行的来宾,则接收 QEMU 需要启动
qemu-system-ppc64 -machine pseries-5.1 (...)
注意:以下内容适用于上游 QEMU。发行版可能在其构建中支持不同版本的机器类型。
此列表自 QEMU 6.2 起;将来可能会添加新版本的机器类型,有时旧版本的机器类型会被弃用和删除。下一个 QEMU 版本的机器类型通常在发布周期的早期引入(至少,这是目标......)
该virt
机器类型支持 2.6 以后的版本。
该virt
机器类型支持 6.0 以后的版本。
该pseries
机器类型支持 2.1 之后的版本。
该s390-ccw-virtio
机器类型支持 2.4 以后的版本。
机器pc-i440fx
类型支持1.4以后的版本(以前还有更老的版本,但是已经被删除了),而pc-q35
机器类型支持2.4以后的版本。
这里还需要考虑另一件事:pc
机器类型别名(从 QEMU 6.2 开始)指向最新的pc-i440fx
机器类型;如果您想要最新的
pc-q35
机器类型,则必须使用q35
.
如果您只想启动 QEMU 实例并再次关闭它,而不希望将其迁移到任何地方,则可以坚持使用默认机器类型。但是,如果您以后可能想要迁移机器,那么明确指定版本化机器类型可能是个好主意,这样您就不必记住启动时使用的 QEMU 版本。
或者直接使用libvirt之类的管理软件,它会自动帮你把机器类型扩展到最新版本,以后就不用担心了。
兼容机种的使用部分就到此结束;后续文章将介绍如何实际实施。
ref:https://people.redhat.com/~cohuck/2022/01/05/qemu-machine-types.html
收了一台pixel5,看到如题的提示
解决:
恢复出厂设置
用的是惠普dl360服务器,增加了几块磁盘后,发现ubuntu中看不到。
新增6块:
2块保留sata模式
4块组成raid6
lsblk
NAME MAJ:MIN RM SIZE RO TYPE MOUNTPOINTS
loop0 7:0 0 4K 1 loop /snap/bare/5
loop1 7:1 0 63.4M 1 loop /snap/core20/1974
loop2 7:2 0 63.9M 1 loop /snap/core20/2182
loop3 7:3 0 73.9M 1 loop /snap/core22/858
loop4 7:4 0 237.2M 1 loop /snap/firefox/2987
loop5 7:5 0 349.7M 1 loop /snap/gnome-3-38-2004/143
loop6 7:6 0 485.5M 1 loop /snap/gnome-42-2204/120
loop7 7:7 0 497M 1 loop /snap/gnome-42-2204/141
loop8 7:8 0 91.7M 1 loop /snap/gtk-common-themes/1535
loop9 7:9 0 12.3M 1 loop /snap/snap-store/959
loop10 7:10 0 53.3M 1 loop /snap/snapd/19457
loop11 7:11 0 40.4M 1 loop /snap/snapd/20671
loop12 7:12 0 452K 1 loop /snap/snapd-desktop-integration/83
sda 8:0 0 2.2T 0 disk
sdb 8:16 0 238.5G 0 disk
├─sdb1 8:17 0 512M 0 part /boot/efi
└─sdb2 8:18 0 238G 0 part /var/snap/firefox/common/host-hunspell
/
sdc 8:32 0 745.2G 0 disk
sdd 8:48 0 745.2G 0 disk
sde 8:64 0 512M 1 disk
└─sde1 8:65 0 509.8M 1 part /media/zcj/VID
# 格式化成 Ext4
mkfs.ext4 /dev/vdb1
# 格式化为 XFS
apt install xfsprogs
mkfs.xfs /dev/vdb2
# 格式化为 Btrfs
apt install btrfs-progs
mkfs.btrfs /dev/vdb3
这里我们选择xfs
sudo mkfs.xfs /dev/sdc
meta-data=/dev/sdc isize=512 agcount=4, agsize=48838262 blks
= sectsz=4096 attr=2, projid32bit=1
= crc=1 finobt=1, sparse=1, rmapbt=0
= reflink=1 bigtime=0 inobtcount=0
data = bsize=4096 blocks=195353046, imaxpct=25
= sunit=0 swidth=0 blks
naming =version 2 bsize=4096 ascii-ci=0, ftype=1
log =internal log bsize=4096 blocks=95387, version=2
= sectsz=4096 sunit=1 blks, lazy-count=1
realtime =none extsz=4096 blocks=0, rtextents=0
Discarding blocks...Done.
mount -t xfs /dev/sdc /disk2
sudo mkfs.xfs /dev/sda
mkfs.xfs: /dev/sda appears to contain a partition table (gpt).
mkfs.xfs: Use the -f option to force overwrite.
这里提示无法挂载,有gpt分区表,因为确认是新raid,我们选择强制格式化,加-f参数:
sudo mkfs.xfs -f /dev/sda
df -h 查看挂载结果
vim /etc/fstab
/swapfile none swap sw 0 0
/dev/sdc /disk2 xfs defaults 0 0
/dev/sdd /disk3 xfs defaults 0 0
生效查看:
mount -a
fatal: not in a git directory
Error: Command failed with exit 128: git
首先 网上说的那个git config 是没用的,我是在brew -v 正常的情况下,出现这个错误的,
所以,继续搜索...
解决:
执行 brew doctor,然后按照提示,把所有的warnning消除掉,然后就正常了
brew doctor
Your system is ready to brew.
brew update --verbose
Checking if we need to fetch /opt/homebrew/Homebrew...
Fetching /opt/homebrew/Homebrew...
Checking if we need to fetch formula.jws.json...
Checking if we need to fetch cask.jws.json...
Checking if we need to fetch formula_tap_migrations.jws.json...
Checking if we need to fetch cask_tap_migrations.jws.json...
Already up-to-date.
安装:
cd /opt/homebrew/
/bin/zsh -c "$(curl -fsSL https://gitee.com/huwei1024/HomebrewCN/raw/master/Homebrew.sh)"
消除告警:
git config --global --add safe.directory /opt/homebrew/Homebrew/Library/Taps/homebrew/homebrew-core git config --global --add safe.directory /opt/homebrew/Homebrew/Library/Taps/homebrew/homebrew-cask
最后将brew路径写入shell配置 .zshrc
export PATH=$PATH:/opt/homebrew/bin
最终一键脚本:ssc-1key-linux
系统: Ubuntu 22.04
{
"server": "您服务器地址",
"server_port": 9999,
"local_address": "127.0.0.1",
"local_port": 1080,
"password": "密码",
"timeout": 600,
"method": "aes-256-cfb"
}
解决sodium库问题
sudo ln -s /usr/lib/x86_64-linux-gnu/libsodium.a /usr/lib/x86_64-linux-gnu/liblibsodium.a
设置路径权限
sudo chmod 777 /var/log
sudo chmod 777 /var/run
shadowsocks 开机自启动
sudo vim /etc/systemd/system/shadowsocks.service:
Description=Shadowsocks Client Service
After=network.target
[Service]
Type=simple
User=root
ExecStart=/usr/local/bin/sslocal -c /etc/shadowsocks.json restart
[Install]
WantedBy=multi-user.target
systemctl enable shadowsocks.service
实现全局代理,我们可以使用polipo
polipo 安装
wget http://archive.ubuntu.com/ubuntu/pool/universe/p/polipo/polipo_1.1.1-8_amd64.deb
安装 sudo dpkg -i polipo_1.1.1-8_amd64.deb
配置 vi /etc/polipo/config
logSyslog = true
logFile = /var/log/polipo/polipo.log
proxyAddress = "0.0.0.0"
socksParentProxy = "127.0.0.1:1080"
socksProxyType = socks5
chunkHighMark = 50331648
objectHighMark = 16384
serverMaxSlots = 64
serverSlots = 16
serverSlots1 = 32
polipo安装后会自动运行。
通过polipo设置本地http代理
export http_proxy=http://127.0.0.1:8123
export https_proxy=http://127.0.0.1:8123
取消代理
unset http_proxy
unset https_proxy
如果想使用http下的pac机制,可以考虑用provoxy替换polipo
provoxy 安装
安装:sudo apt-get install -y privoxy
cp /etc/privoxy/config /etc/privoxy/config.bak
vim /etc/privoxy/config
确保 listen-address 127.0.0.1:8118
打开
在/etc/profile, ~/.bashrc,~/.bash_profile 中添加:
proxy="http://127.0.0.1:8118"
export https_proxy=$proxy
export http_proxy=$proxy
export ftp_proxy=$proxy
systemctl enable privoxy
systemctl restart privoxy
GFWList2Privoxy 制作pac条目
pip install gfwlist2privoxy
添加自定义域名:在生成的gfwlist.action文件中添加需要通过proxy访问的域名
使pac生效:在/etc/privoxy/config文件中加上actionsfile gfwlist.action,然后重启privoxy服务
/home/zcj/.local/lib/python3.10/site-packages/shadowsocks/lru_cache.py
34行 MutableMapping
前面加上abc.
凭着些许的记忆,我找到了《燕尾蝶》,那是少年时的震撼,一直萦绕于心,趁这个春节有空,得以找到资源。重温后,却感觉些许的迷茫,一种破碎记忆的感觉,时间太久远了,记忆已经模糊,感觉就是印象中的故事,又感觉有些生疏,因为印象中没有这么多细节,我只记依稀得移民,黑社会,各种混杂的语言,昏暗的画面。。。
一时恍惚。
我又仔细搜索了下,着实找不到第二个能对的上记忆的影片,只能悻悻道,可能就是它吧。
人的记忆是会变的,趁年轻,多写些记忆吧。
https://developers.google.cn/android/images?hl=zh-cn#crosshatch
https://www.qemu.org/download/#windows
For 64 bit Windows 8.1 or above (in UCRT64):
pacman -S mingw-w64-ucrt-x86_64-qemu
qemu-img --version
qemu-img version 8.2.0
Copyright (c) 2003-2023 Fabrice Bellard and the QEMU Project developers
qemu-system-aarch64
先login
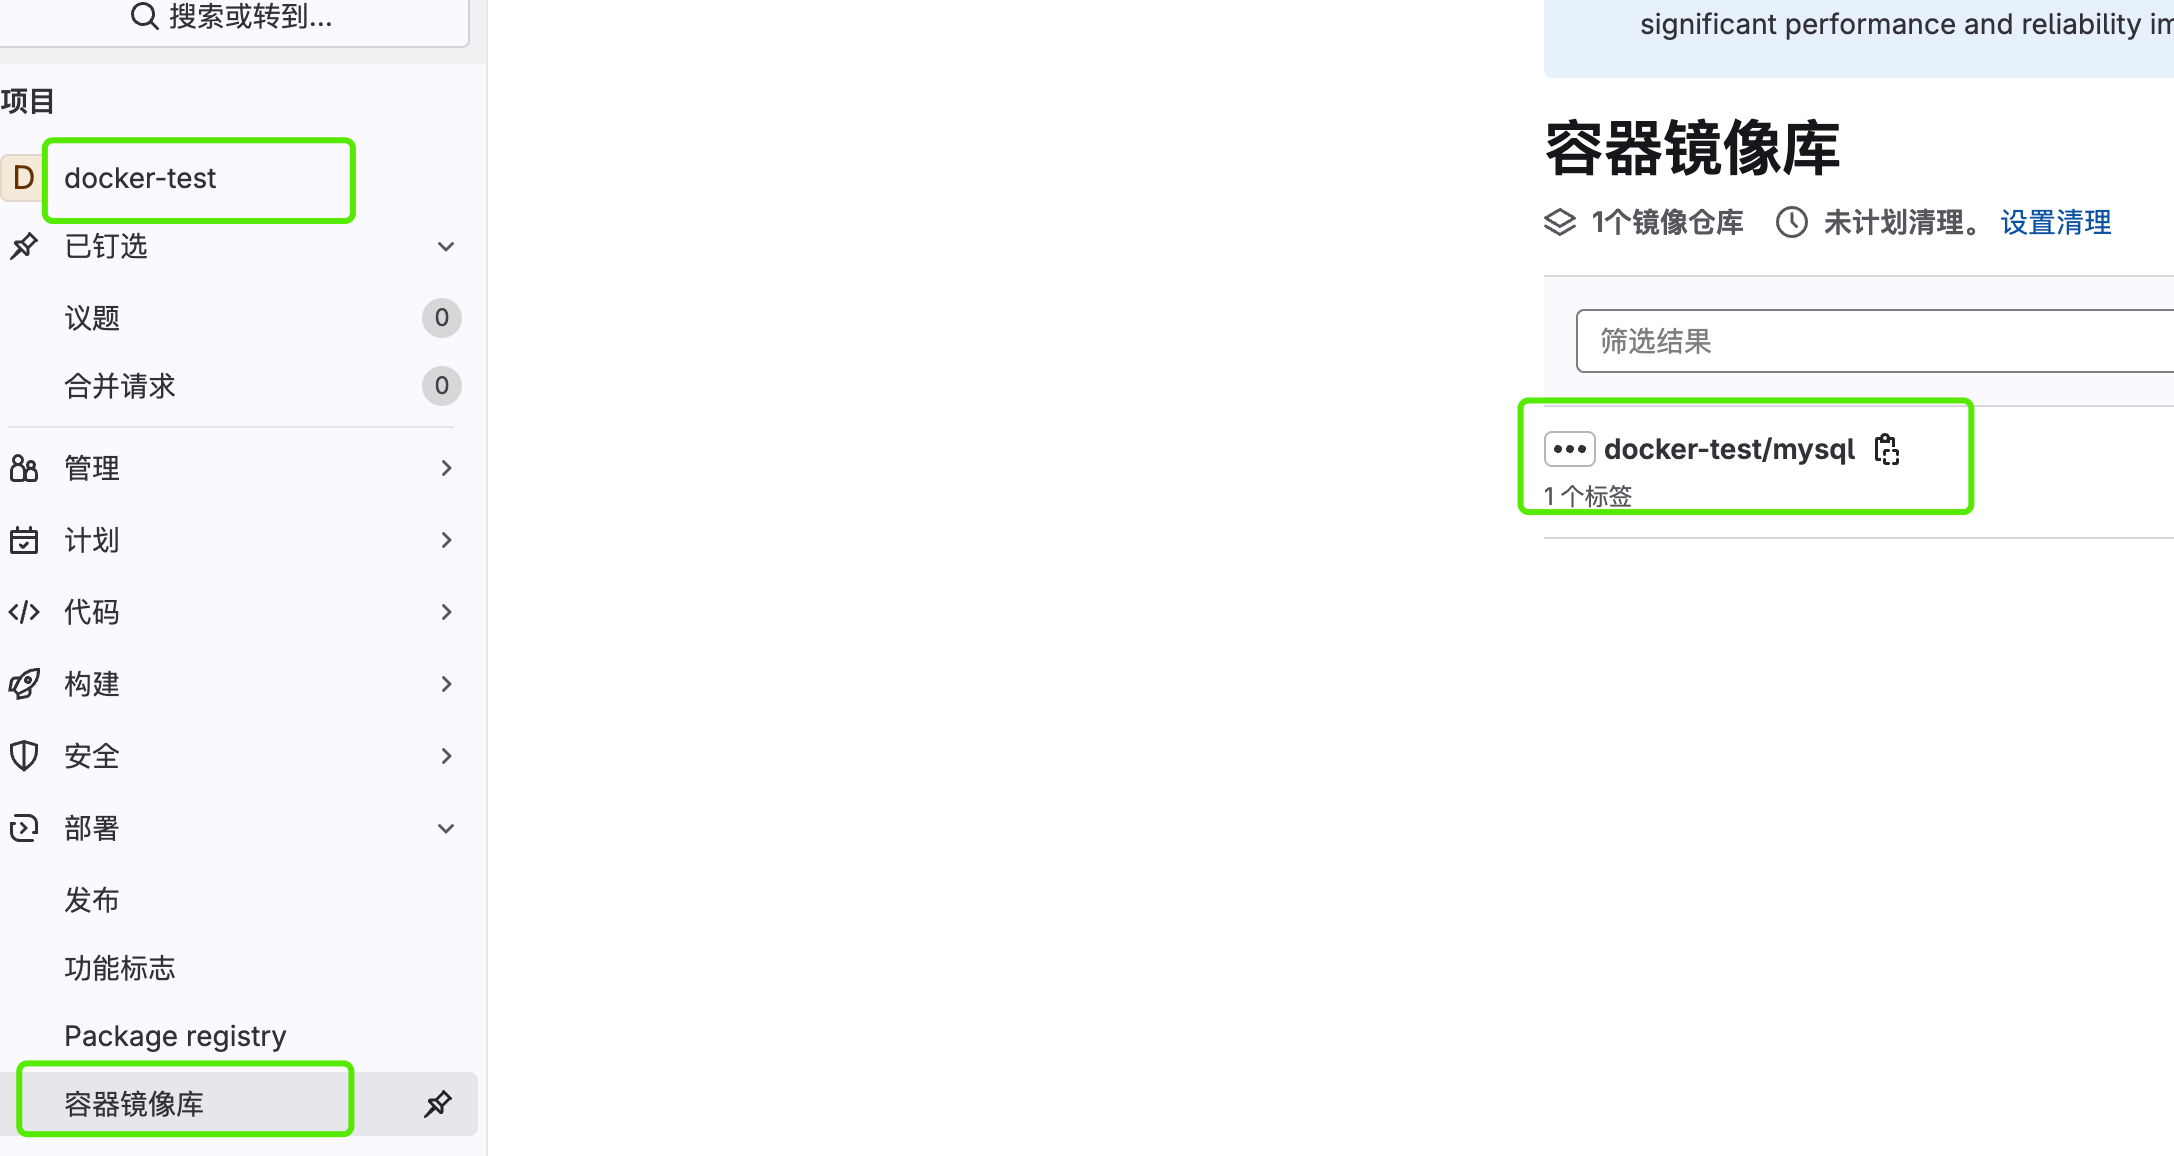
docker login registry.gitlab.com
输入正确的的账号和密码。然后 token就会被自动保存在:
/root/.docker/config.json
账号一般是邮箱
后面就可以像使用普通镜像一样直接run了
某些地方我们需要uuid
cat /dev/urandom | od -x | head -1 | awk '{print $2$3"-"$4"-"$5"-"$6"-"$7$8$9}'
安装后提示:
docker is already the newest version (1.5-2)
但是运行docker 命令提示找不到。
然后重新安装:
curl -sSL https://get.docker.com/ | sudo sh
提示:
The repository 'https://download.docker.com/linux/ubuntu bookworm Release' does not have a Release file.
cd /etc/apt/sources.list.d/
发现有个 archive_uri-https_download_docker_com_linux_ubuntu-bookworm.list
rm archive_uri-https_download_docker_com_linux_ubuntu-bookworm.list
删除后再执行,就正常了。
Client: Docker Engine - Community
Version: 25.0.3
API version: 1.44
Go version: go1.21.6
Git commit: 4debf41
Built: Tue Feb 6 21:14:25 2024
OS/Arch: linux/amd64
Context: default
Server: Docker Engine - Community
Engine:
Version: 25.0.3
API version: 1.44 (minimum version 1.24)
Go version: go1.21.6
Git commit: f417435
Built: Tue Feb 6 21:14:25 2024
OS/Arch: linux/amd64
Experimental: false
containerd:
Version: 1.6.28
GitCommit: ae07eda36dd25f8a1b98dfbf587313b99c0190bb
runc:
Version: 1.1.12
GitCommit: v1.1.12-0-g51d5e94
docker-init:
Version: 0.19.0
GitCommit: de40ad0
看日志:
gitlab-ctl tail
看运行状态:
gitlab-ctl status
配置:
vi /etc/gitlab/gitlab.rb
打开屏蔽,然后 gitlab-ctl reconfigure
网上的一份最简配置
external_url 'http://git.xxx.com'
gitlab_rails['time_zone'] = 'Asia/Shanghai'
# 关闭电子邮件相关功能
gitlab_rails['smtp_enable'] = false
gitlab_rails['gitlab_email_enabled'] = false
gitlab_rails['incoming_email_enabled'] = false
# Terraform
gitlab_rails['terraform_state_enabled'] = false
# Usage Statistics
gitlab_rails['usage_ping_enabled'] = false
gitlab_rails['sentry_enabled'] = false
grafana['reporting_enabled'] = false
# 关闭容器仓库功能
gitlab_rails['gitlab_default_projects_features_container_registry'] = false
gitlab_rails['registry_enabled'] = false
registry['enable'] = false
registry_nginx['enable'] = false
# 包仓库
gitlab_rails['packages_enabled'] = false
gitlab_rails['dependency_proxy_enabled'] = false
# GitLab KAS
gitlab_kas['enable'] = false
gitlab_rails['gitlab_kas_enabled'] = false
# Mattermost
mattermost['enable'] = false
mattermost_nginx['enable'] = false
# Kerberos
gitlab_rails['kerberos_enabled'] = false
sentinel['enable'] = false
# GitLab Pages
gitlab_pages['enable'] = false
pages_nginx['enable'] = false
# 禁用 PUMA 集群模式
puma['worker_processes'] = 0
puma['min_threads'] = 1
puma['max_threads'] = 2
# 降低后台守护进程并发数
sidekiq['max_concurrency'] = 5
gitlab_ci['gitlab_ci_all_broken_builds'] = false
gitlab_ci['gitlab_ci_add_pusher'] = false
# 关闭监控
prometheus_monitoring['enable'] = false
alertmanager['enable'] = false
node_exporter['enable'] = false
redis_exporter['enable'] = false
postgres_exporter['enable'] = false
pgbouncer_exporter['enable'] = false
gitlab_exporter['enable'] = false
grafana['enable'] = false
sidekiq['metrics_enabled'] = false
curl -s https://packages.gitlab.com/install/repositories/gitlab/gitlab-ee/script.deb.sh | bash
否则会报找不到gitlab-ee
GITLAB_ROOT_PASSWORD="xxx" EXTERNAL_URL="http://xx.example.com" apt install gitlab-ee
经常简单微博上分享的歌曲合集是mp4的,很烦恼,如何提取mp3:
ffmpeg.exe -i input.mp4 -vn -b:v 211k -b:a 128k -ar 44.1k -c:a mp3 output.mp3
最近发现app无法更新
看网上好几个gitee的版本,但是尝试后,下面这个可用
find -type d -empty | xargs -n 1 rm -rf
按理说find就是递归的,但是测试出一次没有删除完全的case,目标目录中有空格,没有深究,待日后遇到再细究
当你拿到一台新的惠普服务器后,第一重要和有用的任务就是设置iLO。
通过以下的步骤,你将会设置iLO的用户和密码以及相关网络信息
arm-none-eabi-gcc: error: unrecognized command line option '-rdynamic'
这个是cmake 和 arm-none-eabi-gcc公用的一个问题,本质是cmake跟gcc的兼容性,none-eabi 不支持dynamic 选项。
目前的一个方案就是不要用cmake ,直接用gcc 参数拼接脚本,或者用别的编译框架
去除某项功能,创造新的产品
将某项功能,改变空间形态实现,比如控制面板移除到遥控上,优化产品形态体积。
功能性除法:将某个功能改变其位置
物理型除法:将产品随机分解成若干部分
保留型出发:吧产品缩小
属性依存策略是在两个先前没有关联的变量之间制造依存关系。