IAR的link配置
不像STVD有详实的UI界面来配置详细的link参数,IAR无法无法细致的展现这些参数,那么如何配置这些参数呢,比如section,内存起始等。
在我们创建IAR的工程时,会生成EWSTM8目录,在目录下面的icf文件,就是默认iar工程加载的配置文件。没有的话,也可以自己修改或者从其他工程拿模板来修改。
不像STVD有详实的UI界面来配置详细的link参数,IAR无法无法细致的展现这些参数,那么如何配置这些参数呢,比如section,内存起始等。
在我们创建IAR的工程时,会生成EWSTM8目录,在目录下面的icf文件,就是默认iar工程加载的配置文件。没有的话,也可以自己修改或者从其他工程拿模板来修改。
有时候拿到的开发板或者其他ST的产品在IAR中烧录时会提示写保护。
解决的办法:
用STVP进行一次写入(默认会擦除flash,所以标识也被擦除了)Program the current tab
今天突然反馈说硬件ftp无法下载了,这期间没有动过相关的部分。于是开始测试分析。
在filezilla中,发现了如下的日志:
服务器发回了不可路由的地址。使用服务器地址代替。
但是可以正常下载。但是硬件设备就无法下载文件。
网上一堆相同的文章和改客户端为主动方式的解决方案,基本无用。
仔细分析,应该还是这个提示在硬件中有影响,打开详细日志,能看到更多信息:
响应: 227 Entering Passive Mode (0,0,0,0,39,62).
状态: 服务器发回了不可路由的地址。使用服务器地址代替。
本能想就应该是指0.0.0.0这个地址了。
据此为线索搜索如下:
https://stackoverflow.com/questions/41046707/vsftpd-returns-0-0-0-0-in-response-to-pasv
https://serverfault.com/questions/821025/vsftpd-passive-reply-with-0-0-0-0-address-even-with-correct-pasv-address
最终修改配置文件:
#connect_from_port_20=YES
pasv_enable=YES
pasv_min_port=10000
pasv_max_port=10050
pasv_address=1.2.3.4
pasv_addr_resolve=YES
pasv_promiscuous=YES
listen_ipv6=NO
listen=YES
其中1.2.3.4是云主机的外网地址,不是本机网卡地址。
测试通过,硬件又恢复了。说明硬件也是实现的是pasv方式的ftp获取。
造成这个可能原因:
根据上面的两个帖子,这个问题可能是IPV6环境下的bug
这个在本机被远程挂马时后很有用,自己体会下:
iptables -A OUTPUT -p tcp -d 104.20.208.21/24 --dport 80 -m state --state NEW,ESTABLISHED -j DROP
iptables -A OUTPUT -p tcp -d 104.20.208.21/24 --dport 443 -m state --state NEW,ESTABLISHED -j DROP
参考:http://www.xker.com/page/e2012/0926/120758.html
php下使用redis
先去官网看了下php的client支持,选择了:https://github.com/hiproz/php-redis-client
根据文档描述,只支持到redis4.0,所以我们需要安装redis4.0
下载 redis4.0
编译:
$ wget http://download.redis.io/releases/redis-5.0.0.tar.gz
$ tar xzf redis-5.0.0.tar.gz
$ cd redis-5.0.0
$ make
编译完成后,执行文件就在 src目录下,启动redis server
src/redis-server
安装好后,就可以用本地内置的client来测试:
$ src/redis-cli
redis> set foo bar
OK
redis> get foo
"bar"
make install 后,reids在源码的util目录下提供了可以直接创建系统service的脚本install_server.sh。直接执行,就可以安装成系统服务:
[root@sz-svr1 utils]# ./install_server.sh
Welcome to the redis service installer
This script will help you easily set up a running redis server

Please select the redis port for this instance: [6379]
Selecting default: 6379
Please select the redis config file name [/etc/redis/6379.conf]
Selected default - /etc/redis/6379.conf
Please select the redis log file name [/var/log/redis_6379.log]
Selected default - /var/log/redis_6379.log
Please select the data directory for this instance [/var/lib/redis/6379]
Selected default - /var/lib/redis/6379
Please select the redis executable path [/usr/local/bin/redis-server]
Selected config:
Port           : 6379
Config file    : /etc/redis/6379.conf
Log file       : /var/log/redis_6379.log
Data dir       : /var/lib/redis/6379
Executable     : /usr/local/bin/redis-server
Cli Executable : /usr/local/bin/redis-cli
设置成开机自启动:
[root@sz-svr1 /]# systemctl enable redis_6379
redis_6379.service is not a native service, redirecting to /sbin/chkconfig.
Executing /sbin/chkconfig redis_6379 on
在设置密码后,在我们用systemctl stop redis_xxxx时,redis不会停止,一直输出:
Waiting for Redis to shutdown ...
Waiting for Redis to shutdown ...
Waiting for Redis to shutdown ...
Waiting for Redis to shutdown ...
Waiting for Redis to shutdown ...
所以我们需要在结束指令中,增加密码参数。具体修改自行参看/etc/rc.d/init.d/reids_xxxx
至此,我们的环境完成了,我们执行测试代码 examples/raw_commands.php,在浏览器输入路径后,页面显示:
result: bar result: bar result: or value with spaces
观察php日志,确认代码,我们知道页面的结果是正确的。
支持php环境下的redis支持就完成了,剩下的就是码业务逻辑了。
hanve fun!
默认操作系统集成了对应版本的php版本,但是有时候我们因为要运行特定的程序,需要特定版本的php:
yum install phpXXw
XX的版本,可以参考php官网中的版本分支记录,寻找到合适的版本。
注意在安装新版本前,要卸载系统默认已经安装的所有php相关组件。
在测试开源代码时,提示vendor/autoload.php找不到。
vendor是composer安装后的系统依赖,默认项目里面是没有的。
wget -nc http://getcomposer.org/composer.phar
php composer.phar
mv composer.phar /usr/local/bin/composer
composer -V一般使用composer的工程,目录下都有现成的配置文件composer.json,主要描述了工程需要的各种依赖和需求:
{
  "name": "cheprasov/php-redis-client",
  "version": "1.8.0",
  "description": "Php client for Redis. It is a fast, fully-functional and user-friendly client for Redis, optimized for performance. RedisClient supports the latest versions of Redis starting from 2.6 to 4.0",
  "homepage": "http://github.com/cheprasov/php-redis-client",
  "minimum-stability": "stable",
  "license": "MIT",
  "authors": [
    {
      "name": "Alexander Cheprasov",
      "email": "acheprasov84@gmail.com"
    }
  ],
  "autoload": {
    "psr-0": {
      "RedisClient\\": "src"
    }
  },
  "require": {
    "php": ">=5.5"
  },
  "require-dev": {
    "phpunit/phpunit": "4.8.*",
    "cheprasov/php-extra-mocks": "^1.0.0"
  }
}
我们在项目的的composer.json同级目录下执行:
composer install
正常成功后:
Writing lock file
Generating autoload files
至此,verdor目录生成
如果没有安装过composer,也可以直接通过php安装,在项目根目录下执行(有composer.json的目录):
php composer.phar require xxx
xxx是composer.json 中的name字段。
系统中yum 和make install的路径是不同的。但是由于PATH路径的优先级问题,很多时候不同场景是不同的版本在生效,导致混乱。
如果源代码没有支持uninstall,怎么干净的卸载完所有的安装包呢,没有捷径,只有本笨办法:
1. 重新编译部署一次,使用--prefix=/xxx/xxx/ 指定make install的目录: ./configure --prefix=/tmp/packname/ && make && sudo make install
2. 根据安装完后的目录层次,依次手动在现有系统中删除对应的文件。
3. 重启相关的服务。
正常在系统版本兼容的情况下,只需要yum就可以全部安装:
yum install php
yum install php-fpm
yum install php-pdo
yum install php-mysql
pdo_mysql.so 驱动就在php-mysql包中。
如果yum安装的pdo_mysql加载有问题:
php -m
看不到对应的pdo_mysql,或者
php -v
有pdo_mysql相关的warning或者错误,则可以参考用源码编译:
pdo_mysql源码编译(github)
资料整理,避免下次再浪费时间,待细化:
在CentOS中默认安装有MariaDB,这个是MySQL的分支,但为了需要,还是要在系统中安装MySQL,而且安装完成之后可以直接覆盖掉MariaDB。
1 下载并安装MySQL官方的 Yum Repository
[root@localhost ~]# wget -i -c http://dev.mysql.com/get/mysql57-community-release-el7-10.noarch.rpm
使用上面的命令就直接下载了安装用的Yum Repository,大概25KB的样子,然后就可以直接yum安装了。
[root@localhost ~]# yum -y install mysql57-community-release-el7-10.noarch.rpm
之后就开始安装MySQL服务器。
[root@localhost ~]# yum -y install mysql-community-server
这步可能会花些时间,安装完成后就会覆盖掉之前的mariadb。
至此MySQL就安装完成了,然后是对MySQL的一些设置。
2 MySQL数据库设置
首先启动MySQL
[root@localhost ~]# systemctl start mysqld.service
查看MySQL运行状态,运行状态如图:
[root@localhost ~]# systemctl status mysqld.service
此时MySQL已经开始正常运行,不过要想进入MySQL还得先找出此时root用户的密码,通过如下命令可以在日志文件中找出密码:
[root@localhost ~]# grep "password" /var/log/mysqld.log
如下命令进入数据库:
[root@localhost ~]# mysql -uroot -p
输入初始密码,此时不能做任何事情,因为MySQL默认必须修改密码之后才能操作数据库:
mysql> ALTER USER 'root'@'localhost' IDENTIFIED BY 'new password';
这里有个问题,新密码设置的时候如果设置的过于简单会报错:
原因是因为MySQL有密码设置的规范,具体是与validate_password_policy的值有关:
MySQL完整的初始密码规则可以通过如下命令查看:
复制代码
mysql> SHOW VARIABLES LIKE 'validate_password%';
+--------------------------------------+-------+
| Variable_name | Value |
+--------------------------------------+-------+
| validate_password_check_user_name | OFF |
| validate_password_dictionary_file | |
| validate_password_length | 4 |
| validate_password_mixed_case_count | 1 |
| validate_password_number_count | 1 |
| validate_password_policy | LOW |
| validate_password_special_char_count | 1 |
+--------------------------------------+-------+
7 rows in set (0.01 sec)
复制代码
密码的长度是由validate_password_length决定的,而validate_password_length的计算公式是:
validate_password_length = validate_password_number_count + validate_password_special_char_count + (2 * validate_password_mixed_case_count)
我的是已经修改过的,初始情况下第一个的值是ON,validate_password_length是8。可以通过如下命令修改:
mysql> set global validate_password_policy=0;
mysql> set global validate_password_length=1;
设置之后就是我上面查出来的那几个值了,此时密码就可以设置的很简单,例如1234之类的。到此数据库的密码设置就完成了。
但此时还有一个问题,就是因为安装了Yum Repository,以后每次yum操作都会自动更新,需要把这个卸载掉:
[root@localhost ~]# yum -y remove mysql57-community-release-el7-10.noarch
此时才算真的完成了。
关闭防火墙:
[root@localhost system]# systemctl stop firewalld.service
[root@localhost system]# systemctl disable firewalld.service
Removed symlink /etc/systemd/system/multi-user.target.wants/firewalld.service.
Removed symlink /etc/systemd/system/dbus-org.Fedoraproject.FirewallD1.service.
设置mysql的开机启动:
[root@localhost system]# systemctl enable mysqld
Created symlink from /etc/systemd/system/multi-user.target.wants/mysqld.service to /usr/lib/systemd/system/mysqld.service.
[root@localhost system]# systemctl list-unit-files | grep mysqld
mysqld.service enabled
取消mysql的开机自启动:
[root@localhost system]# systemctl disable mysqld
Removed symlink /etc/systemd/system/multi-user.target.wants/mysqld.service.
[root@localhost system]# systemctl list-unit-files | grep mysqld
mysqld.service disabled
mcu:STM8L051F3P6,属于 STM8L Series low density
已经内置bootloader的mcu

没有内置bootloader的mcu

bootloader执行流程图:

ota 同步消息SYNCHR=0x7F
支持传输的外设

从图上看,051F支持UART或者SPI
UART设置:1 start bit, 8 data bit, 1 bit 奇校验 ,1 stop bit
波特率:通过0x7F的传输,自动适配波特率,最大115200,最小4800.
传输回复
串口:1 start bit, 8 data bit, no parity bit, 1 stop bit,波特率自适应
SPI设置
• 8 data bit, MSB first
• Bit rate: Set by the host which acts as a master
• Peripheral set in slave mode with software management of NSS
• Data polarity: CPOL = 0 (SCK to 0 when idle), CPHA = 0 (the first clock transition is the
first data capture edge).
收到命令后,bl回复ACK 0x79
从资源的角度,我们倾向于使用spi做外设,因为uart可以预留来做用户调试用,但是目前官方提供了uart的串口下载PC客户端,方便测试。所以目前看使用uart作为bl外设可能更方便。这里也就要求选用单片机时,最好是多串口的设备。
关键点检测后,要跳转的地址表:

目前我们可以先考虑实现串口的版本,但是最后还是SPI的更实用。
完整文档:UM0560
详细完整参见:
https://github.com/Neilpang/acme.sh/wiki/说明
文章已经讲的很详细了,现就就DNS和通配相关的使用做简要摘录和关键步骤说明
想要实现通配证书,目前dns方式是唯一的方式。
安装
curl https://get.acme.sh | sh重定向
打开 .bashrc,添加 alias acme.sh=~/.acme.sh/acme.sh ,方便命令输入
生成证书。
默认dns是需要手动添加域名记录验证归属合法性的,通过dnspod这样的第三方平台 API,我们就可以实现自动验证的功能。
export DP_Id="1234"
export DP_Key="sADDsdasdgdsf"
acme.sh --issue --dns dns_dp -d *.aa.comdnspod的token申请路径:https://www.dnspod.cn/console/user/security
这期间可能提示你需要:
acme.sh --register-account -m aaa@bbb.com注意,DNS的账号信息,只需要操作一次,系统会自动记录到配置文件,后面直接使用"--dns dns_dp" 就可以。
~/.acme.sh/通配域名/注意,下面的命令不会自动创建目录,如果目录不存在,需要手动提前创建。
rsa 密钥:
acme.sh --install-cert -d *.aa.com --key-file /path/domain/privkey.pem --fullchain-file /path/domian/fullchain.pem --reloadcmd "systemctl force-reload nginx.service"说明:以上两个路径是安装的目的地址,也就是将第3步的证书内容,按照这个命令中的地址,进行安装。
ecc 密钥:
acme.sh --install-cert --ecc -d *.aa.com --key-file /path/domain/privkey.pem --fullchain-file /path/domian/fullchain.pem --reloadcmd "systemctl force-reload nginx.service"以上相关的操作都会被acme脚本自动记录,并且在证书自动更新的时候会自动执行。
证书的更新
完成以上后,acme就会自动帮你更新证书了。
acme.sh本身的自动更新
开启:acme.sh --upgrade --auto-upgrade
关闭:acme.sh --upgrade --auto-upgrade 0
acme的卸载
acme.sh --uninstall
点击项目和平台时,VSC提示错误:
ENOENT: no such file or directory, scandir 'C:\Users\xxx.aos\AliOS-Things\board'
很显然是alios-studio插件的系统路径和实际安装的不符。
在VSC中,点击设置,在右侧有"用户设置"和"工作区设置",点击工作区设置,指定对应的路径如下:
{
  "aliosStudio.sdkPath": "xxxxx\\AliOS-Things"
}
仅供参考,其中对vue-element-admin 的移动性适配表述不准确,最新的经过体验,是支持自适配的。
$cfg['blowfish_secret'] 参数,参数字符串长度必须在32位以上。sudo mkdir -m 777 ./tmpVivamus fringilla euismod pharetra. Proin cursus gravida nunc a placerat. Nunc nec sollicitudin nibh. Sed vel elementum lectus. Nunc nec congue quam, vitae varius massa. Pellentesque habitant morbi tristique senectus et netus et malesuada fames ac turpis egestas. Fusce eu consectetur mi.

Vestibulum et euismod nulla. Fusce quam nulla, tincidunt ac dignissim porta, facilisis id turpis. Ut viverra pharetra massa, et auctor orci convallis sit amet. Nullam eu vulputate elit. Fusce nunc purus, hendrerit vitae est vitae, feugiat consectetur urna. Praesent eget nisl at nibh tincidunt gravida vitae sit amet nibh.
Listening sounds like a ridiculous characteristic for mentoring, but genuinely being invested and interested in people, meeting them for cups of coffee and spending time with people, and using the network I've been very lucky to build up to help others are all things I do to help others.
Sinead Burke

Morbi purus augue, varius at enim. Morbi molestie cursus dolor, nec lacinia velit dictum eget. Cras tortor nisi, porttitor eget malesuada ac, vestibulum non justo. Integer vel molestie libero. Quisque eget sagittis enim, ut volutpat velit. Donec purus nisi, pharetra at consequat at, venenatis vel lectus.
Proin viverra consectetur felis, a accumsan felis tincidunt ut. Ut cursus lacus sed pulvinar viverra. Duis eu magna vestibulum risus dignissim condimentum quis sed nulla. Duis iaculis purus vel vestibulum facilisis. Sed gravida viverra dui pulvinar condimentum. Suspendisse eget eros at ipsum pulvinar pellentesque. Etiam ac nibh ut arcu gravida sollicitudin.
Etiam sed commodo libero, vel eleifend augue. Praesent arcu tellus, commodo non pulvinar sed, elementum ac felis. Integer id venenatis mi. Pellentesque ut diam quis enim dapibus semper. Quisque ullamcorper, risus non molestie volutpat, orci odio convallis metus, sed bibendum odio felis eu nunc.
Vivamus fringilla euismod pharetra. Proin cursus gravida nunc a placerat. Nunc nec sollicitudin nibh. Sed vel elementum lectus. Nunc nec congue quam, vitae varius massa. Pellentesque habitant morbi tristique senectus et netus et malesuada fames ac turpis egestas. Fusce eu consectetur mi.
Vestibulum et euismod nulla. Fusce quam nulla, tincidunt ac dignissim porta, facilisis id turpis. Ut viverra pharetra massa, et auctor orci convallis sit amet. Nullam eu vulputate elit. Fusce nunc purus, hendrerit vitae est vitae, feugiat consectetur urna. Praesent eget nisl at nibh tincidunt gravida vitae sit amet nibh.
Listening sounds like a ridiculous characteristic for mentoring, but genuinely being invested and interested in people, meeting them for cups of coffee and spending time with people, and using the network I've been very lucky to build up to help others are all things I do to help others.
Sinead Burke
Morbi purus augue, varius at enim. Morbi molestie cursus dolor, nec lacinia velit dictum eget. Cras tortor nisi, porttitor eget malesuada ac, vestibulum non justo. Integer vel molestie libero. Quisque eget sagittis enim, ut volutpat velit. Donec purus nisi, pharetra at consequat at, venenatis vel lectus.
Proin viverra consectetur felis, a accumsan felis tincidunt ut. Ut cursus lacus sed pulvinar viverra. Duis eu magna vestibulum risus dignissim condimentum quis sed nulla. Duis iaculis purus vel vestibulum facilisis. Sed gravida viverra dui pulvinar condimentum. Suspendisse eget eros at ipsum pulvinar pellentesque. Etiam ac nibh ut arcu gravida sollicitudin.
Etiam sed commodo libero, vel eleifend augue. Praesent arcu tellus, commodo non pulvinar sed, elementum ac felis. Integer id venenatis mi. Pellentesque ut diam quis enim dapibus semper. Quisque ullamcorper, risus non molestie volutpat, orci odio convallis metus, sed bibendum odio felis eu nunc.
目前发现一个问题在通过clang-format保存自动格式化时,函数的括号风格老是变化,一会是后置风格,一会是另起一行,如下所示:
风格1:
void fun(void){

}
风格2:
void fun(void)
{

}
本人想统一为风格1,无耐在VSC的UI里面各种参数尝试无果,于是找到官网:
找到相关的设置:
BraceWrapping (BraceWrappingFlags)
Control of individual brace wrapping cases.
If BreakBeforeBraces is set to BS_Custom, use this to specify how each individual brace case should be handled. Otherwise, this is ignored.
# Example of usage:
BreakBeforeBraces: Custom
BraceWrapping:
  AfterEnum: true
  AfterStruct: false
  SplitEmptyFunction: false
  afterFunction: true
其中设置函数后括号风格的:
bool AfterFunction Wrap function definitions.
true:
void foo()
{
  bar();
  bar2();
}

false:
void foo() {
  bar();
  bar2();
}
将以上的配置添加到.clang-format 文件中,放到VSC工程的根目录下,才能生效
路径:
/etc/php-fpm.d/www.conf
修改 :
listen = /var/run/php-fpm/php-fpm.sock
listen.mode = 0666
我们采用源码的方式安装:
git clone https://github.com/ErikDubbelboer/phpRedisAdmin.git
cd phpRedisAdmin
git clone https://github.com/nrk/predis.git vendor
安装后默认是不需要账户可以浏览的,如果要设置权限,修改 include/config.sample.inc.php 中的账号内容
下载
https://redis.io/
安装参考
http://ghoulich.xninja.org/2016/07/28/how-to-install-redis-in-centos/
需要先单独编译deps目录下的各组件,其他的缺少的工具按照提示安装就好了
rpm -Uvh https://dl.fedoraproject.org/pub/epel/epel-release-latest-7.noarch.rpm
rpm -Uvh https://mirror.webtatic.com/yum/el7/webtatic-release.rpm
yum clean all
yum makecache fast
yum install -y php71w-fpm  mod_php71w php71w-cli php71w-common \
php71w-gd php71w-mbstring php71w-mysqlnd \
php71w-xml  php71w-ldap
php -v
PHP 7.1.18 (cli) (built: Jun  2 2018 08:16:19) ( NTS )
Copyright (c) 1997-2018 The PHP Group
Zend Engine v3.1.0, Copyright (c) 1998-2018 Zend Technologies
sudo systemctl enable php-fpm参考:http://www.jslink.org/linux/centos-postfix-mailx-qq-smtp-sendmail.html
目前遗留的问题:
1) 发件人的昵称是root,没有跟随配置的发件人邮箱同步
如何设置IMAP、POP3/SMTP及其SSL加密方式?
如果您的电子邮件客户端支持SSL,可以在设置中选择使用SSL。
通用配置参数:
(我们已经默认都支持这些协议,用户无需自己手动开启这些服务器与端口)
POP3/SMTP协议
接收邮件服务器:pop.exmail.qq.com ,使用SSL,端口号995
发送邮件服务器:smtp.exmail.qq.com ,使用SSL,端口号465
海外用户可使用以下服务器
接收邮件服务器:hwpop.exmail.qq.com ,使用SSL,端口号995
发送邮件服务器:hwsmtp.exmail.qq.com ,使用SSL,端口号465
IMAP协议
接收邮件服务器:imap.exmail.qq.com ,使用SSL,端口号993
发送邮件服务器:smtp.exmail.qq.com ,使用SSL,端口号465
海外用户可使用以下服务器
接收邮件服务器:hwimap.exmail.qq.com ,使用SSL,端口号993
发送邮件服务器:hwsmtp.exmail.qq.com ,使用SSL,端口号465
账户名:您的企业邮箱账户名,账户名需要填写完整的邮件地址
密码:您的企业邮箱密码
电子邮件地址:您的企业邮箱的完整邮件地址
参考系统给的样例,封装了写入函数:
int usr_write_config_to_flash() {
  int ret;
  U32 offset = 0;
  // do {
  // 写入前要先擦除块
  info_block_erase();

  // 写入配置数据
  memset(flash_write_buf, 0, sizeof(flash_write_buf));
  memcpy(flash_write_buf, &sys_config, sizeof(sys_config));
  offset = 0;

  ret = am_hal_flash_program_info(AM_HAL_FLASH_PROGRAM_KEY,
                                  0, // we are only supporting INFO on instance 0.
                                  flash_write_buf,
                                  offset / 4,                    // offset
                                  (sizeof(sys_config) + 3) / 4); // num words
  //} while (ret);

  if (ret) {
    log(ERR, "am_hal_flash_program_info at offset 0x%08x i32ReturnCode = 0x%x.\n", offset, ret);
    return ERROR;
  }
  log(RUN, "flash write success\r\n");
  return SUCCESS;
}
系统的样例是正常的,因为没有别的业务逻辑,我的代码在开机执行也是正常的,但是在业务中调用 am_hal_flash_program_info 函数时就会随机失败,开始一直怀疑是地址区段的问题,各种尝试都不行,后来看函数的原型,发现下面的文字说明,才恍然一惊:

看到蓝色标识的部分,才想到是不是被系统的定时器中断影响了,因为系统起来后开启了很多定时器中断,于是在擦除和写入的逻辑区间关闭了中断,于是就没有再发现失败了。
浪费了半天时间,惭愧,特此随记,以示教训:在没有相关文档的情况下,要仔细看函数原型的任何一行说明文字
遇到的问题:clang-format 启动自动格式化后,每次自动换行的宽度太窄,导致大量的自动换行,影响代码美观。
解决:
以默认的.clang-format 配置文件为模板,修改ColumnLimit参数:
Language: Cpp
ColumnLimit: 120
最后将.clang-format 文件放到工程的根目录下,重新开启VSC,生效。
其中 Language的设置如下:
Language (LanguageKind)
Language, this format style is targeted at.

Possible values:

LK_None (in configuration: None) Do not use.
LK_Cpp (in configuration: Cpp) Should be used for C, C++.
LK_Java (in configuration: Java) Should be used for Java.
LK_JavaScript (in configuration: JavaScript) Should be used for JavaScript.
LK_ObjC (in configuration: ObjC) Should be used for Objective-C, Objective-C++.
LK_Proto (in configuration: Proto) Should be used for Protocol Buffers (https://developers.google.com/protocol-buffers/).
LK_TableGen (in configuration: TableGen) Should be used for TableGen code.
LK_TextProto (in configuration: TextProto) Should be used for Protocol Buffer messages in text format (https://developers.google.com/protocol-buffers/).
相关的选项含义可以参考这里:http://releases.llvm.org/3.6.0/tools/clang/docs/ClangFormatStyleOptions.html
之前研究过这个,今天有人问起,回想了半天才想起来具体的技术细节,所以作下简要笔记,已备下次回顾之用。
在IOS7以后的版本中,当iphone连接硬件wifi热点,跟硬件建立tcp socket连接时,怎么才能同时保证可以通过手机自身的4G上internet,在android上这个是做不到的,但iphone可以,这场景就用到multipath TCP。
2017像以往的任何一个年头一样,在挣扎和匆忙中过去了。
一月的时候,女儿出生了,令我无比幸福,因为只能和妻子两个人来照看孩子,有了孩子后,老婆性情大变,也开始了我结婚以来的抑郁时刻(我们相识10年,结婚6年)。
三月的时候我的母亲意外车祸去世了,我无比痛苦,开始时常会一个人默默流泪,想念我的母亲或者曾经的某刻时光,我感觉自己抑郁了,或者这本身只是老了的一种表现,我不得而知。
年底左右的时候,借钱和贷款买了地铁口的小产权,不知道是生活的一个进阶还是屈服,然而这个喜悦丝毫不能让我从老婆带来的抑郁中走出来。
由于只能我们两个抚养小孩,我上班她全职,再加上她对小孩近乎变态的怜爱和呵护,这让他筋疲力尽,异常暴躁,而我看在眼里,也只能默默忍受这一切的改变,毕竟她是为了女儿,而我因此要责怪她或者女儿,显然不可能。也许这是人生的必经阶段,也许这是婚姻的不可避免,我无可选择。
因为母亲去世,要打官司赔偿,只能把工作辞掉,准备做好持久战的准备,所以在处理完母亲的事故后,四月底重新入职到了现在的公司。
因为是曾经的同学的极力邀请,所以在据掉了一家以色列的初创公司后,开始了一年多的开发历程。
昨天还收到那个以色列公司的创始人的微信拜年,感觉时光匆匆。
目前的公司是北京公司的深圳分部,也就是初创公司,入职的时间也是新公司的注册成立时间,前期就几个主力人员,基本每个人负责一款独立的产品或者软件。
先是四月开始,要完成一款路由器的开发,因为以往软硬件的积累以及linux的开发经验,很快就从零开始完成一款基于openwrt的行业设备的软件开发,其中一半多的时间是梳理需求和设计业务场景和平台通讯接口协议,开发和测试差不多一半时间。但是因为商务订单的问题,这款演示和测试完成后就暂停了。
这期间,因为大家都没有开发过微信公众号,因为自己有后台开发的经验,就一个人主动承担了公司的微信服务公众号的后台开发,基于php的,一个多月就完成了设计和开发,期间为了按计划完成,取消了提前两个月预定的十一探亲机票,还好按计划完成,也算不枉取消机票的损失。但完成自我目标的喜悦完全可以忽略金钱的损失,内心很高兴。完成项目后,请假一周,回家探亲,让父亲看了下他的孙女,父亲不善言语,但知道他看到孙女很高兴。
11月的时候公司因为想争取一个NBIOT的项目,承诺快速给客户演示样机,又进入到了加班加点的样机开发中,后面还出差成都一周进行现场测试,实测下来NB在做定位tracker方面,目前的芯片方案和运营商服务还不是很成熟,后来测试完了后,因为还达不到GSM的移动稳定性,同时客户也是没有实际的业务订单,也只是想看看NB的效果,所以也只能暂告段落。
完成NB的演示后,就进入了政府的牧场项目中,目前的北京总公司资源很丰富,项目真多。这个项目是和内蒙政府做牧场的牲畜定位追踪和食品安全追溯系统。加班加点的在1月25完成第一期的实地场测。签署了第一批350万的订单,然后就紧接着迎来的农历新年放假。据说放假前,公司拿到了项目款,算是总算干了一个进账的项目吧。
放假期间要完成以下的任务:
1.整个系统的需求文档,因为我是整个项目的产品经理,所以需要统筹整体方案(硬件,平台,app)
2.产品的几个相关app原型和交互设计,年后主要做app的产品经理,将基本完成的硬件firmware的代码交接给其他开发同事。
3.现有硬件fireware的概要设计和详细设计
回来的路上开始看“创业维艰”,今天终于看完了,算是对这几天闲暇愧疚的一个慰藉吧,这是一本很好的书,希望有空能单独写一篇读书笔记。
还有一个小小的喜悦是拿到了驾照,工作这么多年来,一直都很忙,创业和上班,没有时间,今年因为考虑小孩的未来需要,终于下决心抽空把驾照考了。
这几天每天都是吃吃吃,每天都有相邻和亲戚来串门或者拜访,不得闲暇,今日有空,故记录流水账,以慰愧疚。
总的来说,因为自己做事的风格以及对自己的要求,工作都很忙,但今年格外忙,在加上母亲的意外和孩子的出生,2017是我人生中最煎熬的一年,希望未来越来越好。
特别感谢一直以来支持的朋友,如果没有你们一直以来的支持和关心,我可能在抑郁和压力中作出令人不敢想象的决定,在这里默默谢谢你们,也祝你们未来越来越好。
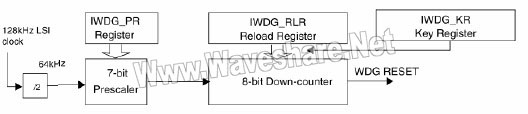
好久不搞stm8了,但朋友请教,还是帮忙确认下。主要是确认STM8的看门狗用法和喂狗时间问题,网上大把的代码样例,但是还是要刨根问底弄清楚细节,才可以用,否则就是埋雷。
大概的调用样例代码:
#define SYS_IWDG_OPEN IWDG_KR=0xCC;
#define SYS_IWDG_FEED IWDG_KR=0xAA;
void SystemIWDG_Config(void)
{
CLK_ICKCR|=S3;
while((CLK_ICKCR&S4)==0);
//STM8单片机需先执行0xCC指令,即先打开IWDG模块,否则IWDG工作不正常
IWDG_KR=0xCC; //启动看门狗
IWDG_KR=0x55; //使能模块访问
IWDG_RLR=0xFF; //溢出时间
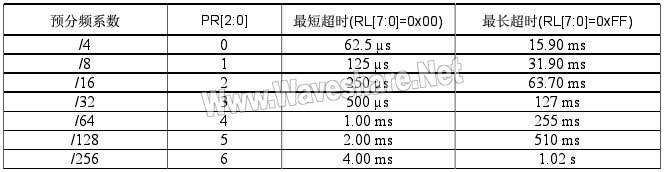
IWDG_PR=0x06; //256分频 38000/256=148HZ T=6.7ms
IWDG_KR=0xAA; //装载IWDG->RLR
}代码的解释请参见以下的网络内容:
|
STM8独立看门狗介绍 独立看门狗模块可以用于解决处理器因为硬件或软件的故障所发生的错误。它由一个内部的128kHz的LSI阻容振荡器作为时钟源驱动,因此即使是主时钟失效时它仍然照常工作。
键寄存器(IWDG_KR) 地址偏移值:0x00
预分频寄存器(IWDG_PR) 地址偏移值:0x01
重装载寄存器(IWDG_RLR) 地址偏移值:0x02
IWDG寄存器映像和复位数值
|
|---|
官方手册原始内容,124页:
http://www.st.com/content/ccc/resource/technical/document/reference_manual/9a/1b/85/07/ca/eb/4f/dd/CD00190271.pdf/files/CD00190271.pdf/jcr:content/translations/en.CD00190271.pdf
本地下载备份:en.CD00190271
根据芯片手册中时钟的配置:
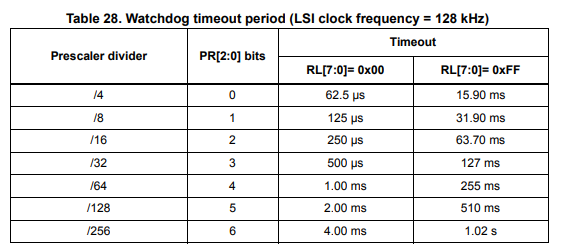
文章开头样例代码的看门狗最大喂狗时间大约1.725秒(38K时钟)
系统升级到最新的sierra后,执行pod update 失败:
zcj-macair:qinmi alex$ pod update
-bash: /usr/local/bin/pod: /System/Library/Frameworks/Ruby.framework/Versions/2.0/usr/bin/ruby: bad interpreter: No such file or directory
zcj-macair:qinmi alex$ brew install ryby
Updating Homebrew...
==> Using the sandbox
xcrun: error: invalid active developer path (/Library/Developer/CommandLineTools), missing xcrun at: /Library/Developer/CommandLineTools/usr/bin/xcrun
Error: git cannot be built with any available compilers.
Install GNU's GCC
  brew install gcc

Error: Git must be installed and in your PATH!
Error: No available formula with the name "ryby"
==> Searching for similarly named formulae...
Error: No similarly named formulae found.
==> Searching taps...
Error: No formulae found in taps.
按照提示安装对应的程序时,进一步提示错误,发现是xcrun错误。
更新xcrun环境:xcode-select --install
更新ruby:brew install ruby
更新pod:gem install cocoapods
设置 /etc/config/network:
config interface 'lan'
        option ifname 'eth0.1 ra0'
        option type 'bridge'
        option proto 'dhcp'
        option macaddr '00:0C:43:00:00:40'
按照模块的使用手册,我们知道设备的usb会虚拟出5个串口设备。
在openwrt中默认是支持usb转uart的驱动的,默认是可以支持此设备的,我们只要在menuconfig中选择相应的开关就可以完成支持
Kernel Modules → USB Support
<*> kmod-usb2
<*> kmod-usb-ohci
<*> kmod-usb-serial
                <*> kmod-usb-serial-option
                -*- kmod-usb-serial-wwan
<*> kmod-usb-core
在网路上有大量的扫描程序和爬虫在扫描肉鸡,其中一个最常用的方式就是扫描ssh权限。这种肉鸡主要用来【翻腔】或者DDOS或者挖矿等,总之是可以牟利的。
新注册的vps,还没多久就发现:
There were 2816 failed login attempts since the last successful login.
而避免被暴力的一种简单的方法就是强制密钥登陆。
然后私钥就可以用来在客户端登录时使用,如果密钥没密码,就可以实现无密码登录了
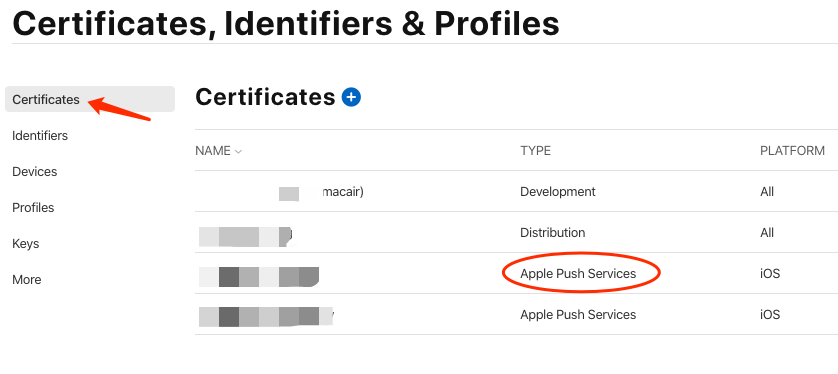
作为一个ios开发者,在你调试APNs时,正常的情况下你需要弄好证书给到后台的同事上线到测试环境,然后才能开始测试调试推送的相关功能。
如果这个过程遇到证书错误,后台代码错误,苹果变更接口等,等到能调试ios的功能,需要等到好久的时间。
那么ios可以独立调试APNs的相关功能吗?当然可以,Knuff就是一款简洁简单的推送调试工具。下面的以MAC的为介绍对象,其他平台的请自行理解。
软件界面如下:

Custom:自定义模式,可以自行选择证书,我们测试自己的应用,就用这个模式
Knuff iOS: Knuff iOS表示使用Knuff的证书,直接推送给Knuff配套的ios应用。
Choose:选择推送的push证书,我们需要选择我们证书,关于如何生成正确的证书,请自行google。
Production:选择证书后,就会出现这个选择,production表示appstore证书,推送给appstore版本的APP。
Sandbox:表示开发调试的非AppStore版本。
Priority:测试时可随意选择。
Payload:表示要推送的报文,具体字段含义这里就不展开了,请自行了解。
Token:device token,在注册苹果 APNs服务时获取的。参考代码如下:
注册服务
[[UIApplication sharedApplication] registerUserNotificationSettings:[UIUserNotificationSettings
                                                                             settingsForTypes:(UIUserNotificationTypeSound | UIUserNotificationTypeAlert | UIUserNotificationTypeBadge)
                                                                             categories:nil]];

[[UIApplication sharedApplication] registerForRemoteNotifications];
回调事件
调用didRegisterForRemoteNotificationsWithDeviceToken
至此我们就可以开始测试了,通过这个工具我们就能轻易的测试我们的device token是否正确,测试我们生成的证书是否正确。给自己发送任意想测试的payload。
have fun!
关于APNs的工作原理,网上有大量的文章,建议学习apple的官方文档。通过APNs我们就可以通过服务器想APP推送想要的内容和事件。从而实现通知或者激活应用的目的。本文我们讲介绍如何搭建php的APNs推送以及如何实现静默推送。
经过多方的验证,目前推荐这个:
https://github.com/immobiliare/ApnsPHP
想要通过苹果服务器推送信息,必须要有合法的证书。很多人在推送这部分花了很多时间,很多情况是没搞清楚失败到底是代码的问题还是证书的问题。所以,我们需要先验证证书的合法和正确性。
推送时,我们要制作推送证书,我们要选择正确的类型,具体的制作过程可自行搜索,最终的证书类型如下:
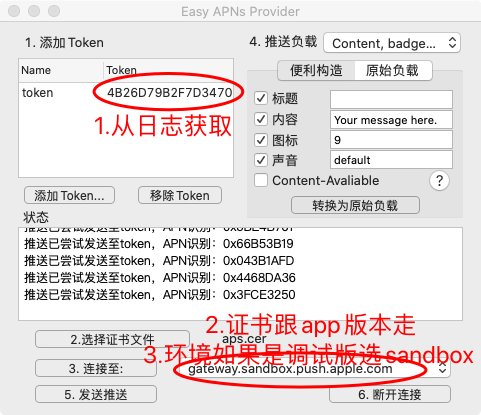
先前我的文章推荐过Knuff,经过深入的实践,这里我推荐Easy APNS Provider,可以从MAC store下载。相比较Knuff,EAP更加的稳定强大。通过工具我们就可以先行验证证书的正确性,避免后面定位问题浪费更多的时间。
[2020.03.31更新]:另一款值得推荐的是: https://github.com/noodlewerk/NWPusher
在MAC上用客户端向苹果发送推送服务器请求时,我们选择上面安装的证书就可以了。
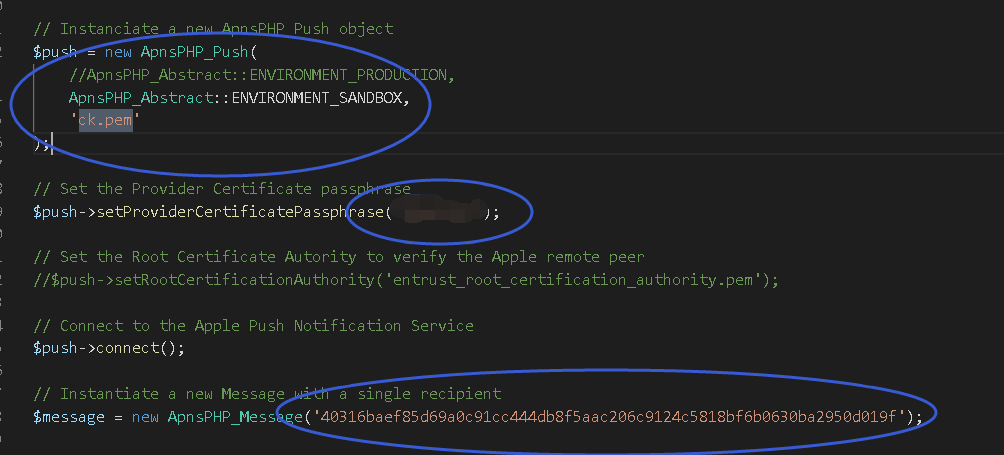
上面我们讲了怎么选择正确的客户端证书,当我们使用php 服务器推送时,我们还要做些额外的工作:
#生成cert.pem
openssl pkcs12 -clcerts -nokeys -out cert.pem -in cert.p12
#生成key.pem(先输出导出key.p12时设置的密码P*d, 然后设置一个新的密码,如pushpwd,这个密码后面php推送时要设置)
openssl pkcs12 -nocerts -out key.pem -in key.p12
#合并成ck.pem
cat cert.pem key.pem > ck.pem这个软件包的最新版本支持HTTP2,如果你的PHP的版本支持HTTP2,建议优先使用。开发包里面自带了几个sample,简单配置后基本就可以使用。这里我们以sample_push.php为测试对象。
如图所示,配置要点如下:
测试通过的返回如下:
Fri, 13 Jan 2017 13:31:35 +0100 ApnsPHP[15355]: INFO: Trying tls://gateway.sandbox.push.apple.com:2195... Fri, 13 Jan 2017 13:31:35 +0100 ApnsPHP[15355]: INFO: Connected to tls://gateway.sandbox.push.apple.com:2195. Fri, 13 Jan 2017 13:31:35 +0100 ApnsPHP[15355]: INFO: Sending messages queue, run #1: 1 message(s) left in queue. Fri, 13 Jan 2017 13:31:35 +0100 ApnsPHP[15355]: STATUS: Sending message ID 1 [custom identifier: Message-Badge-3] (1/3): 167 bytes. Fri, 13 Jan 2017 13:31:36 +0100 ApnsPHP[15355]: INFO: Disconnected.在上面我们提到了设备的device token,那么调试阶段如何获取这个token呢?在我们发起了注册请求后,系统会触发相应的消息回调。相关的参考代码如下:
-(void)application:(UIApplication *)application didRegisterForRemoteNotificationsWithDeviceToken:(NSData *)deviceToken
{
    //读取APNS token
    NSString* _deviceToken = [[[[deviceToken description]
        stringByReplacingOccurrencesOfString: @"<" withString: @""]
        stringByReplacingOccurrencesOfString: @">" withString: @""]
        stringByReplacingOccurrencesOfString: @" " withString: @""];
    QMLogDebug(@"apns token:%@",_deviceToken);
    NSUserDefaults * userDefault = [NSUserDefaults standardUserDefaults];
    [userDefault setObject:_deviceToken forKey:APNSTOKEN];
    [userDefault synchronize];
}
上面的deviceToken就获取了我们需要的token。这里的deviceToken是NSData对象,可以手动导出二进制,然后这个导出文件就可以在测试客户端中使用。
除了ck.pem证书,我们的项目还需要 entrust_root_certification_authority.pem 这个证书,一共两个证书。
ios最新的版本中已经支持了静默推送,静默推送时,客户端会收到消息,执行相应的动作,但不会做任何给用户的提示。在普通的推送中我们可以通过如下的代码实现静默推送的效果:
{
  "aps" : {
    "badge" : 0
  }
}
但是苹果还是专门定义了一个开关来表示静默推送 "content-available" : 1,由于此开关优先级较低,在静默推送的报文中不能出现alert,sound 等,否则就会变成普通推送。
静默推送的payload如下:
{
  "aps" : {
    "content-available" : 1
  }
}
静默推送的前提:
参考:
How to generate a Push Notification certificate and download the Entrust Root Authority certificate
首选当时letsencrypt了,官方网站是:https://letsencrypt.org. 网上大把文章,但按照本人一贯的习惯还是去官网,避免被过时的信息误导,反而浪费更多的时间。
官方推荐的是cetrbot:https://certbot.eff.org/
根据本人的系统,实际的文档路径:https://certbot.eff.org/#centosrhel7-nginx
首先需要安装certbot:
默认centos7是不支持certot,你需要先安装EPEL:https://fedoraproject.org/wiki/EPEL#How_can_I_use_these_extra_packages.3F
实际的安装包为:https://dl.fedoraproject.org/pub/epel/epel-release-latest-7.noarch.rpm
下载后安装rpm。然后执行:
sudo yum install certbot
一路‘y’,安装完成:
Installed:
  certbot.noarch 0:0.9.3-1.el7

Dependency Installed:
  dialog.x86_64 0:1.2-4.20130523.el7                 pyOpenSSL.x86_64 0:0.13.1-3.el7                     python-cffi.x86_64 0:1.6.0-5.el7
  python-chardet.noarch 0:2.2.1-1.el7_1              python-enum34.noarch 0:1.0.4-1.el7                  python-idna.noarch 0:2.0-1.el7
  python-ipaddress.noarch 0:1.0.16-2.el7             python-ndg_httpsclient.noarch 0:0.3.2-1.el7         python-parsedatetime.noarch 0:1.5-3.el7
  python-ply.noarch 0:3.4-10.el7                     python-psutil.x86_64 0:2.2.1-1.el7                  python-pycparser.noarch 0:2.14-1.el7
  python-requests.noarch 0:2.6.0-1.el7_1             python-six.noarch 0:1.9.0-2.el7                     python-urllib3.noarch 0:1.10.2-2.el7_1
  python-zope-component.noarch 1:4.1.0-1.el7         python-zope-event.noarch 0:4.0.3-2.el7              python-zope-interface.x86_64 0:4.0.5-4.el7
  python2-acme.noarch 0:0.9.3-1.el7                  python2-certbot.noarch 0:0.9.3-1.el7                python2-configargparse.noarch 0:0.11.0-1.el7
  python2-cryptography.x86_64 0:1.3.1-3.el7          python2-dialog.noarch 0:3.3.0-6.el7                 python2-mock.noarch 0:1.0.1-9.el7
  python2-pyasn1.noarch 0:0.1.9-7.el7                python2-pyrfc3339.noarch 0:1.0-2.el7                pytz.noarch 0:2012d-5.el7

Complete!
在已经有webserver运行的情况下,certbot推荐我们使用“webroot”插件。可以实现在不暂停web服务的情况下更新证书。
webroot:不需要停机你的web服务
certbot certonly --webroot -w AAA -d BBB
BBB是你要支持的域名,AAA是BBB当前已经可以访问的目录。
standalone:需要停机你当前服务器的80端口的服务
certbot certonly --standalone -d xxx.com
以上每一条命令生成一个对立的目录,如果是多个域名就是合在一起的一个文件。如果要每个域名都生成独立的目录和文件,就要执行多次。
成功后:
IMPORTANT NOTES:
 - Congratulations! Your certificate and chain have been saved at
   /etc/letsencrypt/live/xxx/fullchain.pem. Your cert
   will expire on 2017-03-18. To obtain a new or tweaked version of
   this certificate in the future, simply run certbot again. To
   non-interactively renew *all* of your certificates, run "certbot
   renew"
 - If you like Certbot, please consider supporting our work by:

   Donating to ISRG / Let's Encrypt:   https://letsencrypt.org/donate
   Donating to EFF:                    https://eff.org/donate-le
手动在nginx的conf中配置相关的路径就可以了:
ssl_certificate /etc/letsencrypt/live/xxx/fullchain.pem;
ssl_certificate_key /etc/letsencrypt/live/xxx/privkey.pem;
certbot renew
证书没有过期的话,我们可以撤销:
[root@rxblog certbot-0.22.2]# ./certbot revoke --cert-path /etc/letsencrypt/archive/xxx.com/cert1.pem
Saving debug log to /var/log/letsencrypt/letsencrypt.log

-------------------------------------------------------------------------------
Would you like to delete the cert(s) you just revoked?
-------------------------------------------------------------------------------
(Y)es (recommended)/(N)o: Y

-------------------------------------------------------------------------------
Deleted all files relating to certificate iwwenbo.com.
-------------------------------------------------------------------------------

-------------------------------------------------------------------------------
Congratulations! You have successfully revoked the certificate that was located
at /etc/letsencrypt/archive/iwwenbo.com/cert1.pem

-------------------------------------------------------------------------------
如果证书已经过期了,我们只能删除了
certbot delete --cert-name example.com
OK,暂时告一段落。
其实主要就是要理解这两个函数的功能和适用场景:
startUpdatingLocation
startMonitoringSignificantLocationChanges
可以参看苹果的这个demo:https://developer.apple.com/library/content/samplecode/Regions/Introduction/Intro.html
理解了,自己改动下,就能实现强大的后台定位
2016.12.25:
了解更多的细节,可以参看这里,全部确认到了,基本就搞定了:
https://developer.apple.com/library/content/documentation/UserExperience/Conceptual/LocationAwarenessPG/CoreLocation/CoreLocation.html
最近在重构之前的代码,所以在本地游多个分支,经常出现如下的问题:
linker command failed with exit code 1 (use -v to see invocation)
之前也是基本重新update下pod基本就ok,今天发现之前ok的提交到git的代码,拉到本地又出现这个问题了,所有有必要弄清楚根源,避免每次都各种莫名尝试浪费时间。
从其中的一条错误提示入手:
ld: warning: directory not found for option '-L/Users/xxx/Library/Developer/Xcode/DerivedData/xxx-gttrbsolrpknxhbtjxulraplunas/Build/Products/Debug-iphonesimulator/AFNetworking'
在这个路径下确实发现缺少东西,对于目前成功编译的项目,我们手动删除目标后,再此编译,发现也提示这个错误这个很奇怪,按理应该成功才对。所以初步的原因是这个目标对象对应的pod库没有。那么是什么时候生成的呢,我们进一步分析。
在尝试了pod install和update后,目标并没有生成,所以pod阶段只是创建关联project。应该还是在编译阶段生成的。
按照正常的流程,应该是build时生成相应的target的库,现在却没有生成,进一步在网上搜索,看到“Build Active Architecture Only”
这个选项,当为 YES时,表示只编译当前的architecture版本。所以改为yes后,便可以生成当前 architecture的库了。
所以失败的原因是,这个选项为NO时默认生成所有的target的库,但是是按默认顺序的,还并没有来的及生成当前的目标库,所以link时就失败了。改为YES,相当于当前平台更改为了最高优先级,所以就直接生成了。
最近把ios的代码升级到了ios10和xcode8 ,出现了大量:
NSManageObjectContext - Class is not key value coding-compliant for the key @count
解决:
参考:http://stackoverflow.com/questions/39511997/nsmanageobjectcontext-class-is-not-key-value-coding-compliant-for-the-key-cou
更新RestKit:
pod 'RestKit', :git => 'https://github.com/RestKit/RestKit.git', :commit => '9cbba9eb1b490c3c5e2873c8fba8e9c0fec1bf07'
更新后会有新的错误,依照提示修复就可以了。
安装 cocoapods:
sudo gem install cocoapods

ERROR:  While executing gem ... (Errno::EPERM)
    Operation not permitted - /usr/bin/xcodeproj
解决:手动指定路径:
sudo gem install -n /usr/local/bin cocoapods
os:centos6
type:vps
1. 创建用于交换分区的文件
2. 设置交换分区文件
3. 立即启用交换分区文件
4. 设置开机时自启用swap分区,需要修改文件/etc/fstab中的swap行,添加记录。
dd if=/dev/zero of=/data/swap bs=1M count=4096
mkswap /data/swap
swapon /data/swap
/data/swap swap swap defaults 0 0
update user set Host='%' where Host ='127.0.0.1';
flush privileges;
原文:https://access.redhat.com/documentation/en-US/Red_Hat_Enterprise_Linux/7/html/Security_Guide/sec-Using_Firewalls.html#sec-Introduction_to_firewalld1
参考译文:http://blog.csdn.net/steveguoshao/article/details/45999645
firewall-cmd --state
firewall-cmd --get-zones
firewall-cmd --zone=public --list-all
firewall-cmd --zone=public --add-port=80/tcp --permanent
firewall-cmd --zone=public --add-port=3306/tcp --permanent
firewall-cmd --reload
如何实现自动备份数据路里面所有业务表的功能:
#!/bin/bash
echo "Dump mysql databases..."

DB_USER=xxx
DB_PASSWORD=xxx

DB_LIST=$(echo "show databases;" | mysql -u${DB_USER} -p${DB_PASSWORD})
for db in ${DB_LIST}
do
  if [ $db != "Database" ] && [ $db != "mysql" ] &&
      [ $db != "phpmyadmin" ] && [ $db != "information_schema" ] &&
      [ $db != "performance_schema" ]; then
    echo "  backup "$db
    mysqldump -u${DB_USER} -p${DB_PASSWORD} $db > ./$db.sql
  fi
done
错误:Perl module Authen::PAM needed for PAM is not installed
解决:yum install perl-Authen-PAM
错误:PAM test failed - maybe /etc/pam.d/webmin does not exist
解决:这个是要创建webmin的pam配置。这里我们可以直接copy sshd的配置
vs code 使用 调试F5时,提示如下:
Failed to continue: "Cannot find Delve debugger. Ensure it is in your GOPATH/bin or PATH."
根据提示缺少“Delve debugger”
解决:
go get github.com/derekparker/delve/cmd/dlv
如果把读书比多银海拾贝,这本书就是沙粒中一颗精致优美的贝壳。
本书很精薄,我基本上是一口气读完的,从晚上9点多到临晨1点多。
全书讲述了主人公木村,因执念绿色种植苹果的理念,被人当作傻子,最终经历8年的执着和等待,最终获得成功的故事。
故事里面不光有木村的执着,还有生动鲜活的果园风光,虫鸟与风草。文章细致描写了绿色种植理念的起因和主人公实际操作后面临的真实果园处境,采用第三视角和第一视角口述的方式交叉推进,显得真实而生动。
当主人公经历8年的辛苦,孤独,嘲讽,最终看到开花结果,而他的岳父母去世的时候,我的眼眶湿润了,有多少奋斗的人能等到亲人共享的时刻。
当因为自己的执念而让妻子和孩子受苦时,木村的心里苦不甘言,只能默默承受,恰似无数正在奋斗的人们。
最终执念和傻得到了回报,而我经历了一次难得的心灵旅程。
人生难得执念,主人公的成功也不必介怀,真实的人生,大部分人面临的最终可能是失败。
but:
人生只有一次,这种执念傻瓜的经历,又何尝不是一种幸福和境界?