6110R-1F-DEV 开发板使用纪要
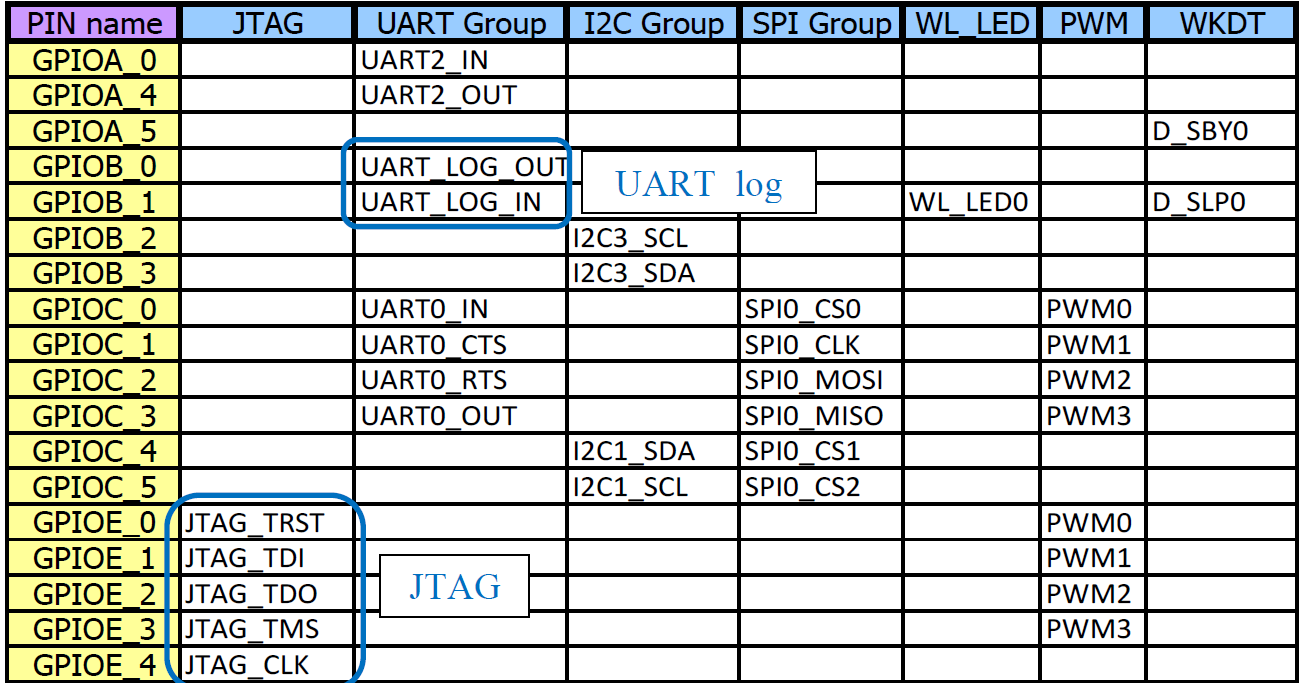
日志串口
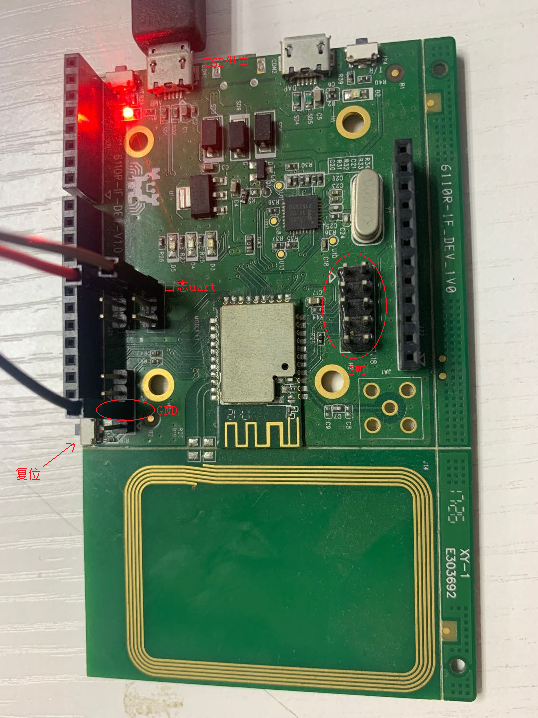
6110R-1F-DEV 是一款用于realtek 8710af相关的模组测试的开发板,起使用接口如下:
此开发板贴的是rtl8710af模组,默认的波特率是38400
rtl8710芯片功能管脚定义如下:
swd 接线
swd接口定义:
TMS=>SWIO
TCLK=>SWCLK
6110R-1F-DEV 是一款用于realtek 8710af相关的模组测试的开发板,起使用接口如下:
此开发板贴的是rtl8710af模组,默认的波特率是38400
rtl8710芯片功能管脚定义如下:
swd接口定义:
TMS=>SWIO
TCLK=>SWCLK
Pushing Background Updates to Your App
Sending Notification Requests to APNs
iOS 13 beta 7 Silent Push Bug
仔细看完以上3篇,我想关于最新版ios13下的推送,你应该都能搞定了。
贴一份在用的参考配置,欢迎大家讨论
BasedOnStyle: LLVM
Language: Cpp
ColumnLimit: 200
# 允许对注释排版
ReflowComments: false
# 允许修改头文件顺序
SortIncludes: false
#括号风格
BreakBeforeBraces: Custom
BraceWrapping:
AfterFunction: true
AfterEnum: false
AfterStruct: false
SplitEmptyFunction: false # 空函数,括号可以同行
# 注释左对齐
AlignTrailingComments: true
# 单行函数也要换行
AllowShortFunctionsOnASingleLine: false
## 是否允许短if语句单行
AllowShortIfStatementsOnASingleLine: true
# 单行循环可以单行,比如while1 和空for等
AllowShortLoopsOnASingleLine: true
# 自动换行后,二元运算符总在前
BreakBeforeBinaryOperators: true
# 缩进宽度
IndentWidth: 4
# 连续声明时,对齐所有声明的变量名
AlignConsecutiveDeclarations: true
# 针和引用的对齐: Left, Right, Middle
PointerAlignment: Left
# 在C风格类型转换后添加空格
SpaceAfterCStyleCast: false
# 在赋值运算符之前添加空格
SpaceBeforeAssignmentOperators: true
# 开圆括号之前添加一个空格: Never, ControlStatements, Always
SpaceBeforeParens: ControlStatements
# 在空的圆括号中添加空格
SpaceInEmptyParentheses: false
# 在尾随的评论前添加的空格数(只适用于//)
SpacesBeforeTrailingComments: 2
# 在尖括号的<后和>前添加空格
SpacesInAngles: true
# 宏赋值对齐
AlignConsecutiveMacros: true
需要开启:AlignConsecutiveMacros: true
参见:clang-format options
支持的llvm版本:10.0
给个qi ang 内的连接,顺便鄙视下csdn,和那些csdner,太丢志气了,这种公共开发资源自己拿到了,不是想着方便更多的开发者,而是去搞什么垃圾积分下载,csdn就是垃圾,多年前就全部清空和退出了,跌份。
LLVM-10.0.0-win64.exe
设置-》搜索引擎,设置bing就可以了。
其他参考:
添加系统搜索引擎为自定义:https://www.bing.com/search?q=%s 就可以了
配置完注意检查“外观”和“启动时选项”
clang-format是很好用的插件,所以我们也想在xcode中继续使用。
brew install clang-format
check version:
clang-format --version
clang-format version 9.0.0 (tags/google/stable/2019-05-14)
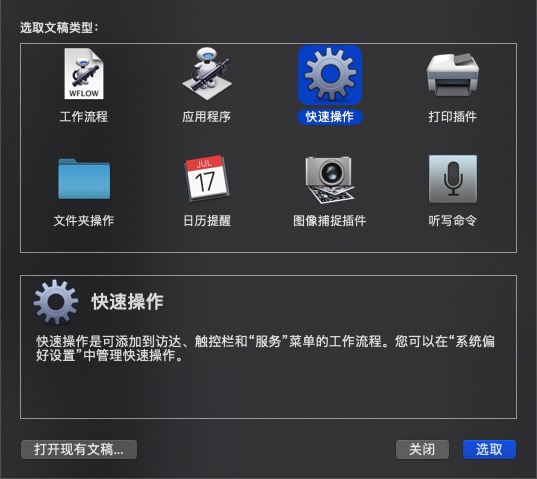
创建automator action
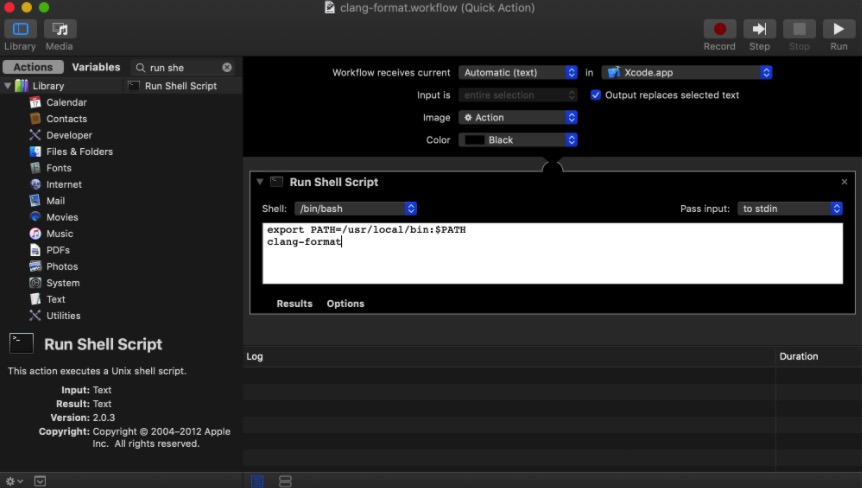
在左侧搜索“运行shell脚本”,并拖入右侧,在脚本本输入:
export PATH=/usr/local/bin:$PATH
clang-format
将服务保存为clang-format(或者任意你喜欢的),后面还有用到这个名字。
在当前用户的根目录 ~ 放置一个 .clang-format 文件。参考内容如下:
BasedOnStyle: LLVM
BreakBeforeBraces: Linux
Language: Cpp
ColumnLimit: 120
ReflowComments: false
SortIncludes: false
#括号风格
BreakBeforeBraces: Custom
BraceWrapping:
AfterEnum: false
AfterStruct: false
SplitEmptyFunction: false
注意,这个只是参考,你需要按照你实际的风格进行设置。
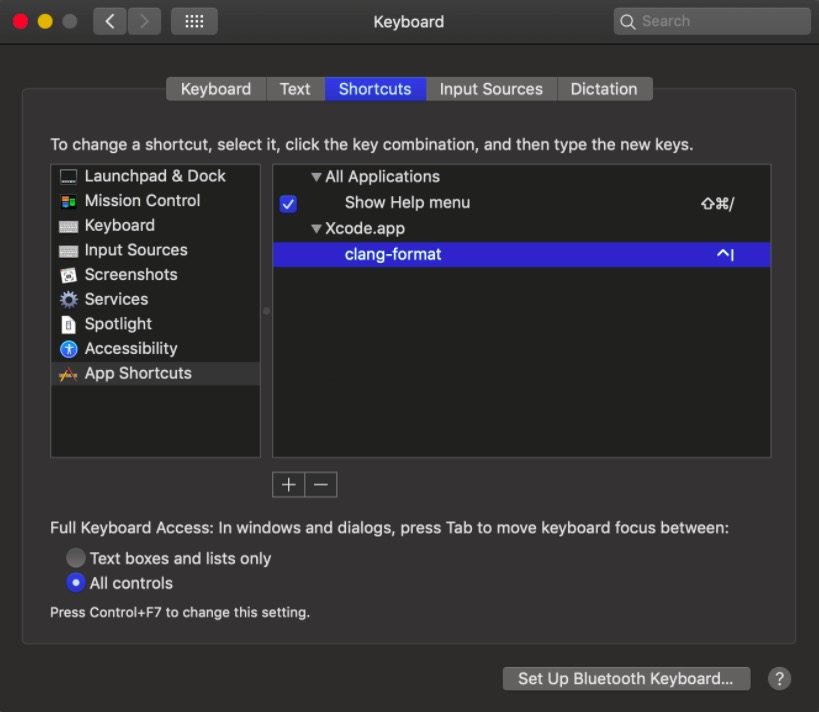
在系统设置页面找到“键盘”,选择“快捷键”的tab,在左侧选择 “app快捷键”,然后选择+号,创建用于xcode的快捷键,选择clang-format服务,然后选择一个你准备用户代码格式化的快捷键组合,比如 ctrl+i。
在xcode中,选择我们的目标代码,然后ctrl+i,就触发clang-format格式化了。
done!
在Info.plist 中设置:
Bundle display name => ${PRODUCT_NAME}.${BUNDLE_SHOW_NAME_SUFFIX}
这样就可以根据不同的版本设置不同的名称后缀
ios运行时出现大量:
nehelper sent invalid result code [1] for Wi-Fi information request
经过搜索,增加"Access WiFi Information" 权限后问题解决。
ref:https://stackoverflow.com/questions/58791035/ios-13-2-message-nehelper-sent-invalid-result-code-1-for-wi-fi-information-re
systemctl stop shadowsocks-libev-local.service
ref:http://claude-ray.com/2018/12/01/ss-local/
certbot renew时出现类似的错误:
OCSP check failed for /xxx/cert1.pem (are we offline?)
经搜索原因:原因是 ocsp.int-x3.letsencrypt.org 的 cname 域名 a771.dscq.akamai.net 受到了干扰。
可以采用本地修改hosts的方案进行临时处理,在/etc/hosts中添加
23.32.3.72 ocsp.int-x3.letsencrypt.org
# openssl ocsp -no_nonce -issuer /etc/letsencrypt/archive/xxx/chain1.pem -cert /etc/letsencrypt/archive/xxx/cert1.pem -url http://ocsp.int-x3.letsencrypt.org -CAfile /etc/letsencrypt/archive/xxx/chain1.pem -verify_other /etc/letsencrypt/archive/xxx/chain1.pem -trust_other -header Host ocsp.int-x3.letsencrypt.org
Response verify OK
/etc/letsencrypt/archive/www.itranscloud.com/cert1.pem: good
This Update: May 14 10:00:00 2020 GMT
Next Update: May 21 10:00:00 2020 GMT
添加后,在重试 certbot renew,ok,正常
ref:https://holmesian.org/letsencrypt-ocsp-fix
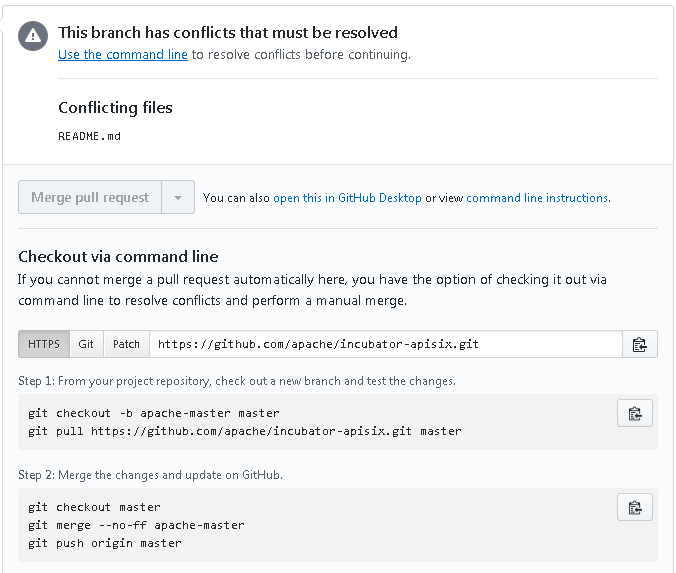
使用git日常免不了遇到conflicts,那么如何消除conflicts呢,以下的内容以一个具体的过程来讲解整个过程和原理。
以下我们手动创造一个conflicts:
Step 1: From your project repository, check out a new branch and test the changes.
git checkout -b apache-master master
git pull https://github.com/apache/incubator-apisix.git master
Step 2: Merge the changes and update on GitHub.
git checkout master
git merge --no-ff apache-master
git push origin master
以上的的例子, 我们从A合入到B:B <== A。
A: https://github.com/apache/incubator-apisix.git
B: xxxx/incubator-apisix.git
例子中有一个README.md的冲突,并且给出了解决的命令行参考。
我们将逐条命令来解释如何按照提示解决冲突。
From https://github.com/apache/incubator-apisix
* branch master -> FETCH_HEAD
Auto-merging README.md
CONFLICT (content): Merge conflict in README.md
Automatic merge failed; fix conflicts and then commit the result.
$ git commit -m "resolve the conflict"
[apache-master 6ad2d5e] resolve the conflict
最终解决了冲突,完成了对B master的更新。
希望以上就解释清楚,谢谢!
certbot version:0.9.3
centos version:CentOS Linux release 7.0.1406 (Core)
#sudo yum update certbot
# certbot --version
certbot 1.3.0
#certbot update_account
Saving debug log to /var/log/letsencrypt/letsencrypt.log
Enter email address (used for urgent renewal and security notices) (Enter 'c' to
cancel): xxx@xxx.com
Starting new HTTPS connection (1): acme-v02.api.letsencrypt.org
- - - - - - - - - - - - - - - - - - - - - - - - - - - - - - - - - - - - - - - -
Would you be willing to share your email address with the Electronic Frontier
Foundation, a founding partner of the Let's Encrypt project and the non-profit
organization that develops Certbot? We'd like to send you email about our work
encrypting the web, EFF news, campaigns, and ways to support digital freedom.
- - - - - - - - - - - - - - - - - - - - - - - - - - - - - - - - - - - - - - - -
(Y)es/(N)o: y
Starting new HTTPS connection (1): supporters.eff.org
IMPORTANT NOTES:
- Your e-mail address was updated to xxx@xxx.com.
ls /etc/letsencrypt/accounts
acme-staging.api.letsencrypt.org acme-v01.api.letsencrypt.org acme-v02.api.letsencrypt.org
you can see the acme-v02 information, it indicate that the upgrade is successful.
done, have fun!
4.0寸的iPhone5/5s
4.7寸的iPhone678
5.5寸的iPhone6P7P8P
5.8寸的iPhoneX/XS iPhone11Pro
6.1寸的iPhoneXr iPhone11
6.5寸的iPhone XS Max/iPhone 11 Pro Max
Device | Portrait dimensions | Landscape dimensions |
---|---|---|
12.9" iPad Pro | 2048px × 2732px | 2732px × 2048px |
11" iPad Pro | 1668px × 2388px | 2388px × 1668px |
10.5" iPad Pro | 1668px × 2224px | 2224px × 1668px |
9.7" iPad | 1536px × 2048px | 2048px × 1536px |
7.9" iPad mini 4 | 1536px × 2048px | 2048px × 1536px |
iPhone XS Max | 1242px × 2688px | 2688px × 1242px |
iPhone XS | 1125px × 2436px | 2436px × 1125px |
iPhone XR | 828px × 1792px | 1792px × 828px |
iPhone X | 1125px × 2436px | 2436px × 1125px |
iPhone 8 Plus | 1242px × 2208px | 2208px × 1242px |
iPhone 8 | 750px × 1334px | 1334px × 750px |
iPhone 7 Plus | 1242px × 2208px | 2208px × 1242px |
iPhone 7 | 750px × 1334px | 1334px × 750px |
iPhone 6s Plus | 1242px × 2208px | 2208px × 1242px |
iPhone 6s | 750px × 1334px | 1334px × 750px |
iPhone SE | 640px × 1136px | 1136px × 640px |
Device | Scale Factor |
---|---|
12.9" iPad Pro | @2x |
11" iPad Pro | @2x |
10.5" iPad Pro | @2x |
9.7" iPad | @2x |
7.9" iPad mini 4 | @2x |
iPhone XS Max | @3x |
iPhone XS | @3x |
iPhone XR | @2x |
iPhone X | @3x |
iPhone 8 Plus | @3x |
iPhone 8 | @2x |
iPhone 7 Plus | @3x |
iPhone 7 | @2x |
iPhone 6s Plus | @3x |
iPhone 6s | @2x |
iPhone SE | @2x |
ref:https://www.paintcodeapp.com/news/ultimate-guide-to-iphone-resolutions
ref:https://medium.com/@hacknicity/how-ipad-apps-adapt-to-the-new-10-2-ipad-5d050b565fca
On 10th September 2019, Apple announced a 7th generation iPad with a 10.2" screen. There are now five different iPad resolutions (in landscape):
9.7": 1024×768 points (2048×1536 pixels)
10.2": 1080×810 points (2160×1620 pixels)
10.5": 1112×834 points (2224×1668 pixels)
11.0": 1194×834 points (2388×1668 pixels)
12.9": 1366×1024 points (2732×2048 pixels)
无效的资源bundle,请检查AMap.bundle是否正确导入
这种错误一般是由于pod错误引起的。
需要在asset catalog下面创建 AppIcon对象
问题1:
上传商店时,一直莫名提示:
ERROR ITMS-90713: "Missing Info.plist value. A value for the Info.plist key 'CFBundleIconName' is missing in the bundle 'com.xxx.xxx'. Apps built with iOS 11 or later SDK must supply app icons in an asset catalog and must also provide a value for this Info.plist key. For more information see http://help.apple.com/xcode/mac/current/#/dev10510b1f7."
解决:
原来是CFBundleIconName节点的内容错误导致,正确的内容为在plist xml文件中添加如下:
<key>CFBundleIcons</key>
<dict>
<key>CFBundlePrimaryIcon</key>
<dict>
<key>CFBundleIconFiles</key>
<array>
<string>icon-20-ipad</string>
<string>icon-20</string>
<string>icon-29-ipad</string>
<string>icon-29</string>
<string>icon-40</string>
<string>icon-60</string>
<string>icon-76</string>
<string>icon-83.5</string>
<string>ItunesArtwork</string>
</array>
<key>CFBundleIconName</key>
<string>AppIcon</string>
</dict>
</dict>
成功后,在UI中表现就是出现:
Icon files (iOS 5) 相关的节点内容
ps:刚开始不知道怎么配置,看到此字段带了个括号iOS 5,以为是陈旧的格式,随手就把这个删除了,后面一直在网上找的不对的配置格式,各种折腾都无果,最后还是在github 代码片段的帮助下搞定了这个问题。
在app上传时遇到如下的error:
ERROR ITMS-90704: "Missing App Icon. An app icon measuring 1024 by 1024 pixels in PNG format must be included in the Asset Catalog of apps built for iOS, iPadOS, or watchOS. Without this icon, apps cannot be submitted for review. For details, see https://developer.apple.com/ios/human-interface-guidelines/icons-and-images/app-icon/."
各种搜索,大部分讨论都在 stackoverflow, 比如:https://stackoverflow.com/questions/44667434/how-to-solve-missing-marketing-icon-ios-apps-must-include-a-1024x1024px/61618816#61618816
无非以下几种排查思路:
1. 遗漏1024分辨率icon文件的,补上文件就ok了
2. 检查文件的alpha 和透明度
3. plist配置文件错误的。
经过仔细排查以上几点,都无果:
- 所有的AppIcon集合,都正常,只是提示这个1024的一直有问题,
- 用图片工具,确认过第二点,也没问题
- 配置的问题,多方搜索比较,也排查完了已有的问题,最后只剩下这个1024的问题
后面根据字面意思:must be included in the Asset Catalog 进行猜测和尝试,最终得以解决:
建立新的Asset catalog,并将之前的AppIcon目录移过去,然后就ok了。所以之前虽然icon得以正确调用,能正确显示icon但实际的asset catalog配置是没通的,导致这个app store需要的1024 icon一直找不到。
以上方法,仅供片面参考!
xcode 11.4.1
昨天准备上传一个更新的app,一直无法成功,刚开始以为网络问题,只是速度慢,后面挂机睡觉,今天早上一看,还是一样卡死不动。提示:Authenticating with the App Store
搜索了下,发现了些许线索:
【1】https://juejin.im/post/5e4cab5ee51d4526d6405981
【2】https://github.com/iOSDevLog/com.apple.amp.itmstransporter
原因在上面的两个链接里都有解释,简单说就是,第一次运行时iTMSTransporter更新速度过慢或者网络异常导致无法更新成功。实际测试,6k左右的速度,还不停断链。
错误提示:
[!] Failed to connect to GitHub to update the CocoaPods/Specs specs repo - Please check if you are offline, or that GitHub is down
根据字面意思以为是qiang的原因,后面手动对source测试,发现没问题。
解决:
rm Podfile.lock
pod install
仅供参考
#import <sys/utsname.h>
struct utsname systemInfo;
uname(&systemInfo);
NSString * phoneType = [NSString stringWithCString: systemInfo.machine encoding:NSASCIIStringEncoding];
if ([phoneType isEqualToString:@"iPhone12,8"]) return @"iPhone SE2";
来源参考:https://stackoverflow.com/questions/26028918/how-to-determine-the-current-iphone-device-model
SE2的UI设计规范可以参考 iPhone 8
设计参考规范: http://www.xueui.cn/design/142395.html
现象:mac下格式化成fat 或者exfat ,window下都是磁盘管理器可以看到,但无法格式化和操作,导致用户界面看不到。
解决:
1. 从开始菜单里找到附件 - 命令提示符,右键点击“命令提示符”,选择“以管理员模式运行”:
2. 进行命令行操作:
DISKPART> list disk
磁盘 ### 状态 大小 可用 Dyn Gpt
-------- ------------- ------- ------- --- ---
磁盘 0 联机 223 GB 1024 KB
磁盘 1 联机 931 GB 3072 KB
磁盘 2 联机 28 GB 0 B *
DISKPART> select disk 2
磁盘 2 现在是所选磁盘。
DISKPART> clean
DiskPart 成功地清除了磁盘。
done!
Format particular block of code
Select the code and press:
⌘+]: for right move (indent)
⌘+[: for left move (un-indent)
ref:https://stackoverflow.com/questions/829954/how-can-i-indent-multiple-lines-in-xcode
在多线程开发当中,程序员只要将想做的事情定义好,并追加到DispatchQueue(派发队列)当中就好了。
派发队列分为两种,一种是串行队列(SerialDispatchQueue),一种是并行队列(ConcurrentDispatchQueue)。
一个任务就是一个block,比如,将任务添加到队列中的代码是:
```dispatch_async(queue, block);```
当给queue添加多个任务时,如果queue是串行队列,则它们按顺序一个个执行,同时处理的任务只有一个。
当queue是并行队列时,不论第一个任务是否结束,都会立刻开始执行后面的任务,也就是可以同时执行多个任务。
但是并行执行的任务数量取决于XNU内核,是不可控的。比如,如果同时执行10个任务,那么10个任务并不是开启10个线程,线程会根据任务执行情况复用,由系统控制。
系统提供了两个队列,一个是MainDispatchQueue,一个是GlobalDispatchQueue。
前者会将任务插入主线程的RunLoop当中去执行,所以显然是个串行队列,我们可以使用它来更新UI。
后者则是一个全局的并行队列,有高、默认、低和后台4个优先级。
它们的获取方式如下:
dispatch_queue_t queue = dispatch_get_main_queue();
dispatch queue_t queue = dispatch_get_global_queue(DISPATCH_QUEUE_PRORITY_DEFAULT, 0);
执行异步任务
dispatch_queue_t queue = dispatch_get_global_queue(DISPATCH_QUEUE_PRIORITY_DEFAULT, 0);
dispatch_async(queue, ^{
//...
});
这个代码片段直接在子线程里执行了一个任务块。使用GCD方式任务是立即开始执行的它不像操作队列那样可以手动启动,同样,缺点也是它的不可控性。
xcode 出现类似的 log:
Background Task 139 ("xxx"), was created over 30 seconds ago. In applications running in the background, this creates a risk of termination. Remember to call UIApplication.endBackgroundTask(_:) for your task in a timely manner to avoid this.
原因:
由于IOS sdk进行了更新,导致beginBackgroundTaskWithExpirationHandler 没有进行正确的调用,参考:
https://stackoverflow.com/questions/10319643/proper-use-of-beginbackgroundtaskwithexpirationhandler
正确调用方式参考代码:
- (void) doUpdate
{
dispatch_async(dispatch_get_global_queue(DISPATCH_QUEUE_PRIORITY_DEFAULT, 0), ^{
[self beginBackgroundUpdateTask];
NSURLResponse * response = nil;
NSError * error = nil;
NSData * responseData = [NSURLConnection sendSynchronousRequest: request returningResponse: &response error: &error];
// Do something with the result
[self endBackgroundUpdateTask];
});
}
- (void) beginBackgroundUpdateTask
{
self.backgroundUpdateTask = [[UIApplication sharedApplication] beginBackgroundTaskWithExpirationHandler:^{
[self endBackgroundUpdateTask];
}];
}
- (void) endBackgroundUpdateTask
{
[[UIApplication sharedApplication] endBackgroundTask: self.backgroundUpdateTask];
self.backgroundUpdateTask = UIBackgroundTaskInvalid;
}
注意以上代码只是告诉你begin和end配对调用的使用方式,具体代码的细节问题,要根据你自己的工程进行调整。
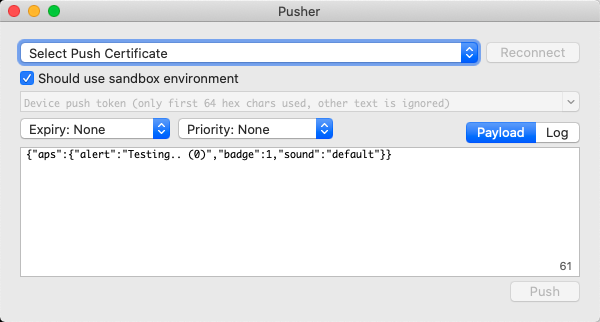
之前介绍过Easy APNs provider, 今天介绍一款甚至更稳定好用的工具:
Pusher: https://github.com/noodlewerk/NWPusher
0.7.5 binary copy:
pusher v0.7.5
主界面:
打开一个现有的工程:
ld: library not found for -lAFNetworking
clang: error: linker command failed with exit code 1 (use -v to see invocation)
其中一种可能:
workspace 没有打开pod工程
这个是GSM的,在页面里面有4G和5G的链接:
https://www.worldtimezone.com/gsm.html
composer成功后,跑对应的例子,提示 Class 'xxxx' not found
原因是没有启用autoload:
<?php
require __DIR__ . '/vendor/autoload.php';
composer dump-autoload --optimize
ref:https://github.com/aliyun/openapi-sdk-php/blob/master/docs/en-US/1-Installation.md
phpredis 版本:2.2.5
下载地址:http://pecl.php.net/package/redis
更新PHP后,原有的php redis组件失效,需要重新配置。
phpinfo 获取php版本号,根据 PHP Extension的时间,在pecl页面寻找最贴近的新版本。比如我们的是20121226 我们就找 2.2.5 stable 2014-03-19 对应的2.2.5版本。
拿到phpredis的代码包后,要用当前的php环境重新编译:
# /usr/local/php/bin/phpize
# ./configure --with-php-config=/usr/local/php/bin/php-config
# make && make install
php.x86_64 5.4.16-36.3.el7_2 @updates
php-bcmath.x86_64 5.4.16-36.3.el7_2 @updates
php-cli.x86_64 5.4.16-36.3.el7_2 @updates
php-common.x86_64 5.4.16-36.3.el7_2 @updates
php-dba.x86_64 5.4.16-36.3.el7_2 @updates
php-embedded.x86_64 5.4.16-36.3.el7_2 @updates
php-enchant.x86_64 5.4.16-36.3.el7_2 @updates
php-fpm.x86_64 5.4.16-36.3.el7_2 @updates
php-gd.x86_64 5.4.16-36.3.el7_2 @updates
php-intl.x86_64 5.4.16-36.3.el7_2 @updates
php-ldap.x86_64 5.4.16-36.3.el7_2 @updates
php-mbstring.x86_64 5.4.16-36.3.el7_2 @updates
php-mysqlnd.x86_64 5.4.16-36.3.el7_2 @updates
php-odbc.x86_64 5.4.16-36.3.el7_2 @updates
php-pdo.x86_64 5.4.16-36.3.el7_2 @updates
php-pear.noarch 1:1.9.4-21.el7 @base
php-pecl-memcache.x86_64 3.0.8-4.el7 @base
php-pgsql.x86_64 5.4.16-36.3.el7_2 @updates
php-process.x86_64 5.4.16-36.3.el7_2 @updates
php-pspell.x86_64 5.4.16-36.3.el7_2 @updates
php-recode.x86_64 5.4.16-36.3.el7_2 @updates
php-soap.x86_64 5.4.16-36.3.el7_2 @updates
php-xml.x86_64 5.4.16-36.3.el7_2 @updates
php-xmlrpc.x86_64 5.4.16-36.3.el7_2 @updates
rpm -Uvh https://mirror.webtatic.com/yum/el7/epel-release.rpm
rpm -Uvh https://mirror.webtatic.com/yum/el7/webtatic-release.rpm
yum remove php-common
yum install -y php56w php56w-bcmath php56w-cli php56w-common php56w-dba php56w-opcache php56w-embedded php56w-enchant php56w-fpm php56w-gd php56w-ldap \
php56w-mbstring php56w-mysqlnd php56w-odbc php56w-pdo php56w-pear php56w-pecl-memcache php56w-pgsql php56w-process php56w-pspell php56w-xml php56w-recode \
php56w-soap php56w-xmlrpc php56w-mcryptcd php56w-intl php56w-mbstring
这里分别演示搭建etcd-browser和etcdkeeper,两者功能大同小异,不同的是etcdkeeper支持v3的api
etcd-browser
docker run --rm -d --name etcd-browser \
-p 8000:8000 \
--env ETCD_HOST=10.211.55.25 \
--env ETCD_PORT=2379 \
buddho/etcd-browser
运行后访问http://10.211.55.25:8000/
etcdkeeper
docker run -it -d --name etcdkeeper \
-p 8080:8080 \
deltaprojects/etcdkeeper
ref:http://www.iigrowing.cn/etcd_shi_yong_ru_men.html
简单:安装配置简单,而且提供了 HTTP API 进行交互,使用也很简单
安全:支持 SSL 证书验证
快速:根据官方提供的 benchmark 数据,单实例支持每秒 2k+ 读操作
可靠:采用 raft 算法,实现分布式系统数据的可用性和一致性
在这篇文章编写的时候,etcd 已经发布了 3.0.4 版本,被被用在 CoreOS、kubernetes、Cloud Foundry 等项目中。
etcd 目前默认使用 2379 端口提供 HTTP API 服务,2380 端口和 peer 通信(这两个端口已经被 IANA 官方预留给 etcd);在之前的版本中,可能会分别使用 4001 和 7001,在使用的过程中需要注意这个区别。
虽然 etcd 也支持单点部署,但是在生产环境中推荐集群方式部署,一般 etcd 节点数会选择 3、5、7。etcd 会保证所有的节点都会保存数据,并保证数据的一致性和正确性。
单点安装
如果在测试环境,启动一个单点的 etcd 服务,只需要运行 etcd 命令就行。
➜ etcd-v3.0.4-darwin-amd64 ./etcd
2016-08-01 23:33:09.066930 I | etcdmain: etcd Version: 3.0.4
2016-08-01 23:33:09.067085 I | etcdmain: Git SHA: d53923c
2016-08-01 23:33:09.067092 I | etcdmain: Go Version: go1.6.3
2016-08-01 23:33:09.067101 I | etcdmain: Go OS/Arch: darwin/amd64
2016-08-01 23:33:09.067111 I | etcdmain: setting maximum number of CPUs to 4, total number of available CPUs is 4
2016-08-01 23:33:09.067120 W | etcdmain: no data-dir provided, using default data-dir ./default.etcd
2016-08-01 23:33:09.067803 I | etcdmain: listening for peers on http://localhost:2380
2016-08-01 23:33:09.068123 I | etcdmain: listening for client requests on localhost:2379
2016-08-01 23:33:09.069442 I | etcdserver: name = default
2016-08-01 23:33:09.069465 I | etcdserver: data dir = default.etcd
2016-08-01 23:33:09.069474 I | etcdserver: member dir = default.etcd/member
2016-08-01 23:33:09.069480 I | etcdserver: heartbeat = 100ms
2016-08-01 23:33:09.069485 I | etcdserver: election = 1000ms
2016-08-01 23:33:09.069491 I | etcdserver: snapshot count = 10000
2016-08-01 23:33:09.069510 I | etcdserver: advertise client URLs = http://localhost:2379
2016-08-01 23:33:09.069523 I | etcdserver: initial advertise peer URLs = http://localhost:2380
2016-08-01 23:33:09.069536 I | etcdserver: initial cluster = default=http://localhost:2380
2016-08-01 23:33:09.258167 I | etcdserver: starting member 8e9e05c52164694d in cluster cdf818194e3a8c32
2016-08-01 23:33:09.258927 I | raft: 8e9e05c52164694d became follower at term 0
2016-08-01 23:33:09.259395 I | raft: newRaft 8e9e05c52164694d [peers: [], term: 0, commit: 0, applied: 0, lastindex: 0, lastterm: 0]
2016-08-01 23:33:09.259594 I | raft: 8e9e05c52164694d became follower at term 1
2016-08-01 23:33:09.331125 I | etcdserver: starting server... [version: 3.0.4, cluster version: to_be_decided]
2016-08-01 23:33:09.331800 E | etcdserver: cannot monitor file descriptor usage (cannot get FDUsage on darwin)
2016-08-01 23:33:09.334611 I | membership: added member 8e9e05c52164694d [http://localhost:2380] to cluster cdf818194e3a8c32
2016-08-01 23:33:09.499412 I | raft: 8e9e05c52164694d is starting a new election at term 1
2016-08-01 23:33:09.499450 I | raft: 8e9e05c52164694d became candidate at term 2
2016-08-01 23:33:09.499462 I | raft: 8e9e05c52164694d received vote from 8e9e05c52164694d at term 2
2016-08-01 23:33:09.499480 I | raft: 8e9e05c52164694d became leader at term 2
2016-08-01 23:33:09.499493 I | raft: raft.node: 8e9e05c52164694d elected leader 8e9e05c52164694d at term 2
2016-08-01 23:33:09.499702 I | etcdserver: setting up the initial cluster version to 3.0
2016-08-01 23:33:09.507070 N | membership: set the initial cluster version to 3.0
2016-08-01 23:33:09.507129 I | api: enabled capabilities for version 3.0
2016-08-01 23:33:09.507211 I | etcdserver: published {Name:default ClientURLs:[http://localhost:2379]} to cluster cdf818194e3a8c32
2016-08-01 23:33:09.507221 I | etcdmain: ready to serve client requests
2016-08-01 23:33:09.507811 N | etcdmain: serving insecure client requests on localhost:2379, this is strongly discouraged!
从上面的输出中,我们可以看到很多信息:
etcd 默认将数据存放到当前路径的 default.etcd/ 目录下
在 http://localhost:2380 和集群中其他节点通信
在 http://localhost:2379 提供 HTTP API 服务,供客户端交互
该节点的名称默认为 default
heartbeat 为 100ms,后面会说明这个配置的作用
election 为 1000ms,后面会说明这个配置的作用
snapshot count 为 10000,后面会说明这个配置的作用
集群和每个节点都会生成一个 uuid
启动的时候,会运行 raft,选举出 leader
etcd 是一个分布式的key-value存储系统,采用 raft 算法选举leader,保证集群数据不丢失。
1、在https://github.com/coreos/etcd/releases/ 下载最新版本 etcd-v3.1.0-rc.1-linux-amd64.tar.gz
2、解压后,有etcd和etcdctl两个执行文件
用root用户启动etcd ./etcd –会在2379端口上监听,2380端口上监听集群消息
3、基本操作
./etcdctl –version –我的api版本是v2,v3的api和v2不同,有put等操作
./etcdctl ls -p / –列出目录下所有目录或节点,-p参数会自动用/标识出节点还是目录
./etcdctl set /p1/p2/v1 hello –创建一个节点,并给他一个value
./etcdctl get /p1/p2/v1 –获取一个节点的value
还有mkdir rm update watch 等命令,还有–ttl 60, –recursive –consistent 获取集群内最终一致值。
也可以通过url来操作
curl -s 192.168.56.102:2379/v2/keys/p1/p2/v1
4、集群搭建
在3台机器上分别启动3个实例。(启动参数中,peer-urls是一组,client-url是一组,cluster是一组)
集群安装
在安装和启动 etcd 服务的时候,各个节点需要知道集群中其他节点的信息(一般是 ip 和 port 信息)。根据你是否可以提前知道每个节点的 ip,有几种不同的启动方案:
静态配置:在启动 etcd server 的时候,通过 --initial-cluster 参数配置好所有的节点信息
使用已有的 etcd cluster 来注册和启动,比如官方提供的 discovery.etcd.io
使用 DNS 启动,
etcd 的安装文档官网已经给出了,这里不再赘述。当然,你也可以通过 docker 来安装 etcd,具体的文档可以看这里。
下面给出可以常用配置的参数和它们的解释,方便理解:
--name:方便理解的节点名称,默认为 default,在集群中应该保持唯一,可以使用 hostname
--data-dir:服务运行数据保存的路径,默认为 ${name}.etcd
--snapshot-count:指定有多少事务(transaction)被提交时,触发截取快照保存到磁盘
--heartbeat-interval:leader 多久发送一次心跳到 followers。默认值是 100ms
--eletion-timeout:重新投票的超时时间,如果 follow 在该时间间隔没有收到心跳包,会触发重新投票,默认为 1000 ms
--listen-peer-urls:和同伴通信的地址,比如 http://ip:2380,如果有多个,使用逗号分隔。需要所有节点都能够访问,所以不要使用 localhost!
--listen-client-urls:对外提供服务的地址:比如 http://ip:2379,http://127.0.0.1:2379,客户端会连接到这里和 etcd 交互
--advertise-client-urls:对外公告的该节点客户端监听地址,这个值会告诉集群中其他节点
--initial-advertise-peer-urls:该节点同伴监听地址,这个值会告诉集群中其他节点
--initial-cluster:集群中所有节点的信息,格式为 node1=http://ip1:2380,node2=http://ip2:2380,…。注意:这里的 node1 是节点的 --name 指定的名字;后面的 ip1:2380 是 --initial-advertise-peer-urls 指定的值
--initial-cluster-state:新建集群的时候,这个值为 new;假如已经存在的集群,这个值为 existing
--initial-cluster-token:创建集群的 token,这个值每个集群保持唯一。这样的话,如果你要重新创建集群,即使配置和之前一样,也会再次生成新的集群和节点 uuid;否则会导致多个集群之间的冲突,造成未知的错误
所有以 --init 开头的配置都是在 bootstrap 集群的时候才会用到,后续节点的重启会被忽略。
NOTE:所有的参数也可以通过环境变量进行设置,--my-flag 对应环境变量的 ETCD_MY_FLAG;但是命令行指定的参数会覆盖环境变量对应的值。
在后面的文章中,为了简单起见,我们采用了单点的 etcd server,请在生产环境中配置 etcd 集群,并使用 SSL 安全机制。
在正常运行的状态下,集群中会有一个 leader,其余的 member 都是 followers。leader 向 followers 同步日志,保证数据在各个 member 都有副本。leader 还会定时向所有的 member 发送心跳报文,如果在规定的时间里 follower 没有收到心跳,就会重新进行选举。
客户端所有的请求都会先发送给 leader,leader 向所有的 followers 同步日志,等收到超过半数的确认后就把该日志存储到磁盘,并返回响应客户端。
每个 etcd 服务有三大主要部分组成:raft 实现、WAL 日志存储、数据的存储和索引。WAL 会在本地磁盘(就是之前提到的 --data-dir)上存储日志内容(wal file)和快照(snapshot)。
这个部分,我们就介绍 etcd 通过 HTTP API 提供了哪些功能,并使用 httpie 来交互(当然你也可以使用 curl 或者其他工具)。
获取 etcd 服务的版本信息
➜ http http://127.0.0.1:2379/version
HTTP/1.1 200 OK
Content-Length: 44
Content-Type: application/json
Date: Tue, 02 Aug 2016 04:27:32 GMT
{
"etcdcluster": "3.0.0",
"etcdserver": "3.0.4"
}
key 的增删查改
etcd 的数据按照树形的结构组织,类似于 linux 的文件系统,也有目录和文件的区别,不过一般被称为 nodes。数据的 endpoint 都是以 /v2/keys 开头(v2 表示当前 API 的版本),比如 /v2/keys/names/cizixs。
要创建一个值,只要使用 PUT 方法在对应的 url endpoint 设置就行。如果对应的 key 已经存在, PUT 也会对 key 进行更新。
➜ http PUT http://127.0.0.1:2379/v2/keys/message value=="hello, etcd"
HTTP/1.1 201 Created
Content-Length: 100
Content-Type: application/json
Date: Tue, 02 Aug 2016 04:48:04 GMT
X-Etcd-Cluster-Id: cdf818194e3a8c32
X-Etcd-Index: 4
X-Raft-Index: 28429
X-Raft-Term: 2
{
"action": "set",
"node": {
"createdIndex": 4,
"key": "/message",
"modifiedIndex": 4,
"value": "hello, etcd"
}
}
上面这个命令通过 PUT 方法把 /message 设置为 hello, etcd。返回的格式中,各个字段的意义是:
action:请求出发的动作,这里因为是新建一个 key 并设置它的值,所以是 set
node.key:key 的 HTTP 路径
node.value:请求处理之后,key 的值
node.createdIndex: createdIndex 是一个递增的值,每次有 key 被创建的时候会增加
node.modifiedIndex:同上,只不过每次有 key 被修改的时候增加
除返回的 json 体外,上面的情况还包含了一些特殊的 HTTP 头部信息,这些信息说明了 etcd cluster 的一些情况。它们的具体含义如下:
X-Etcd-Index:当前 etcd 集群的 index
X-Raft-Index:raft 集群的 index
X-Raft-Term:raft 集群的任期,每次有 leader 选举的时候,这个值就会增加
查看信息比较简单,使用 GET 方法,url 指向要查看的值就行:
➜ http GET http://127.0.0.1:2379/v2/keys/message
HTTP/1.1 200 OK
Content-Length: 97
Content-Type: application/json
Date: Tue, 02 Aug 2016 05:23:14 GMT
X-Etcd-Cluster-Id: cdf818194e3a8c32
X-Etcd-Index: 7
X-Raft-Index: 30801
X-Raft-Term: 2
{
"action": "get",
"node": {
"createdIndex": 7,
"key": "/message",
"modifiedIndex": 7,
"value": "hello, etcd"
}
}
这里的 action 变成了 get,其他返回的值和上面的含义一样,略过不提。
NOTE:这两个命令并不是连着执行的,中间我有执行其他操作,因此 index 会出现不连续的情况。
前面已经提过, PUT 也可用来更新 key 的值我们就来看看例子。
➜ http PUT http://127.0.0.1:2379/v2/keys/message value=="I'm changed"
HTTP/1.1 200 OK
Content-Length: 184
Content-Type: application/json
Date: Tue, 02 Aug 2016 05:28:17 GMT
X-Etcd-Cluster-Id: cdf818194e3a8c32
X-Etcd-Index: 8
X-Raft-Index: 31407
X-Raft-Term: 2
{
"action": "set",
"node": {
"createdIndex": 8,
"key": "/message",
"modifiedIndex": 8,
"value": "I'm changed"
},
"prevNode": {
"createdIndex": 7,
"key": "/message",
"modifiedIndex": 7,
"value": "hello, etcd"
}
}
和第一次执行 PUT 命令不同的是,返回中多了一个字段 prevNode,它保存着更新之前该 key 的信息。它的格式和 node 是一样的,如果之前没有这个信息,这个字段会被省略。
删除 key 可以通过 DELETE 方法,,比如我们要删除上面创建的字段:
➜ http DELETE http://127.0.0.1:2379/v2/keys/message
HTTP/1.1 200 OK
Content-Length: 168
Content-Type: application/json
Date: Tue, 02 Aug 2016 05:31:56 GMT
X-Etcd-Cluster-Id: cdf818194e3a8c32
X-Etcd-Index: 9
X-Raft-Index: 31847
X-Raft-Term: 2
{
"action": "delete",
"node": {
"createdIndex": 8,
"key": "/message",
"modifiedIndex": 9
},
"prevNode": {
"createdIndex": 8,
"key": "/message",
"modifiedIndex": 8,
"value": "I'm changed"
}
}
注意,这里的 action 是 delete,并且 modifiedIndex 增加了,但是 createdIndex 没有变化,因为这是一个修改操作,不是新建操作。
TTL
etcd 中,key 可以有 TTL 属性,超过这个时间会被自动删除。我们来设置一个看看:
➜ http PUT http://127.0.0.1:2379/v2/keys/tempkey value=="Gone with wind" ttl==5
HTTP/1.1 201 Created
Content-Length: 159
Content-Type: application/json
Date: Tue, 02 Aug 2016 05:48:17 GMT
X-Etcd-Cluster-Id: cdf818194e3a8c32
X-Etcd-Index: 10
X-Raft-Index: 33810
X-Raft-Term: 2
{
"action": "set",
"node": {
"createdIndex": 10,
"expiration": "2016-08-02T05:48:22.618695843Z",
"key": "/tempkey",
"modifiedIndex": 10,
"ttl": 5,
"value": "Gone with wind"
}
}
除了一般 key 返回的信息之外,上面多了两个字段:
expiration:代表 key 过期被删除的时间
ttl:表示 key 还要多少秒可以存活(这个值是动态的,会根据你请求的时候和过期时间进行计算)
如果我们在 5s 之后再去请求查看该 key,会发现报错信息:
➜ http http://127.0.0.1:2379/v2/keys/tempkey
HTTP/1.1 404 Not Found
Content-Length: 74
Content-Type: application/json
Date: Tue, 02 Aug 2016 05:48:28 GMT
X-Etcd-Cluster-Id: cdf818194e3a8c32
X-Etcd-Index: 11
{
"cause": "/tempkey",
"errorCode": 100,
"index": 11,
"message": "Key not found"
}
http 返回为 404,并且返回体中给出了 errorCode 和错误信息。
TTL 也可通过 PUT 方法进行取消,只要设置空值 ttl= 就行,这样 key 就不会过期被删除。比如:
➜ http PUT http://127.0.0.1:2379/v2/keys/foo value==bar ttl== prevExist==true
注意:需要设置 value==bar,不然 key 会变成空值。
如果只是想更新 TTL,可以添加上 refresh==true 参数:
➜ etcd-v3.0.4-darwin-amd64 http -v PUT http://127.0.0.1:2379/v2/keys/tempkey
HTTP/1.1 200 OK
Content-Length: 305
Content-Type: application/json
Date: Tue, 02 Aug 2016 06:05:12 GMT
X-Etcd-Cluster-Id: cdf818194e3a8c32
X-Etcd-Index: 20
X-Raft-Index: 35849
X-Raft-Term: 2
{
"action": "set",
"node": {
"createdIndex": 20,
"expiration": "2016-08-02T06:13:32.370495212Z",
"key": "/tempkey",
"modifiedIndex": 20,
"ttl": 500,
"value": "hello, there"
},
"prevNode": {
"createdIndex": 19,
"expiration": "2016-08-02T06:10:05.366042396Z",
"key": "/tempkey",
"modifiedIndex": 19,
"ttl": 293,
"value": "hello, there"
}
}
监听变化
etcd 提供了监听的机制,可以让客户端使用 long pulling 监听某个 key,当发生变化的时候接接收通知因为 etcd 经常被用作服务发现,集群中的信息有更新的时候需要及时被检测,做出对应的处理。因此需要有监听机制,来告诉客户端特定 key 的变化情况。
监听动作只需要 GET 方法,添加上 wait=true 参数就行.使用 recursive=true 参数,也能监听某个目录。
➜ http http://127.0.0.1:2379/v2/keys/foo wait==true
HTTP/1.1 200 OK
Content-Type: application/json
Date: Tue, 02 Aug 2016 06:09:47 GMT
Transfer-Encoding: chunked
X-Etcd-Cluster-Id: cdf818194e3a8c32
X-Etcd-Index: 22
X-Raft-Index: 36401
X-Raft-Term: 2
这个时候,客户端会阻塞在这里,如果在另外的 terminal 修改 key 的值,监听的客户端会接收到消息,打印出更新的值:
{
"action": "set",
"node": {
"createdIndex": 23,
"key": "/foo",
"modifiedIndex": 23,
"value": "changed"
},
"prevNode": {
"createdIndex": 22,
"key": "/foo",
"modifiedIndex": 22,
"value": "bar"
}
}
除了这种最简单的监听之外,还可以提供基于 index 的监听。如果通过 waitIndex 指定了 index,那么
会返回从 index 开始出现的第一个事件,这包含了两种情况:
给出的 index 小于等于当前 index ,即事件已经发生,那么监听会立即返回该事件
给出的 index 大于当前 index,等待 index 之后的事件发生并返回
目前 etcd 只会保存最近 1000 个事件(整个集群范围内),再早之前的事件会被清理,如果监听被清理的事件会报错。如果出现漏过太多事件(超过 1000)的情况,需要重新获取当然的 index 值(X-Etcd-Index),然后从 X-Etcd-Index+1 开始监听。
因为监听的时候出现事件就会直接返回,因此需要客户端编写循环逻辑保持监听状态。在两次监听的间隔中出现的事件,很可能被漏过。所以最好把事件处逻辑做成异步的,不要阻塞监听逻辑。
注意:监听 key 时会出现因为长时间没有返回导致连接被 close 的情况,客户端需要处理这种错误并自动重试。
自动创建有序的 keys
在有些情况下,我们需要 key 是有序的,etcd 提供了这个功能。对某个目录使用 POST 方法,能自动生成有序的 key,这种模式可以用于队列处理等场景。
➜ http POST http://127.0.0.1:2379/v2/keys/queue value==job1
HTTP/1.1 201 Created
Content-Length: 121
Content-Type: application/json
Date: Tue, 02 Aug 2016 07:08:38 GMT
X-Etcd-Cluster-Id: cdf818194e3a8c32
X-Etcd-Index: 1030
X-Raft-Index: 44470
X-Raft-Term: 2
{
"action": "create",
"node": {
"createdIndex": 1030,
"key": "/queue/00000000000000001030",
"modifiedIndex": 1030,
"value": "job1"
}
}
创建的 key 会使用 etcd index,只能保证递增,无法保证是连续的(因为两次创建之间可能会有其他发生)。然后用相同的命令创建多个值,在获取值的时候使用 sorted=true参数就会返回已经排序的值:
➜ http http://127.0.0.1:2379/v2/keys/queue sorted==true
HTTP/1.1 200 OK
Content-Length: 385
Content-Type: application/json
Date: Tue, 02 Aug 2016 07:11:32 GMT
X-Etcd-Cluster-Id: cdf818194e3a8c32
X-Etcd-Index: 1032
X-Raft-Index: 44819
X-Raft-Term: 2
{
"action": "get",
"node": {
"createdIndex": 1030,
"dir": true,
"key": "/queue",
"modifiedIndex": 1030,
"nodes": [
{
"createdIndex": 1030,
"key": "/queue/00000000000000001030",
"modifiedIndex": 1030,
"value": "job1"
},
{
"createdIndex": 1031,
"key": "/queue/00000000000000001031",
"modifiedIndex": 1031,
"value": "job2"
},
{
"createdIndex": 1032,
"key": "/queue/00000000000000001032",
"modifiedIndex": 1032,
"value": "job3"
}
]
}
}
设置目录的 TTL
和 key 类似,目录(dir)也可以有过期时间。设置的方法也一样,只不过多了 dir=true 参数来说明这是一个目录。
➜ http PUT http://127.0.0.1:2379/v2/keys/dir dir==true ttl==5 prevExist==true
HTTP/1.1 200 OK
Content-Length: 226
Content-Type: application/json
Date: Tue, 02 Aug 2016 07:15:42 GMT
X-Etcd-Cluster-Id: cdf818194e3a8c32
X-Etcd-Index: 1033
X-Raft-Index: 45325
X-Raft-Term: 2
{
"action": "update",
"node": {
"createdIndex": 1029,
"dir": true,
"expiration": "2016-08-02T07:15:47.970434032Z",
"key": "/dir",
"modifiedIndex": 1033,
"ttl": 5
},
"prevNode": {
"createdIndex": 1029,
"dir": true,
"key": "/dir",
"modifiedIndex": 1029
}
}
目录过期的时候会被自动删除,包括它里面所有的子目录和 key,所有监听这个目录中内容的客户端都会收到对应的事件。
比较更新的原子操作
在分布式环境中,我们需要解决多个客户端的竞争问题,etcd 提供了原子操作 CompareAndSwap(CAS),通过这个操作可以很容易实现分布式锁。
简单来说,这个命令只有在客户端提供的条件成立的情况下才会更新对应的值。目前支持的条件包括:
preValue:检查 key 之前的值是否和客户端提供的一致
prevIndex:检查 key 之前的 modifiedIndex 是否和客户端提供的一致
prevExist:检查 key 是否已经存在。如果存在就执行更新操作,如果不存在,执行 create 操作
举个栗子,比如目前 /foo 的值为 bar,要把它更新成 changed,可以使用:
➜ http PUT http://127.0.0.1:2379/v2/keys/foo prevValue==bar value==changed
HTTP/1.1 200 OK
Content-Length: 190
Content-Type: application/json
Date: Tue, 02 Aug 2016 07:37:05 GMT
X-Etcd-Cluster-Id: cdf818194e3a8c32
X-Etcd-Index: 1036
X-Raft-Index: 47893
X-Raft-Term: 2
{
"action": "compareAndSwap",
"node": {
"createdIndex": 1035,
"key": "/foo",
"modifiedIndex": 1036,
"value": "changed"
},
"prevNode": {
"createdIndex": 1035,
"key": "/foo",
"modifiedIndex": 1035,
"value": "bar"
}
}
如果提供的条件不对,会报 412 错误:
➜ http PUT http://127.0.0.1:2379/v2/keys/foo prevValue==bar value==new
HTTP/1.1 412 Precondition Failed
Content-Length: 85
Content-Type: application/json
Date: Tue, 02 Aug 2016 07:37:38 GMT
X-Etcd-Cluster-Id: cdf818194e3a8c32
X-Etcd-Index: 1036
{
"cause": "[bar != changed]",
"errorCode": 101,
"index": 1036,
"message": "Compare failed"
}
注意:匹配条件是 prevIndex=0 的话,也会通过检查。
这些条件也可以组合起来使用,只有当都满足的时候,才会执行对应的操作。
比较删除的原子操作
和条件更新类似,etcd 也支持条件删除操作:只有在客户端提供的条件成立的情况下,才会执行删除操作。支持 prevValue 和 prevIndex 两种条件检查,没有 prevExist,因为删除不存在的值本身就会报错。
我们来删除上面例子中更新的 /foo ,先看一下提供的条件不对的情况:
➜ http DELETE http://127.0.0.1:2379/v2/keys/foo prevValue==bar
HTTP/1.1 412 Precondition Failed
Content-Length: 85
Content-Type: application/json
Date: Tue, 02 Aug 2016 07:49:13 GMT
X-Etcd-Cluster-Id: cdf818194e3a8c32
X-Etcd-Index: 1043
{
"cause": "[bar != changed]",
"errorCode": 101,
"index": 1043,
"message": "Compare failed"
}
如果提供的条件成立,对应的 key 就会被删除:
➜ http DELETE http://127.0.0.1:2379/v2/keys/foo prevValue==changed
HTTP/1.1 200 OK
Content-Length: 178
Content-Type: application/json
Date: Tue, 02 Aug 2016 07:51:27 GMT
X-Etcd-Cluster-Id: cdf818194e3a8c32
X-Etcd-Index: 1044
X-Raft-Index: 49629
X-Raft-Term: 2
{
"action": "compareAndDelete",
"node": {
"createdIndex": 1043,
"key": "/foo",
"modifiedIndex": 1044
},
"prevNode": {
"createdIndex": 1043,
"key": "/foo",
"modifiedIndex": 1043,
"value": "changed"
}
}
操作目录
在创建 key 的时候,如果它所在路径的目录不存在,会自动被创建,所以在多数情况下我们不需要关心目录的创建。目录的操作和 key 的操作基本一致,唯一的区别是需要加上 dir=true 参数指明操作的对象是目录。
比如,如果想要显示地创建目录,可以使用 PUT 方法,并设置 dir=true:
➜ http PUT http://127.0.0.1:2379/v2/keys/anotherdir dir==true
HTTP/1.1 201 Created
Content-Length: 98
Content-Type: application/json
Date: Tue, 02 Aug 2016 07:53:48 GMT
X-Etcd-Cluster-Id: cdf818194e3a8c32
X-Etcd-Index: 1045
X-Raft-Index: 49914
X-Raft-Term: 2
{
"action": "set",
"node": {
"createdIndex": 1045,
"dir": true,
"key": "/anotherdir",
"modifiedIndex": 1045
}
}
创建目录的操作不能重复执行,再次执行上面的命令会报 HTTP 403 错误。
如果 GET 方法对应的 url 是目录的话,etcd 会列出该目录所有节点的信息(不需要指定 dir=true)。比如要列出根目录下所有的节点:
➜ http http://127.0.0.1:2379/v2/keys/
HTTP/1.1 200 OK
Content-Length: 190
Content-Type: application/json
Date: Tue, 02 Aug 2016 07:55:41 GMT
X-Etcd-Cluster-Id: cdf818194e3a8c32
X-Etcd-Index: 1045
X-Raft-Index: 50141
X-Raft-Term: 2
{
"action": "get",
"node": {
"dir": true,
"nodes": [
{
"createdIndex": 1045,
"dir": true,
"key": "/anotherdir",
"modifiedIndex": 1045
},
{
"createdIndex": 1030,
"dir": true,
"key": "/queue",
"modifiedIndex": 1030
}
]
}
}
如果添加上 recursive=true 参数,就会递归地列出所有的值:
➜ http http://127.0.0.1:2379/v2/keys/\?recursive\=true
HTTP/1.1 200 OK
Content-Length: 482
Content-Type: application/json
Date: Tue, 02 Aug 2016 07:57:48 GMT
X-Etcd-Cluster-Id: cdf818194e3a8c32
X-Etcd-Index: 1045
X-Raft-Index: 50394
X-Raft-Term: 2
{
"action": "get",
"node": {
"dir": true,
"nodes": [
{
"createdIndex": 1045,
"dir": true,
"key": "/anotherdir",
"modifiedIndex": 1045
},
{
"createdIndex": 1030,
"dir": true,
"key": "/queue",
"modifiedIndex": 1030,
"nodes": [
{
"createdIndex": 1031,
"key": "/queue/00000000000000001031",
"modifiedIndex": 1031,
"value": "job2"
},
{
"createdIndex": 1032,
"key": "/queue/00000000000000001032",
"modifiedIndex": 1032,
"value": "job3"
},
{
"createdIndex": 1030,
"key": "/queue/00000000000000001030",
"modifiedIndex": 1030,
"value": "job1"
}
]
}
]
}
}
和 linux 删除目录的设计一样,要区别空目录和非空目录。删除空目录很简单,使用 DELETE 方法,并添加上 dir=true 参数,类似于 rmdir;而对于非空目录,需要添加上 recursive=true,类似于 rm -rf。
➜ http DELETE http://127.0.0.1:2379/v2/keys/queue dir==true
HTTP/1.1 403 Forbidden
Content-Length: 80
Content-Type: application/json
Date: Tue, 02 Aug 2016 08:06:44 GMT
X-Etcd-Cluster-Id: cdf818194e3a8c32
X-Etcd-Index: 1045
{
"cause": "/queue",
"errorCode": 108,
"index": 1045,
"message": "Directory not empty"
}
➜ http DELETE http://127.0.0.1:2379/v2/keys/queue dir==true recursive==true
HTTP/1.1 200 OK
Content-Length: 176
Content-Type: application/json
Date: Tue, 02 Aug 2016 08:06:48 GMT
X-Etcd-Cluster-Id: cdf818194e3a8c32
X-Etcd-Index: 1046
X-Raft-Index: 51478
X-Raft-Term: 2
{
"action": "delete",
"node": {
"createdIndex": 1030,
"dir": true,
"key": "/queue",
"modifiedIndex": 1046
},
"prevNode": {
"createdIndex": 1030,
"dir": true,
"key": "/queue",
"modifiedIndex": 1030
}
}
隐藏的节点
etcd 中节点也可以是默认隐藏的,类似于 linux 中以 . 开头的文件或者文件夹,以 _ 开头的节点也是默认隐藏的,不会在列出目录的时候显示。只有知道隐藏节点的完整路径,才能够访问它的信息。
查看集群数据信息
etcd 还保存了集群的数据信息,包括节点之间的网络信息,操作的统计信息。
/v2/stats/leader会返回集群中 leader 的信息,以及 followers 的基本信息
/v2/stats/self 会返回当前节点的信息
/v2/state/store:会返回各种命令的统计信息
成员管理
etcd 在 /v2/members 下保存着集群中各个成员的信息,
➜ http http://127.0.0.1:2379/v2/members
HTTP/1.1 200 OK
Content-Length: 133
Content-Type: application/json
Date: Tue, 02 Aug 2016 08:15:56 GMT
X-Etcd-Cluster-Id: cdf818194e3a8c32
{
"members": [
{
"clientURLs": [
"http://localhost:2379"
],
"id": "8e9e05c52164694d",
"name": "default",
"peerURLs": [
"http://localhost:2380"
]
}
]
}
可以通过 POST 方法添加成员:
curl http://10.0.0.10:2379/v2/members -XPOST \
-H "Content-Type: application/json" -d '{"peerURLs":["http://10.0.0.10:2380"]}'
也可以通过 DELETE 方法删除成员:
curl http://10.0.0.10:2379/v2/members/272e204152 -XDELETE
或者通过 PUT 更新成员的 peer url:
curl http://10.0.0.10:2379/v2/members/272e204152 -XPUT \
-H "Content-Type: application/json" -d '{"peerURLs":["http://10.0.0.10:2380"]}'
etcdctl 的安装就不说了,从官网下载二进制文件放到系统的 PATH 路径下就行了。
# 设置一个 key 的值
➜ ./etcdctl set /message "hello, etcd"
hello, etcd
# 获取 key 的值
➜ ./etcdctl get /message
hello, etcd
# 获取 key 的值,包含更详细的元数据
➜ ./etcdctl -o extended get /message
Key: /message
Created-Index: 1073
Modified-Index: 1073
TTL: 0
Index: 1073
hello, etcd
# 获取不存在 key 的值,会报错
➜ ./etcdctl get /notexist
Error: 100: Key not found (/notexist) [1048]
# 设置 key 的 ttl,过期后会被自动删除
➜ ./etcdctl set /tempkey "gone with wind" --ttl 5
gone with wind
➜ ./etcdctl get /tempkey
gone with wind
➜ ./etcdctl get /tempkey
Error: 100: Key not found (/tempkey) [1050]
# 如果 key 的值是 "hello, etcd",就把它替换为 "goodbye, etcd"
➜ ./etcdctl set --swap-with-value "hello, world" /message "goodbye, etcd"
Error: 101: Compare failed ([hello, world != hello, etcd]) [1050]
➜ ./etcdctl set --swap-with-value "hello, etcd" /message "goodbye, etcd"
goodbye, etcd
# 仅当 key 不存在的时候创建
➜ ./etcdctl mk /foo bar
bar
➜ ./etcdctl mk /foo bar
Error: 105: Key already exists (/foo) [1052]
# 自动创建排序的 key
➜ ./etcdctl mk --in-order /queue job1
job1
➜ ./etcdctl mk --in-order /queue job2
job2
➜ ./etcdctl ls --sort /queue
/queue/00000000000000001053
/queue/00000000000000001054
# 更新 key 的值或者 ttl,只有当 key 已经存在的时候才会生效,否则报错
➜ ./etcdctl update /message "I'am changed"
I'am changed
➜ ./etcdctl get /message
I'am changed
➜ ./etcdctl update /notexist "I'am changed"
Error: 100: Key not found (/notexist) [1055]
➜ ./etcdctl update --ttl 3 /message "I'am changed"
I'am changed
➜ ./etcdctl get /message
Error: 100: Key not found (/message) [1057]
# 删除某个 key
➜ ./etcdctl mk /foo bar
bar
➜ ./etcdctl rm /foo
PrevNode.Value: bar
➜ ./etcdctl get /foo
Error: 100: Key not found (/foo) [1062]
# 只有当 key 的值匹配的时候,才进行删除
➜ ./etcdctl mk /foo bar
bar
➜ ./etcdctl rm --with-value wrong /foo
Error: 101: Compare failed ([wrong != bar]) [1063]
➜ ./etcdctl rm --with-value bar /foo
# 创建一个目录
➜ ./etcdctl mkdir /dir
# 删除空目录
➜ ./etcdctl mkdir /dir/subdir/
➜ ./etcdctl rmdir /dir/subdir/
# 删除非空目录
➜ ./etcdctl rmdir /dir
Error: 108: Directory not empty (/dir) [1071]
➜ ./etcdctl rm --recursive /dir
# 列出目录的内容
➜ ./etcdctl ls /
/queue
/anotherdir
/message
# 递归列出目录的内容
➜ ./etcdctl ls --recursive /
/anotherdir
/message
/queue
/queue/00000000000000001053
/queue/00000000000000001054
# 监听某个 key,当 key 改变的时候会打印出变化
➜ ./etcdctl watch /message
changed
# 监听某个目录,当目录中任何 node 改变的时候,都会打印出来
➜ ./etcdctl watch --recursive /
[set] /message
changed
# 一直监听,除非 `CTL + C` 导致退出监听
➜ ./etcdctl watch --forever /message
new value
chaned again
Wola
# 监听目录,并在发生变化的时候执行一个命令
➜ ./etcdctl exec-watch --recursive / -- sh -c "echo change detected."
change detected.
change detected.
相比于 zookeeper,etcd 使用起来要简单很多。不过要实现真正的服务发现功能,etcd 还需要和其他工具(比如 registrator、confd 等)一起使用来实现服务的自动注册和更新。
目前 etcd 还没有图形化的工具。
ref: https://www.cnblogs.com/xiaomili/p/10514079.html
一、yarn的简介:
Yarn是facebook发布的一款取代npm的包管理工具。
二、yarn的特点:
速度超快。
Yarn 缓存了每个下载过的包,所以再次使用时无需重复下载。 同时利用并行下载以最大化资源利用率,因此安装速度更快。
超级安全。
在执行代码之前,Yarn 会通过算法校验每个安装包的完整性。
超级可靠。
使用详细、简洁的锁文件格式和明确的安装算法,Yarn 能够保证在不同系统上无差异的工作。
三、yarn的安装:
下载node.js,使用npm安装
npm install -g yarn
查看版本:
yarn --version
安装node.js,下载yarn的安装程序:
提供一个.msi文件,在运行时将引导您在Windows上安装Yarn
Yarn 淘宝源安装,分别复制粘贴以下代码行到黑窗口运行即可
yarn config set registry https://registry.npm.taobao.org -g
yarn config set sass_binary_site http://cdn.npm.taobao.org/dist/node-sass -g
四、yarn的常用命令:
复制代码
安装yarn
npm install -g yarn
安装成功后,查看版本号:
yarn --version
创建文件夹 yarn
md yarn
进入yarn文件夹
cd yarn
初始化项目
yarn init // 同npm init,执行输入信息后,会生成package.json文件
yarn的配置项:
yarn config list // 显示所有配置项
yarn config get
yarn config delete
yarn config set
安装包:
yarn install //安装package.json里所有包,并将包及它的所有依赖项保存进yarn.lock
yarn install --flat //安装一个包的单一版本
yarn install --force //强制重新下载所有包
yarn install --production //只安装dependencies里的包
yarn install --no-lockfile //不读取或生成yarn.lock
yarn install --pure-lockfile //不生成yarn.lock
添加包(会更新package.json和yarn.lock):
yarn add [package] // 在当前的项目中添加一个依赖包,会自动更新到package.json和yarn.lock文件中
yarn add [package]@[version] // 安装指定版本,这里指的是主要版本,如果需要精确到小版本,使用-E参数
yarn add [package]@[tag] // 安装某个tag(比如beta,next或者latest)
//不指定依赖类型默认安装到dependencies里,你也可以指定依赖类型:
yarn add --dev/-D // 加到 devDependencies
yarn add --peer/-P // 加到 peerDependencies
yarn add --optional/-O // 加到 optionalDependencies
//默认安装包的主要版本里的最新版本,下面两个命令可以指定版本:
yarn add --exact/-E // 安装包的精确版本。例如yarn add foo@1.2.3会接受1.9.1版,但是yarn add foo@1.2.3 --exact只会接受1.2.3版
yarn add --tilde/-T // 安装包的次要版本里的最新版。例如yarn add foo@1.2.3 --tilde会接受1.2.9,但不接受1.3.0
发布包
yarn publish
移除一个包
yarn remove
更新一个依赖
yarn upgrade 用于更新包到基于规范范围的最新版本
运行脚本
yarn run 用来执行在 package.json 中 scripts 属性下定义的脚本
显示某个包的信息
yarn info
缓存
yarn cache
yarn cache list # 列出已缓存的每个包
yarn cache dir # 返回 全局缓存位置
yarn cache clean # 清除缓存
复制代码
五、npm 与 yarn命令比较:
比如说你的项目模块依赖是图中描述的,@1.2.1代表这个模块的版本。在你安装A的时候需要安装依赖C和D,很多依赖不会指定版本号,默认会安装最新的版本,这样就会出现问题:比如今天安装模块的时候C和D是某一个版本,而当以后C、D更新的时候,再次安装模块就会安装C和D的最新版本,如果新的版本无法兼容你的项目,你的程序可能就会出BUG,甚至无法运行。这就是npm的弊端,而yarn为了解决这个问题推出了yarn.lock的机制,这是作者项目中的yarn.lock文件。
大家会看到,这个文件已经把依赖模块的版本号全部锁定,当你执行yarn install的时候,yarn会读取这个文件获得依赖的版本号,然后依照这个版本号去安装对应的依赖模块,这样依赖就会被锁定,以后再也不用担心版本号的问题了。其他人或者其他环境下使用的时候,把这个yarn.lock拷贝到相应的环境项目下再安装即可。
注意:这个文件不要手动修改它,当你使用一些操作如yarn add时,yarn会自动更新yarn.lock。
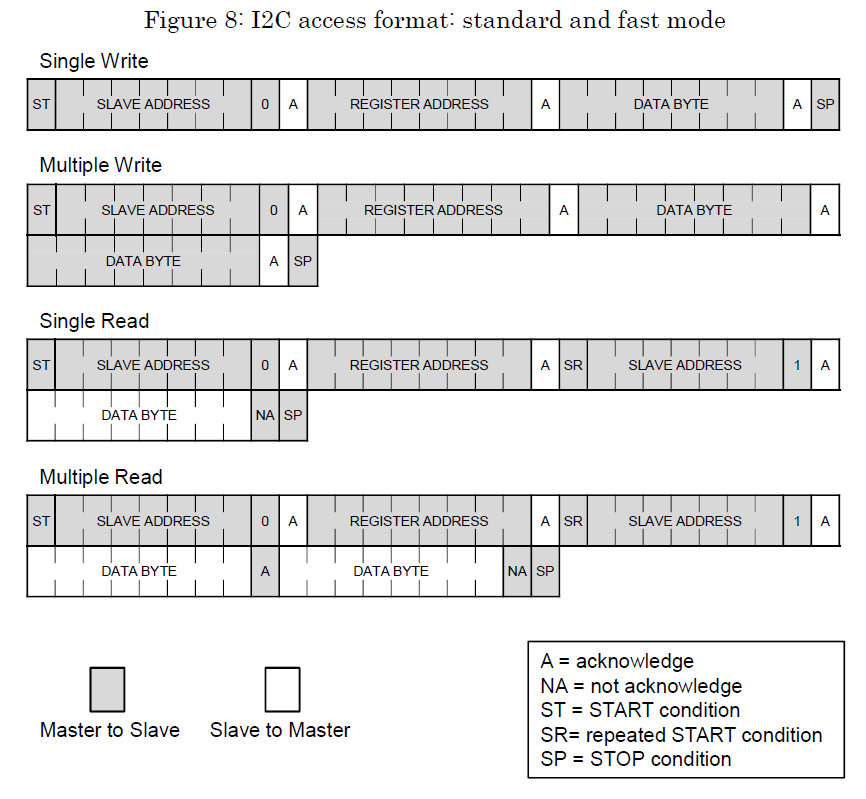
以下是来源于一款iic产品,但其iic标准格式代表了大部分的iic产品数据格式。
所以如果你拿到一款iic产品,但是没有现成的驱动,想自己写驱动,就可以参考这个格式来实现,或者验证已有实现。
主要关注:address,启停标识,读写时序的对齐:
eg:
docker container update --restart=always 容器名字
注意,重启docker很重要,否则修改完的配置文件,重启容器后会被还原
在docker中启用systemd时,过程中出现:
Failed to get D-Bus connection: Operation not permitted
systemd维护系统服务程序,它需要特权去会访问Linux内核。而容器并不是一个完整的操作系统,只有一个文件系统,而且默认启动只是普通用户这样的权限访问Linux内核,也就是没有特权,所以自然就用不了!
添加授权:
docker run -d -name centos7 --privileged=true centos:7 /usr/sbin/init
增加授权会提高风险,需要仔细评估具体的运行脚本和命令,避免对宿主造成安全风险
letsencrypt 过程中出现:
Challenge failed for domain xxx 的错误
经过搜索和分析,发现是:
验证证书的过程是走http的80端口,而我因为不用80,所以没有开放80导致。
根据Walsh所说,容器中没有systemd最大的问题是它“退回到了使用初始化脚本之前。”每个镜像作者都在容器内创建自己的疯狂的启动脚本,而不是使用软件包作者精心制作的启动脚本。他演示了在具有systemd的容器内,服务初始化是何尝的简单,创建一个运行Apache httpd服务器的容器,其Dockerfile只有三行:
FROM fedora
RUN yum -y install httpd; yum clean all; systemctl enable httpd;
CMD [ "/sbin/init" ]
参考:
1. https://lwn.net/Articles/676831/ http://dockone.io/article/1093 (翻译)
因为想要做多个域名cname到同一页面,所以不能用https,只能用http,但是发现在chrome和火狐中怎么也不成功,只有ie可以。反复验证和排查网站设置都无果,同样chrome访问别的http域名也是可以的,并不是所有的都不行,但是我的就是不行。后面通过搜索大概发现了问题的线索:https://stackoverflow.com/questions/50258202/how-does-google-force-https-on-their-app-tld
因为我弄的正好是app后缀的域名,所以无论如何尝试,chrome和火狐都会自己跳转到https,而我没有部署证书,导致无法正常显示。
所以这个问题基本是无望了,只能取消多域名cname同一个页面的想法了,为每一个域名实现独立的https页面了。
网上有很多文章,如果你简单照着配置,大概率是不行的,因为每个人的软件和系统环境都有所差异,所以本文不是告诉你一步一步怎么配置,而是把过程中的要点记录下来,便于排查问题。
我们也称为虚拟用户的宿主用户,这里我们一般建议直接使用ftp账户:
ftp:x:104:107:ftp daemon,,,:/srv/ftp:/bin/false
guest_enable=YES
guest_username=ftp
一般我们使用虚拟用户,每个虚拟用户都配置成拥有自己专有的目录和权限。目录配置如下:
user_config_dir=/etc/vsftpd/vusers
user_sub_token=$USER
local_root=/home/virtual/$USER
经过实际验证,主要是配置anon_umask来控制文件权限,通过anon_xxx来配置动作行为。
网上的文章大部分是基于db4工具db_load 下的pam_userdb.so 的pam配置,并没全场景通过,有待后继进一步确认。在实际的验证中,测试实际通过使用的的是pwdfile库:
auth required pam_pwdfile.so pwdfile /etc/vsftpd/vsftpd.passwd
account required pam_permit.so
这个库的对应账号数据不是通过db_load,而是openssl工具:
openssl passwd -1 "$VSFTPD_USER_PASS"
经过配置,如果你发现,所有的账户还是不能达到预期的权限控制和可达性,请结合 anon_umask 来确认用户的chroot 目录及所操作文件的实际权限
需要进行相应的ftp权限配置,或者关闭
### # Config file for vsftpd ### # Daemon options listen=YES listen_ipv6=NO session_support=NO # Log In Options and Access Controls anonymous_enable=YES anon_root=/home/virtual/share ftpd_banner=Wellcom to iTransCloud ftp server! local_enable=YES # pam pam_service_name=vsftpd # Local User Options chmod_enable=YES chroot_local_user=YES secure_chroot_dir=/var/run/vsftpd/empty guest_enable=YES guest_username=ftp local_umask=0022 anon_umask=0222 user_config_dir=/etc/vsftpd/vusers user_sub_token=$USER local_root=/home/virtual/$USER # ascii ascii_upload_enable=YES ascii_download_enable=YES # Directory Options dirlist_enable=YES dirmessage_enable=NO force_dot_files=NO hide_ids=NO ls_recurse_enable=NO use_localtime=YES # File Transfer Options download_enable=YES chown_uploads=NO write_enable=YES # Logging Options dual_log_enable=NO log_ftp_protocol=NO syslog_enable=NO vsftpd_log_file=/var/log/vsftpd/vsftpd.log xferlog_enable=YES xferlog_std_format=NO # Network Options connect_from_port_20=YES listen_port=21 pasv_enable=YES pasv_address=changeme pasv_min_port=changeme pasv_max_port=changeme pasv_promiscuous=NO port_enable=YES # Connection Options tcp_wrappers=YES max_clients=10 max_per_ip=5 max_login_fails=3 # Tweak seccomp_sandbox=NO allow_writeable_chroot=YES
这里给出的是一个读写全权限的配置,其他组合自行修改
anon_mkdir_write_enable=YES
anon_other_write_enable=YES
anon_upload_enable=YES
anon_umask=0022
在支持虚拟用户的支持,是可以实现支持匿名访问的,实现的要点也是,关注配置和被访问文件夹以及被访问文件的权限设置,设置正确,就可以支持了。
同样的测试内容:chabctimes
在centos7下面:
# echo "chabctimes"|base64
Y2hhYmN0aW1lcwo=
在线测试平台 https://tool.oschina.net/encrypt?type=3 测试如下:
Y2hhYmN0aW1lcw==
根据第三方的验证,下面的内容是通过验证可以正常用的,上面的不行。从对比看,下面跟上面的结果比较,末尾倒数第2个字符一个是=一个是o
一阵g搜索,再结合只有尾部一个字符差异,而且所有内容都是倒数第二个差异,所以初步猜测可能是尾部回车换行的差异导致。
经过不同内容的验证,基本确认以上的猜测:在linux环境下echo命令行的模式,比在线的方式多一个尾部的回车换行。
再就回车换行问题进一步进行确认,因为是1个字符也会多回车换行,还不是经典的76字符回车换行问题,所以怀疑是echo的问题,经搜索,确认是echo的问题。
在echo中增加参数-n 去掉结尾回车换行,验证OK:
echo -n "chabctimes"|base64
###下载安装文件
wget http://www.privoxy.org/sf-download-mirror/Sources/3.0.26%20%28stable%29/privoxy-3.0.26-stable-src.tar.gz
tar -zxvf privoxy-3.0.26-stable-src.tar.gz
cd privoxy-3.0.26-stable
privoxy-3.0.26-stable 是目前最新的稳定版,建议在下载前去 Privoxy 官网下载页 检查一下版本。
Privoxy 强烈不建议使用 root 用户运行,所以我们使用 useradd privoxy 新建一个用户.
autoheader && autoconf
./configure
make && make install
```vi /usr/local/etc/privoxy/config```
找到以下两句,确保没有注释掉
listen-address 127.0.0.1:8118 # 8118 是默认端口,不用改,下面会用到
forward-socks5t / 127.0.0.1:0 . # 这里的端口写 shadowsocks 的本地端口(注意最后那个 . 不要漏了)
privoxy --user privoxy /usr/local/etc/privoxy/config
配置 /etc/profile
vi /etc/profile
添加下面两句:
export http_proxy=http://127.0.0.1:8118 #这里的端口和上面 privoxy 中的保持一致
export https_proxy=http://127.0.0.1:8118
运行以下:
source /etc/profile
curl www.google.com
返回一大堆 HTML 则说明 shadowsocks 正常工作了。
download yum repo on Fedora Copr and put it inside /etc/yum.repos.d/. The release Epel is for RHEL and its derivatives.
Then, install shadowsocks-libev via dnf:
su -c 'dnf update'
su -c 'dnf install shadowsocks-libev'
shadowsocks-libev 默认读取位于 /etc/shadowsocks-libev/config.json 的配置文件,我们可以根据需要参考以下配置文件进行修改:
{
"server": "example.zzz.buzz",
"server_port": 10443,
"local_port": 1080,
"password": "zzz.buzz",
"method": "aes-256-cfb",
"mode": "tcp_and_udp",
"timeout": 600
}
"server": 必填,填入要连接的 shadowsocks 服务器域名或 IP。
"server_port": 必填,填入服务器上 shadowsocks 所监听的端口。
"local_port": 必填,填入本地 shadowsocks 客户端 SOCKS5 代理要监听的端口。
"password": 必填,密码,需与 shadowsocks 服务器端配置一致。
"method": 必填,加密方法,需与 shadowsocks 服务器端配置一致。
"mode": 选填,默认 "tcp_only"。
shadowsocks 所要监听的协议,可填 "tcp_only", "udp_only" 和 "tcp_and_udp"。
填入 "tcp_and_udp" 相当于命令行上提供 -u 参数;填入 "udp_only" 相当于命令行上提供 -U 参数。
"timeout": 选填,不活动连接的保持时间。
默认 60 秒,设置较长时间有助于保持 HTTP 长连接等。设置时间过长则会导致不必要地占用过多 shadowsocks 服务器资源。
对于配置客户端,完成以上几项配置就足够了。
如果想要变更默认的配置文件,或者提供其他命令行参数,我们可以修改 /etc/sysconfig/shadowsocks-libev:
# Configuration file
CONFFILE="/etc/shadowsocks-libev/config.json"
# Extra command line arguments
DAEMON_ARGS="-u"
其中 CONFFILE 指定了 shadowsocks-libev 所读取的配置文件;DAEMON_ARGS 则指定了额外的命令行参数,此处的 "-u" 表示启用 UDP 协议。
需要注意的是,命令行参数 DAEMON_ARGS 比配置文件 CONFFILE 中指定的选项优先级要更高一些。
systemctl enable --now shadowsocks-libev-local
因为更新本身就是对本地文件的更新覆盖,而wordpress的更新程序无法完成本地文件更新所以就会出现ftp的方式提示,所以就是文件的更新权限问题。
因为是wordpress的php部分的逻辑负责更新,所以就是查看这部分php的运行用户权限。如果我们的php是运行在fpm模式,这个我们可以用:
ps aux |grep php-fpm
这条指令来查看,输出第一列就是当前归属的用户组信息。然后我们对当前的wordpress根目录或者主题插件的目录进行用户权限修改:
chown -R xxx:xxx /DDD
xxx为用户和组,DDD为需要更新权限的目录,-R表示递归所有子目录。
mysql的默认错误日志为:hostname.err
完整路径:/usr/local/mysql/var/xxxxxx.err
如果我们要重新设置日志的路径,在[mysqld] 中輸入
#log
log-error=/usr/local/mysql/log/error.log
log=/usr/local/mysql/log/mysql.log
long_query_time=2
log-slow-queries= /usr/local/mysql/log/slowquery.log
需要注意的是这里文件和路径需要mysql用户可访问,所以需要通过chown将log设置为mysql用户:
chown -R mysql:mysql log
第一次看到-qq参数,觉得比较新奇,特意确认了下:
Quiet. Produces output suitable for logging, omitting progress indicators. More q's will produce more quiet up to a maximum of two. You can also use -q=# to set the quiet level, overriding the configuration file. Note that quiet level 2 implies -y, you should never use -qq without a no-action modifier such as -d, --print-uris or -s as APT may decided to do something you did not expect.
所以按照说明,-qq一般是搭配y选项的。
这个参数经常在docker的静默安装指令中使用。
版本:nRF5_SDK_15.3.0_59ac345
#define SD_FLASH_SIZE 0x26000
app:
0x26000-0x77000
bootloader
0x77000-0x7e000
MBR params
0x7e000-7f000
bootloader setting:
7f000-80000
ref:
https://infocenter.nordicsemi.com/topic/com.nordic.infocenter.sr3nrf52.firmware/memory_configuration.html